Search the Community
Showing results for tags 'guide'.
-
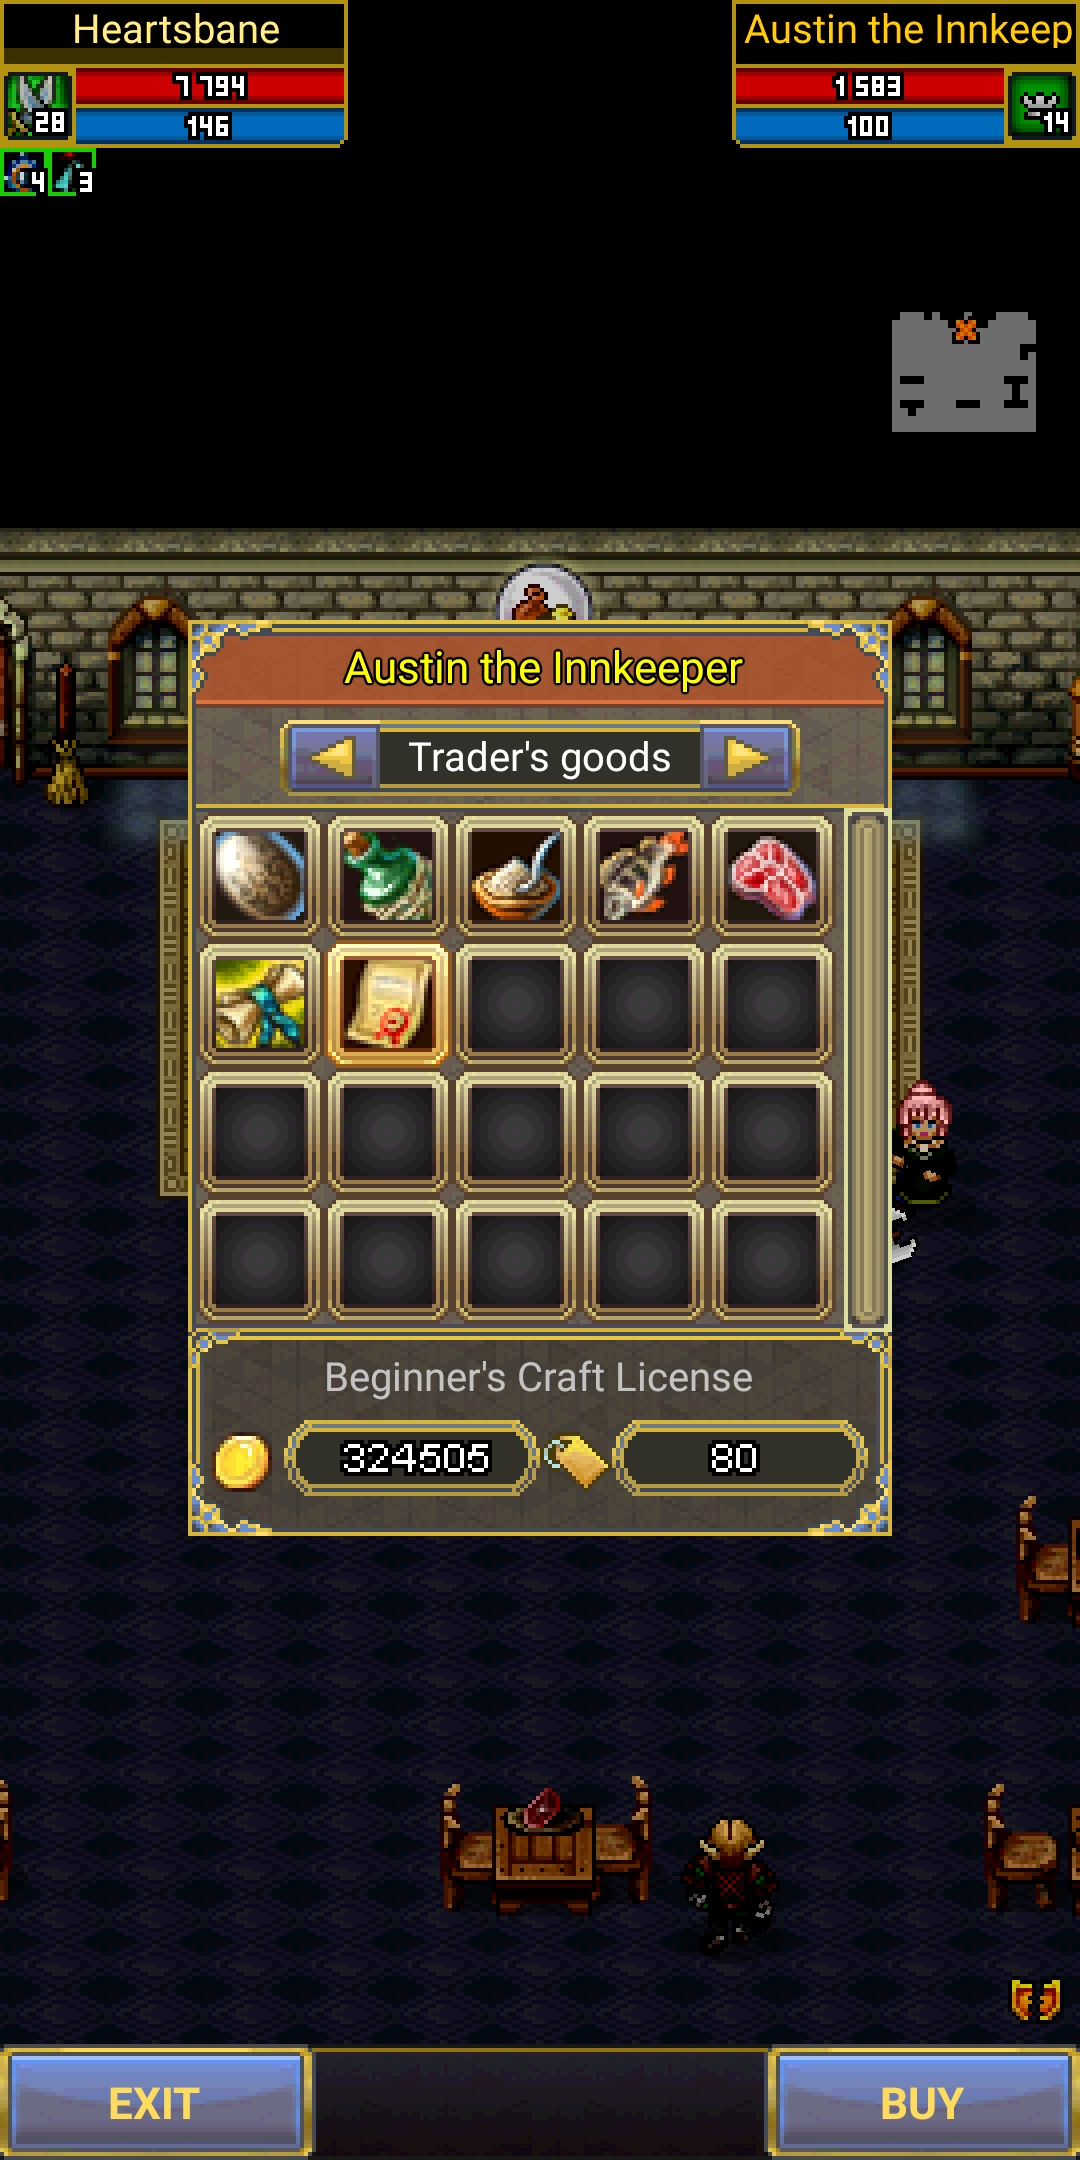
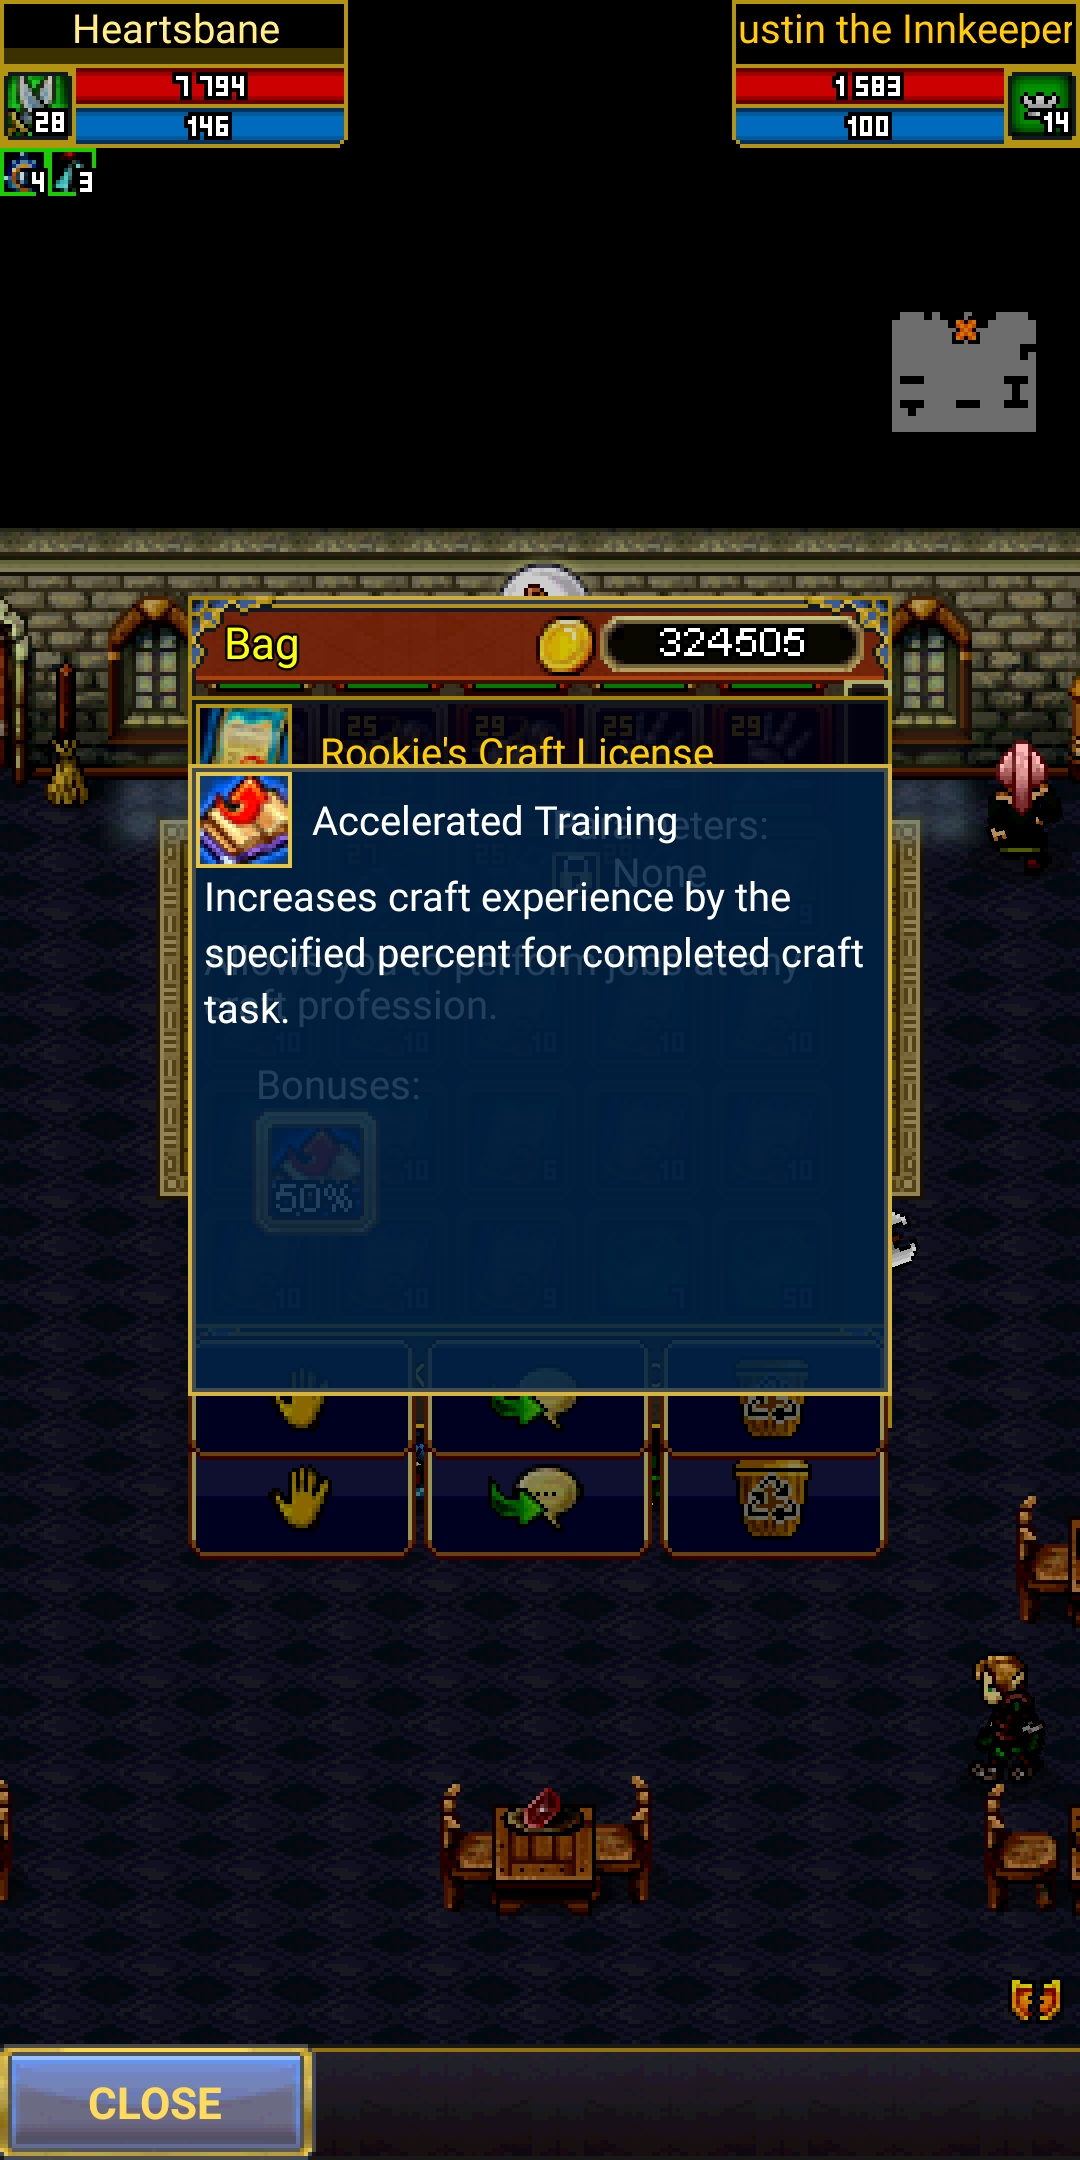
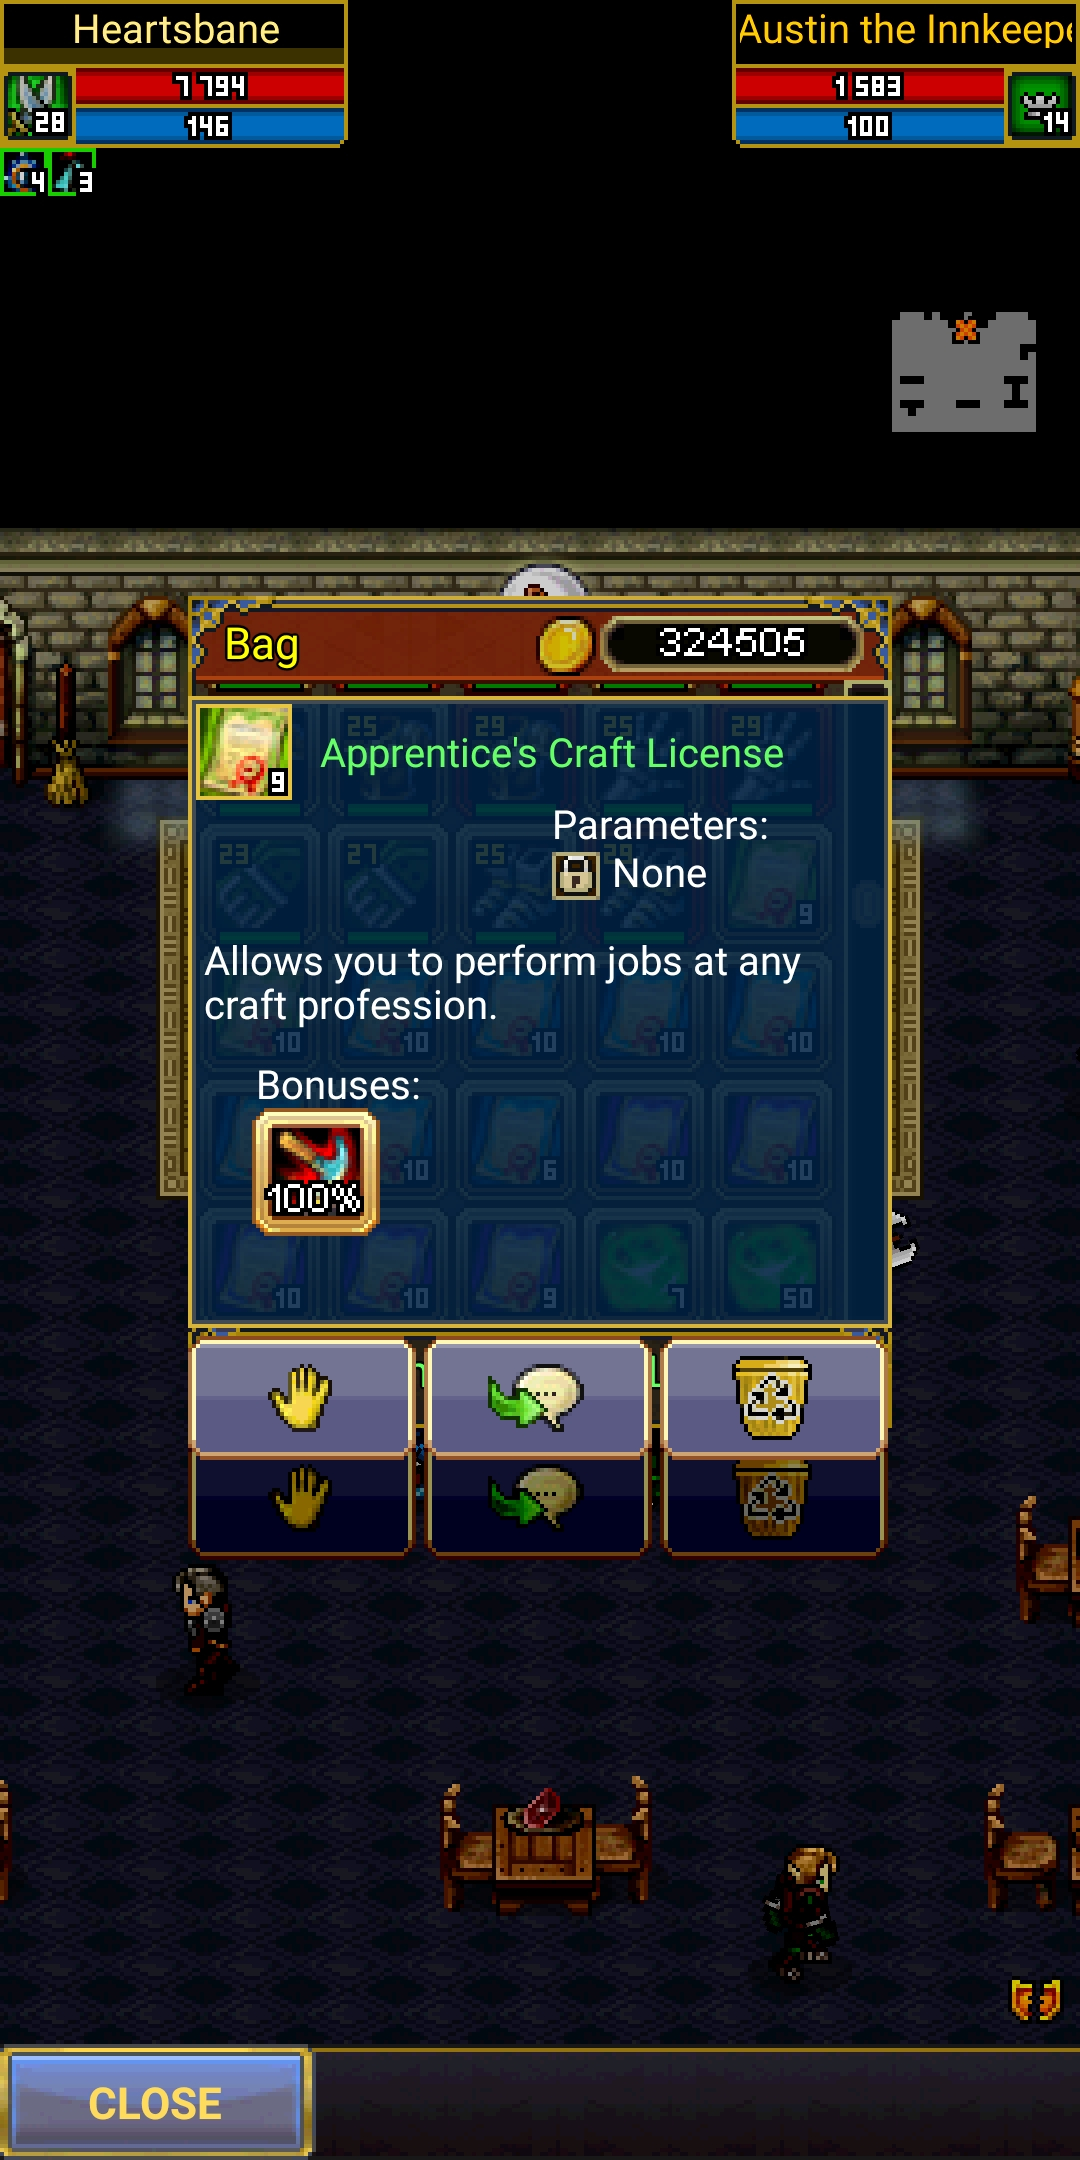
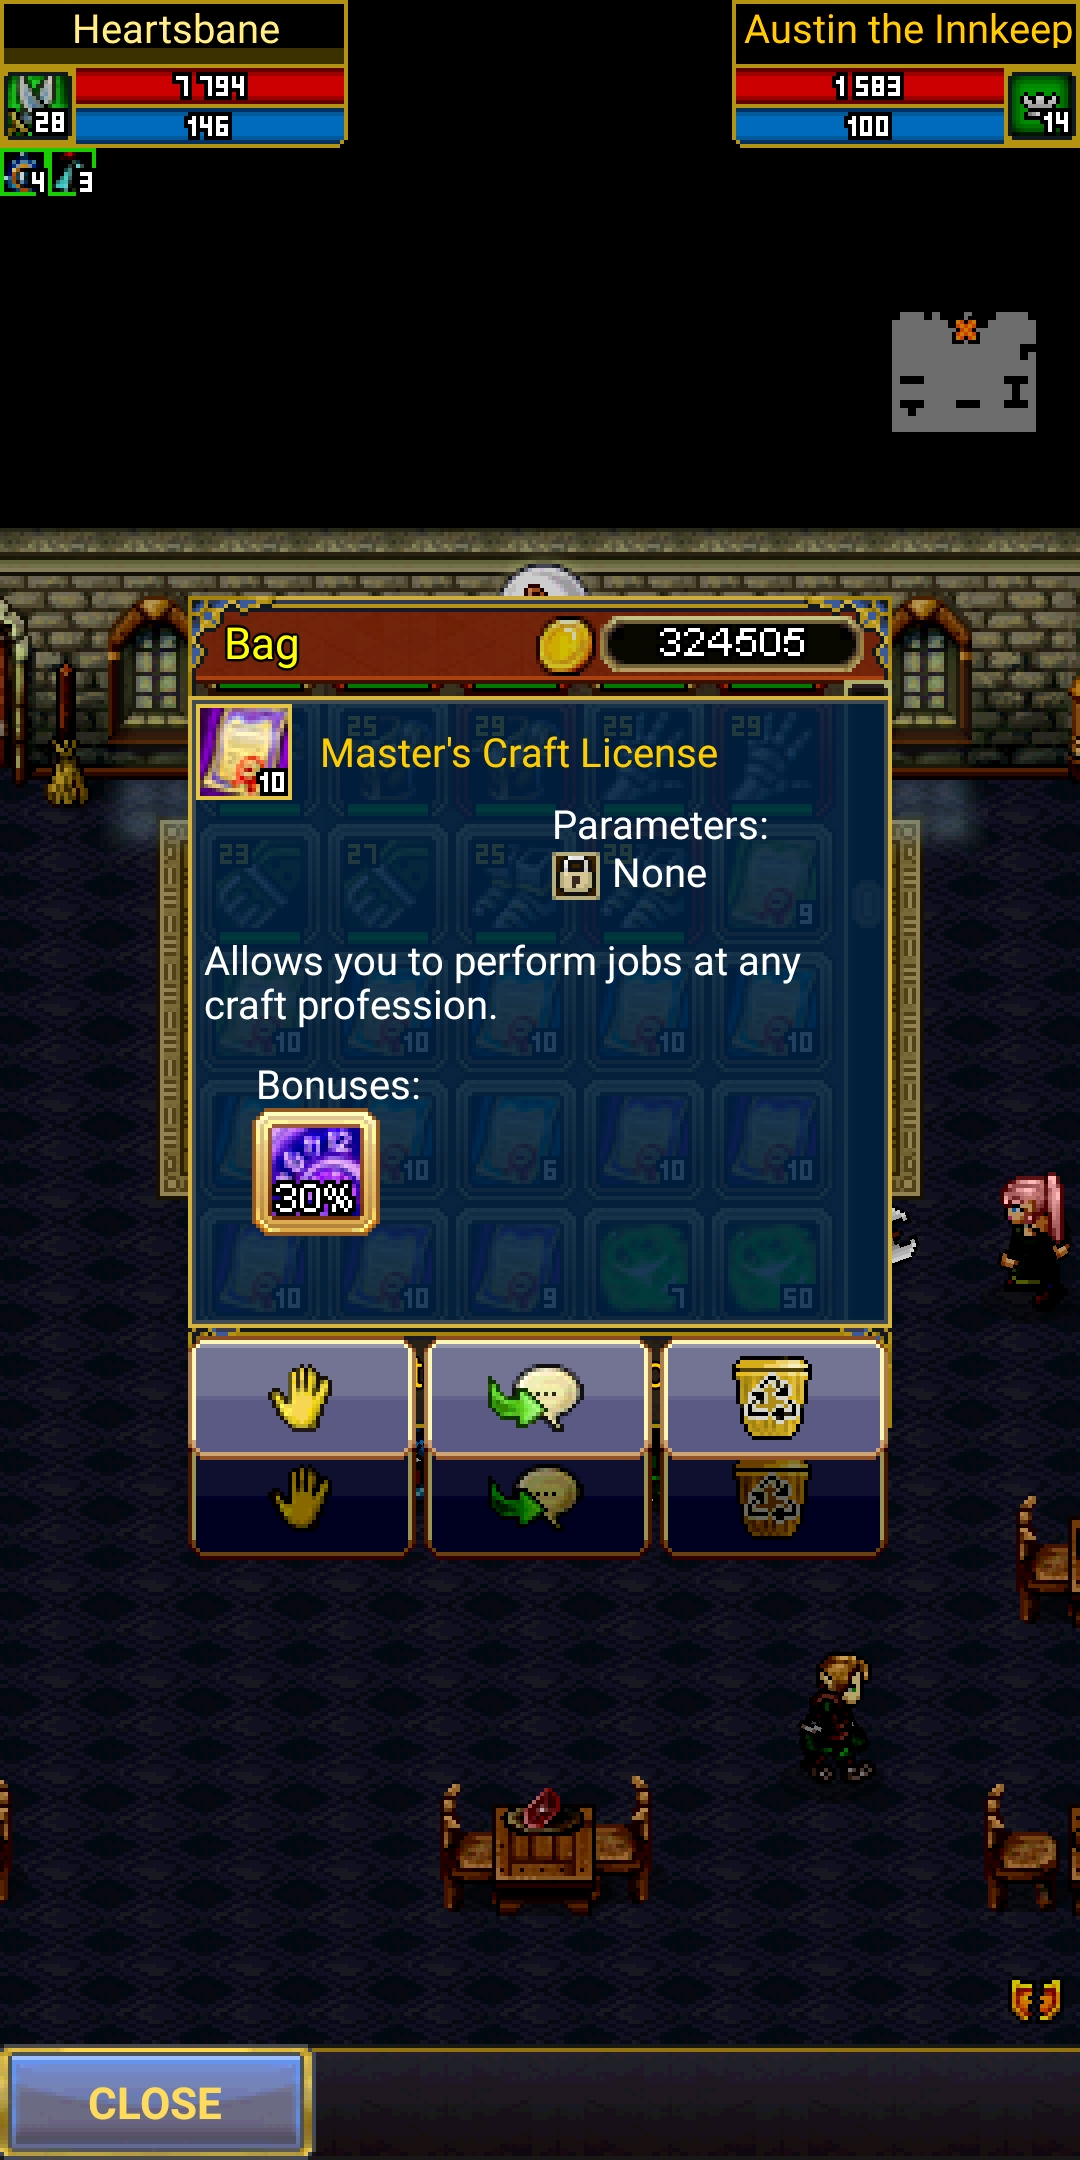
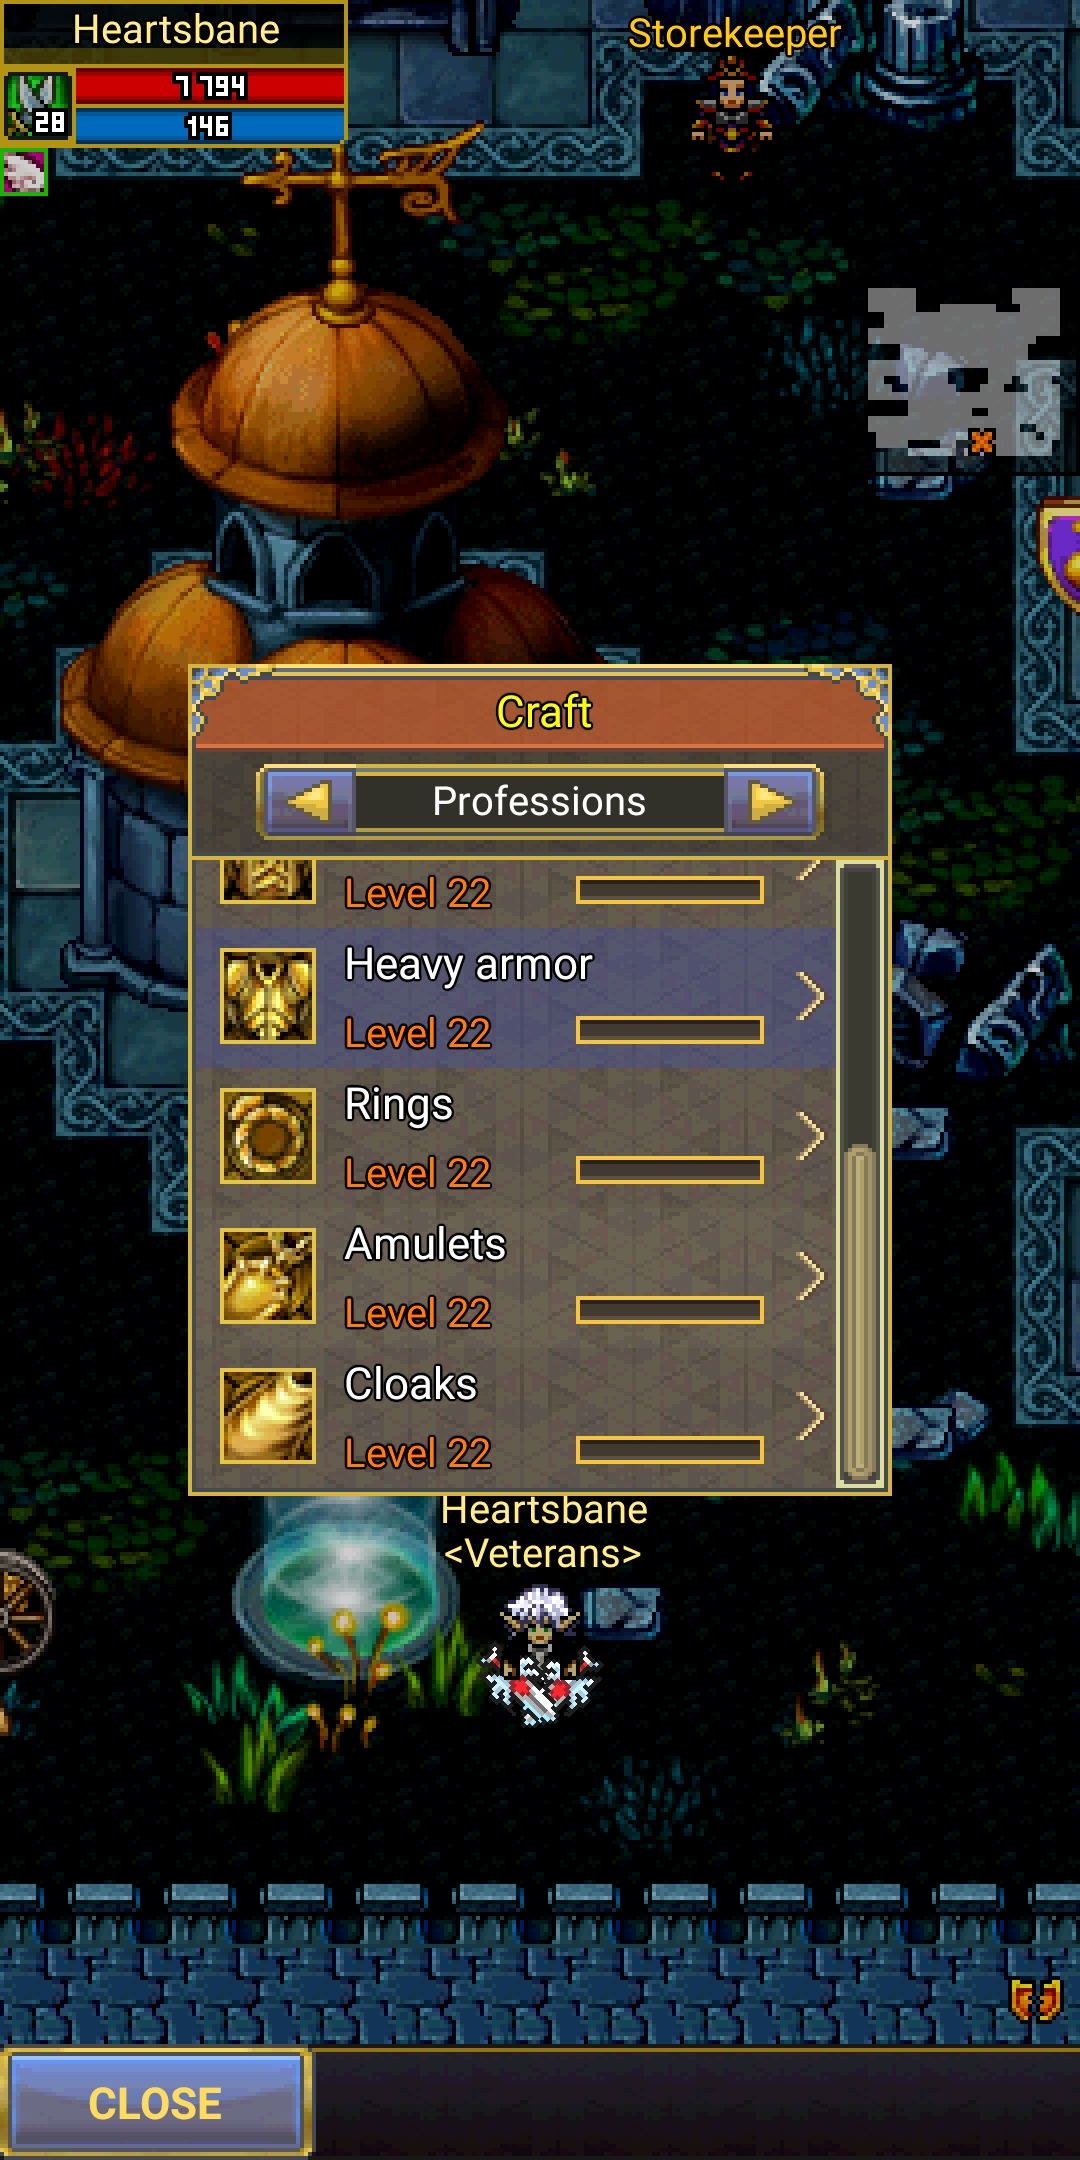
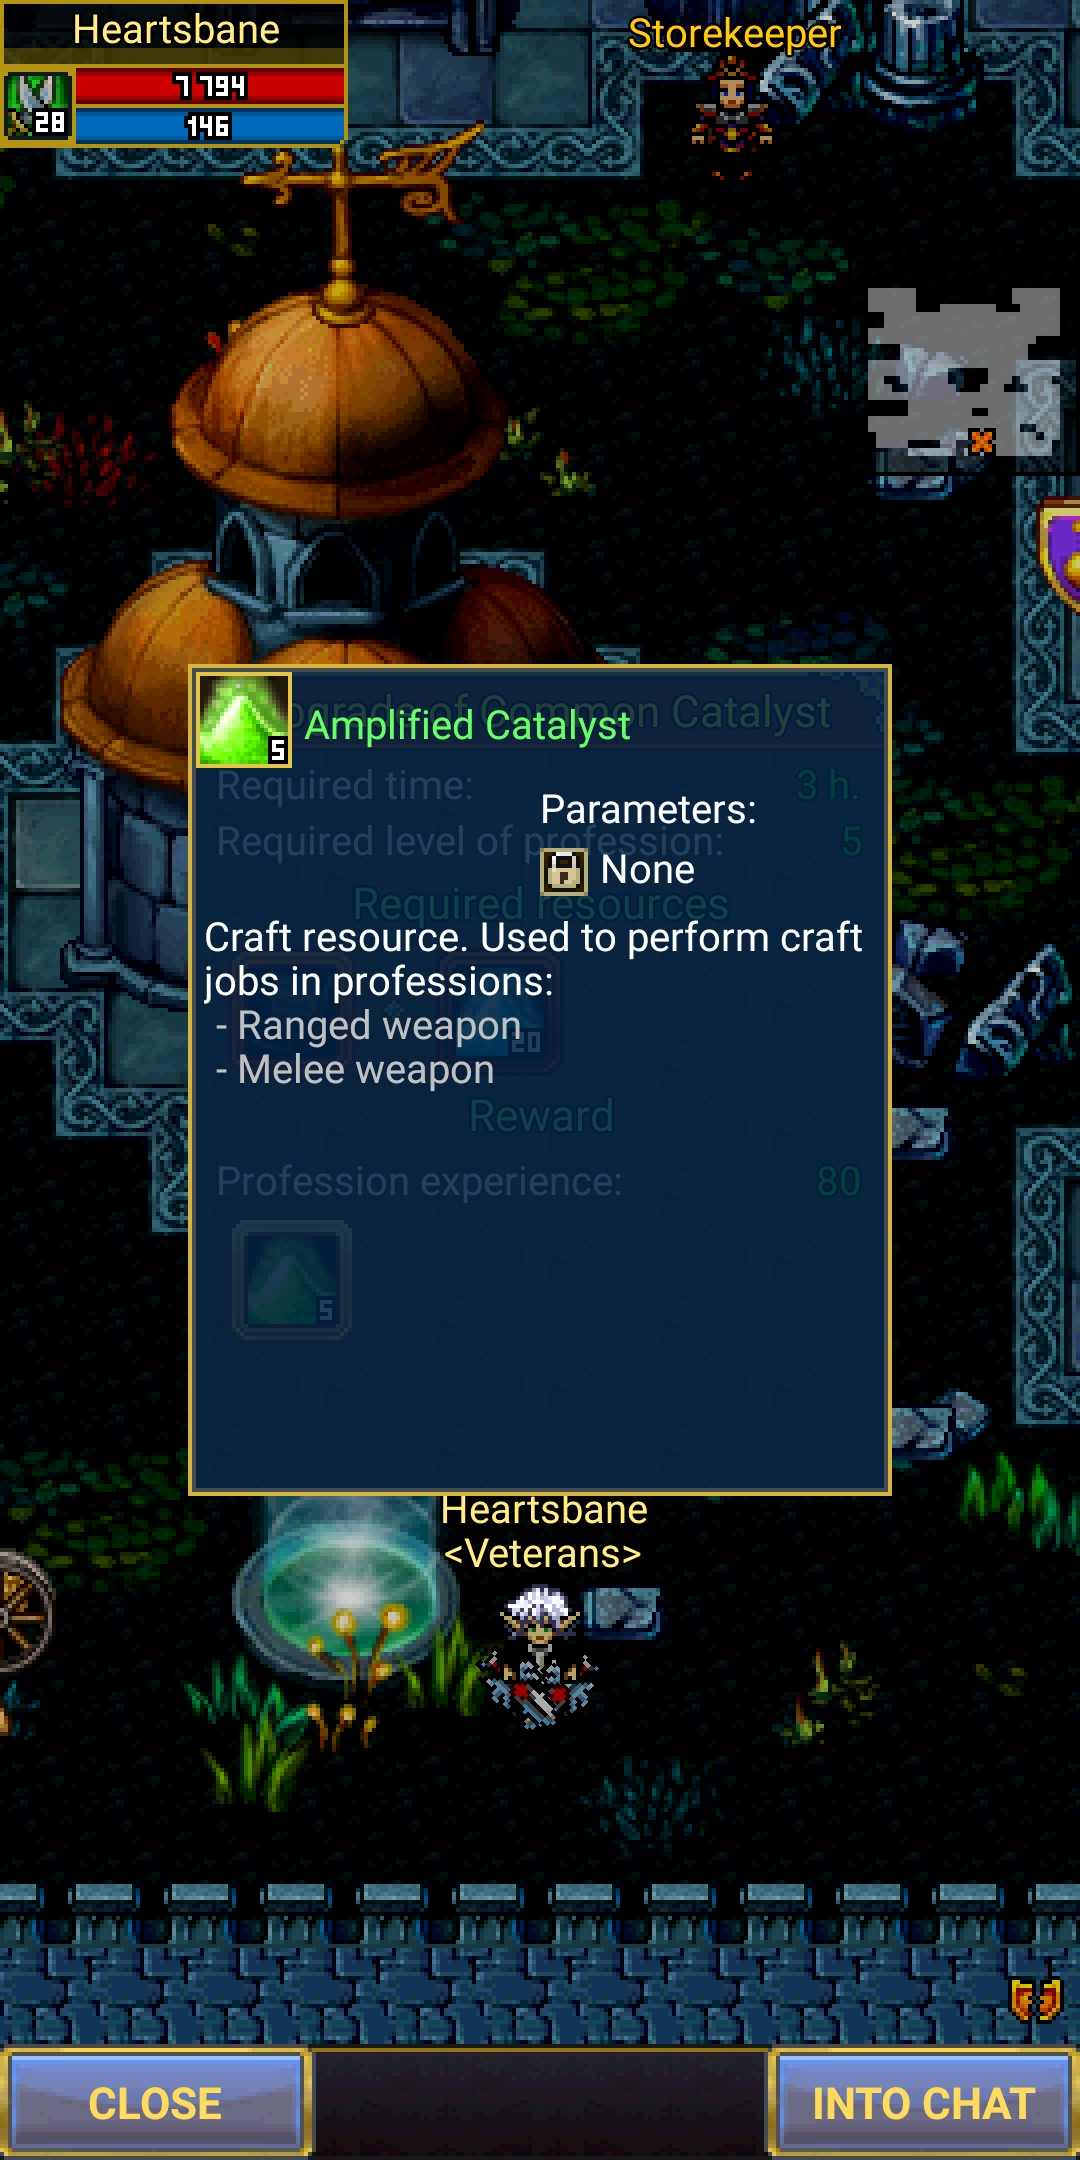
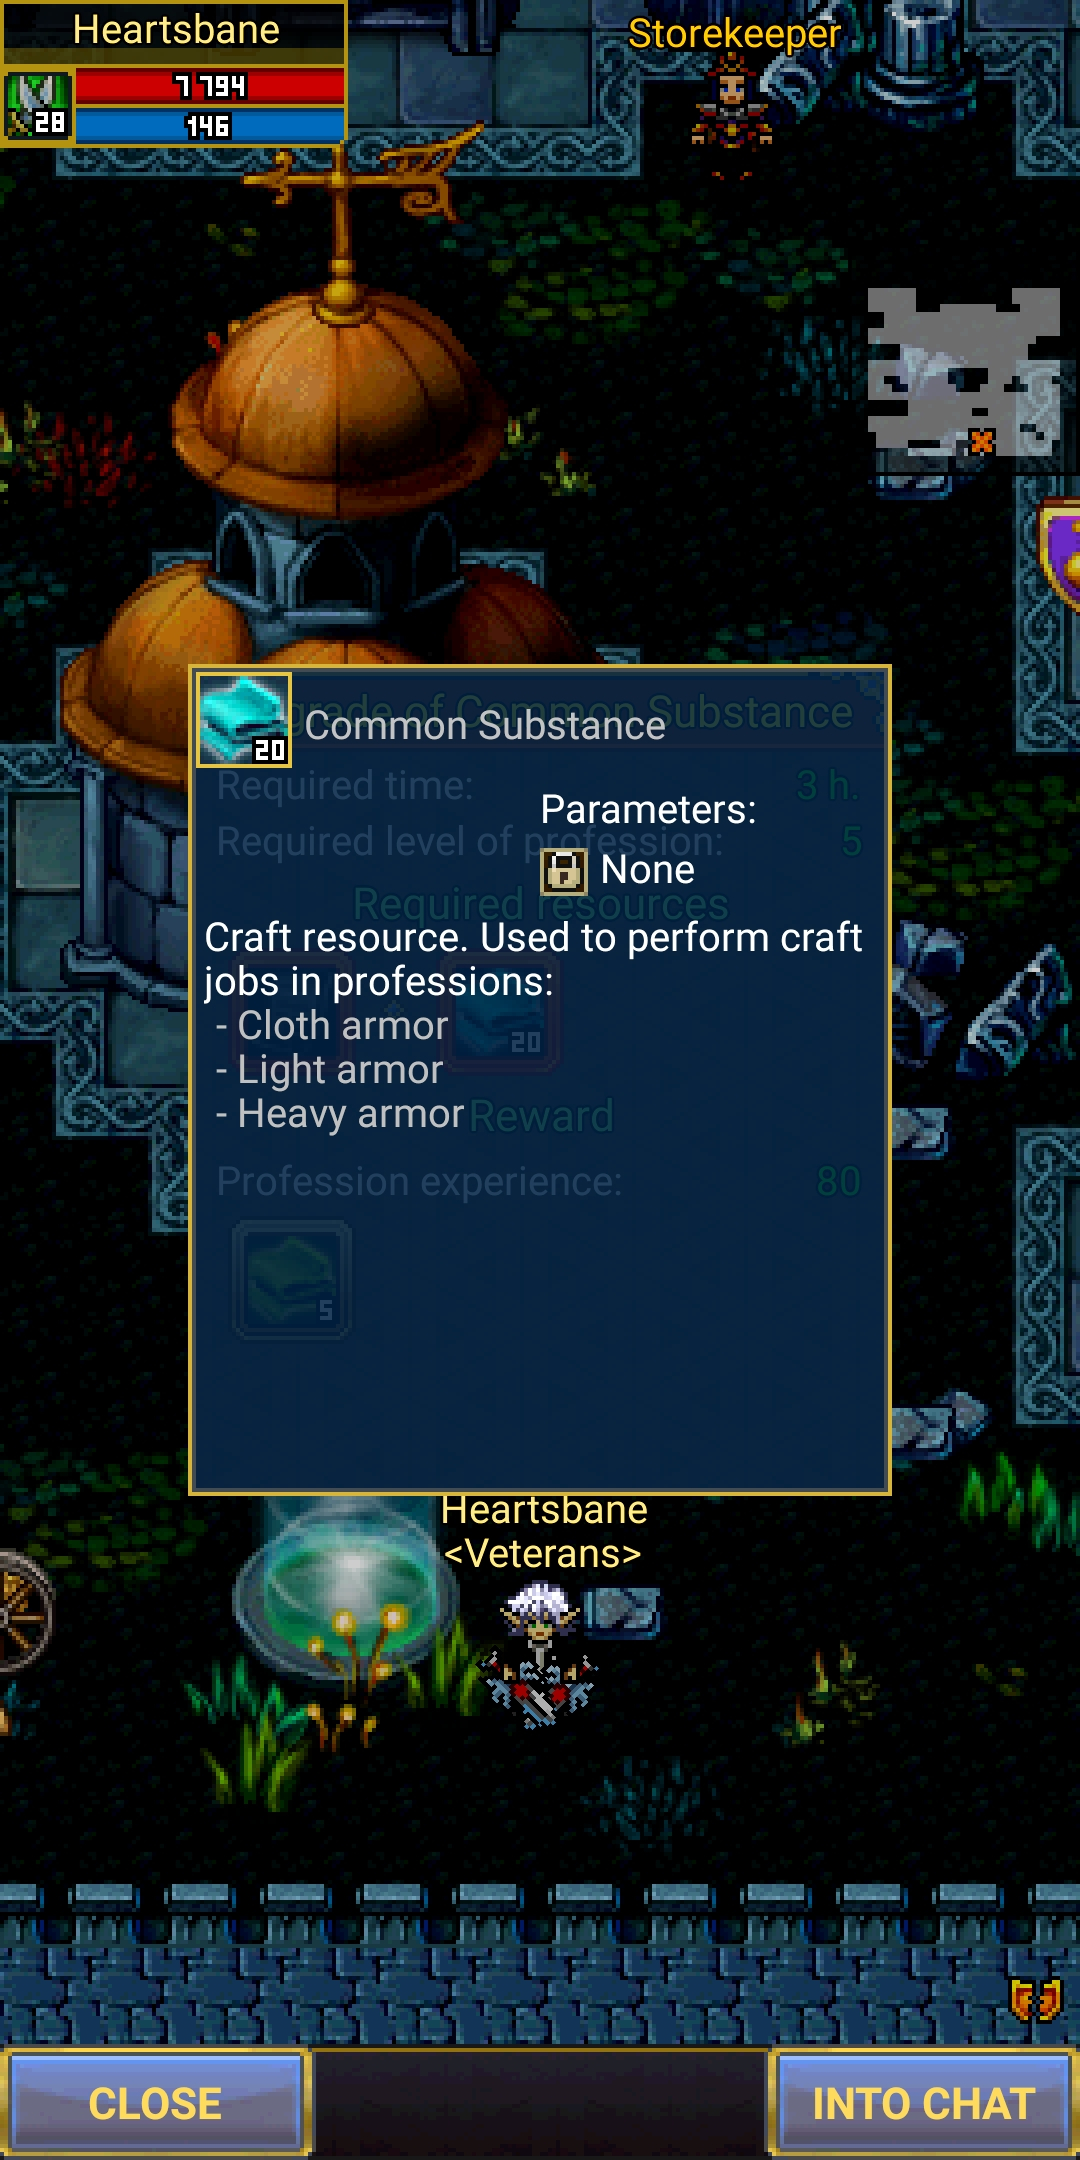
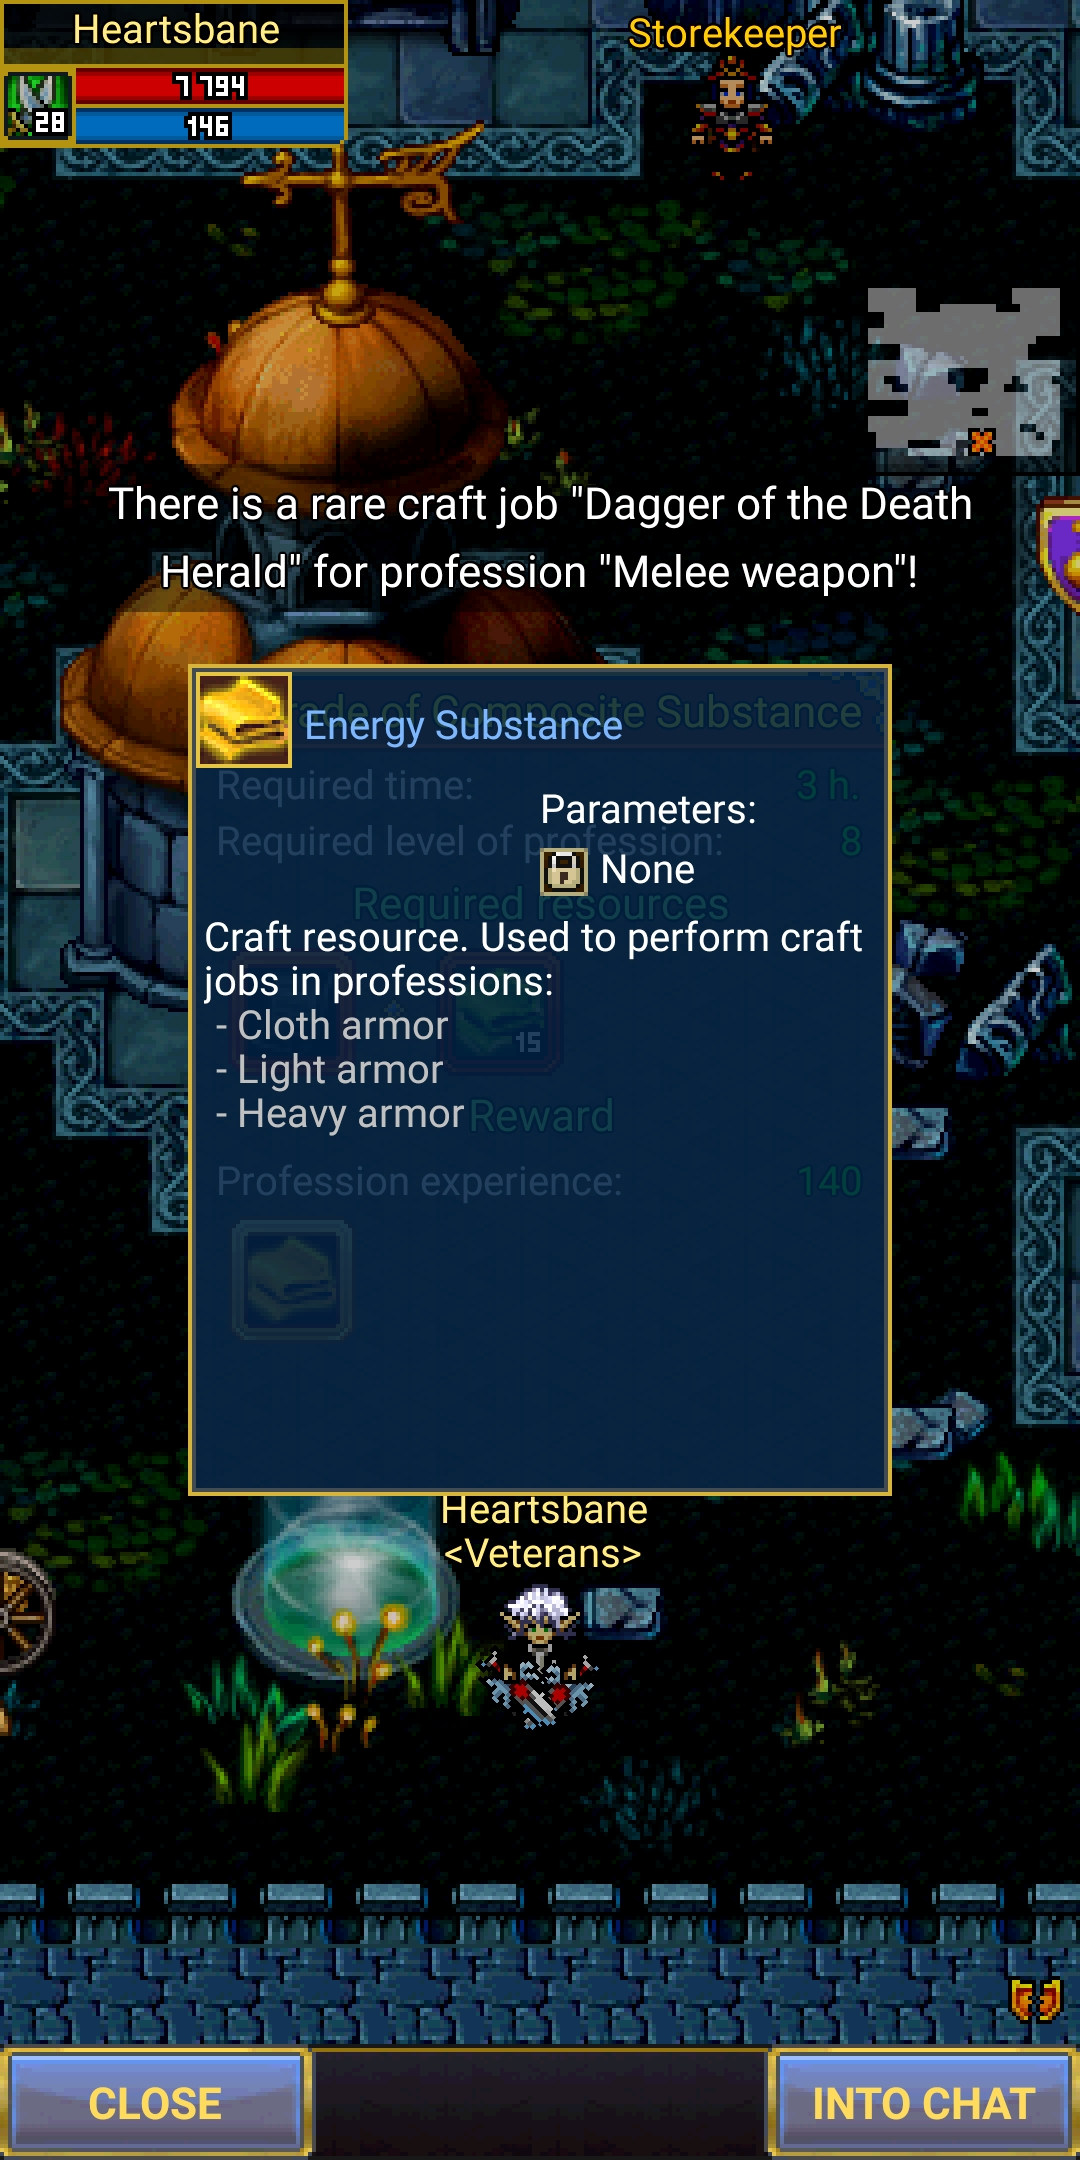
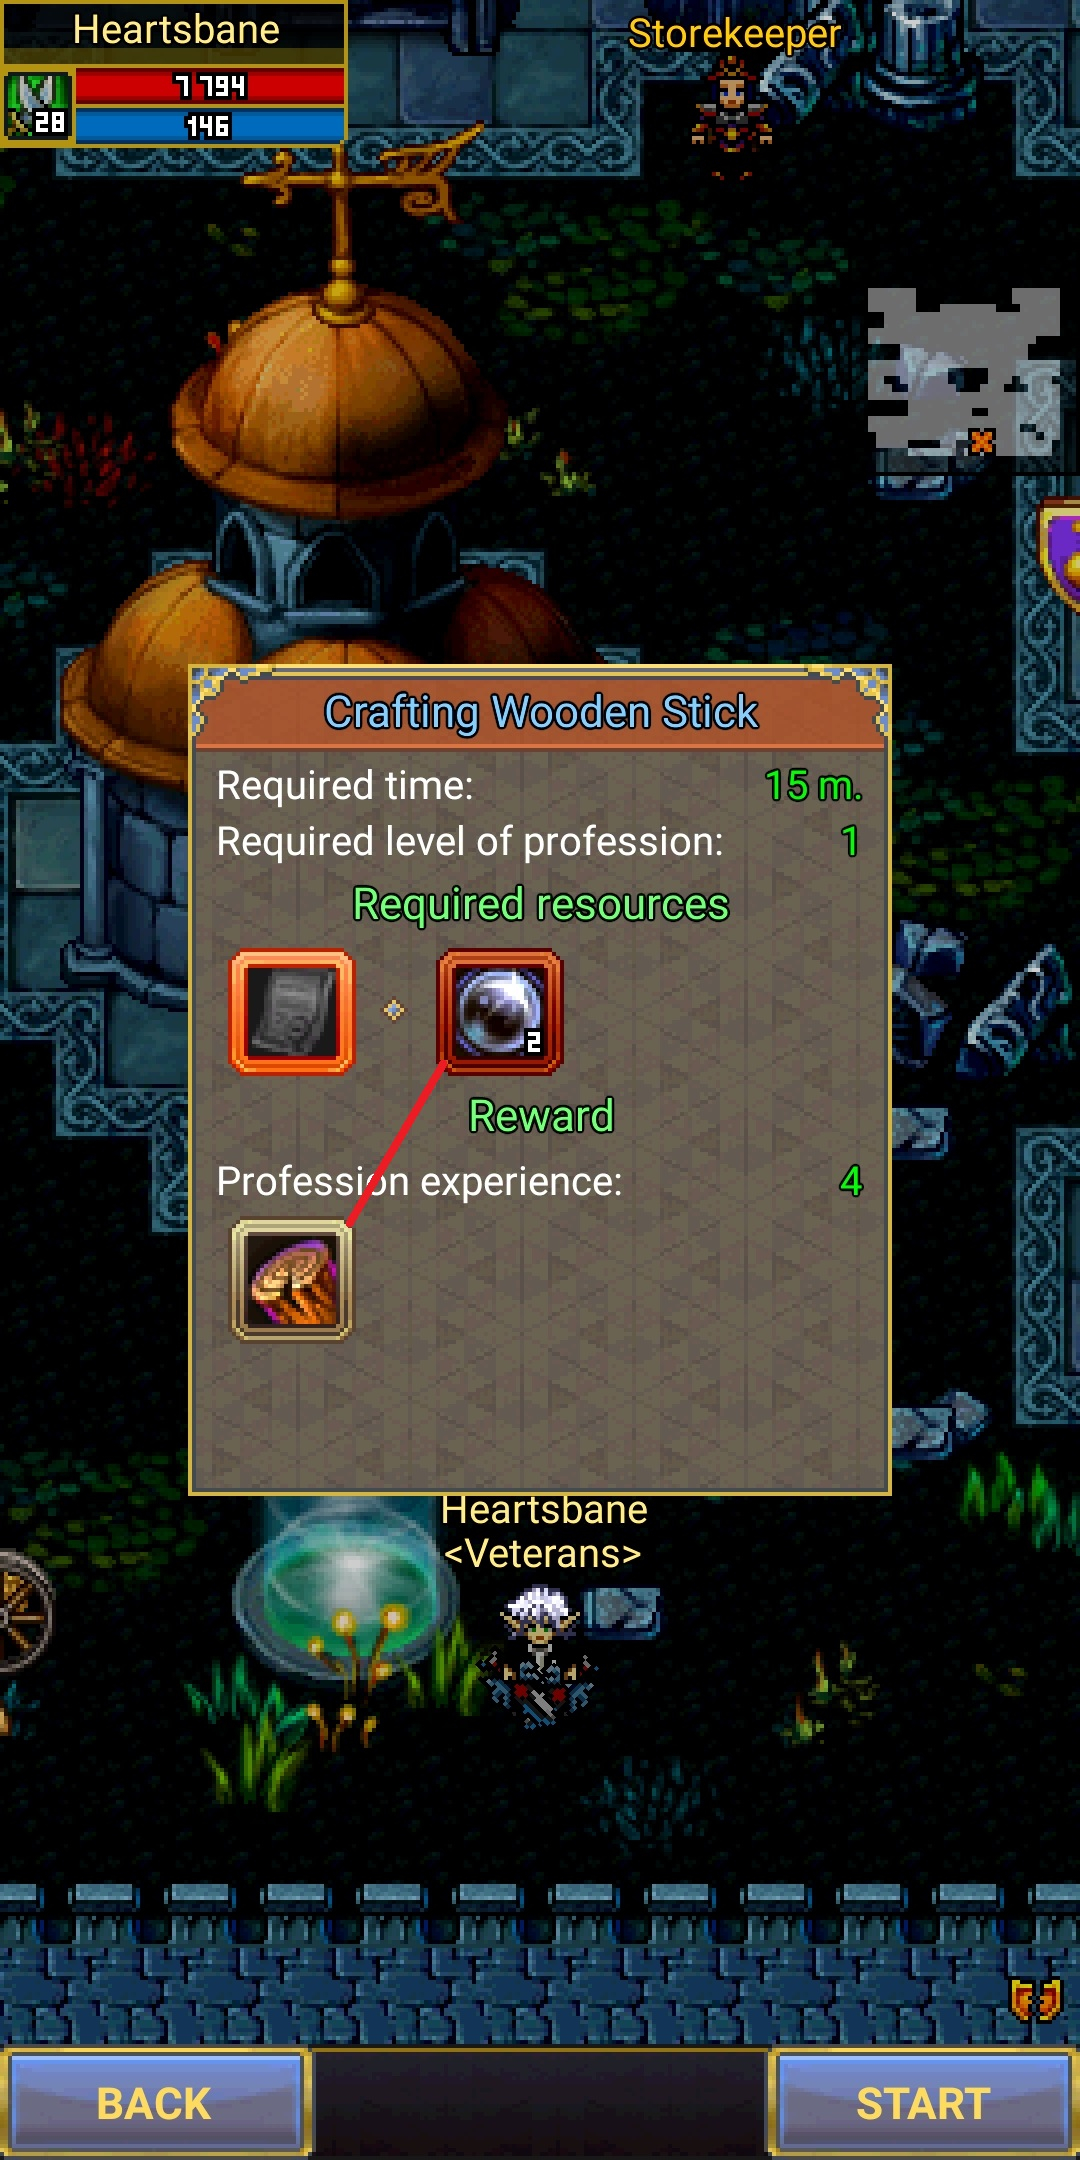
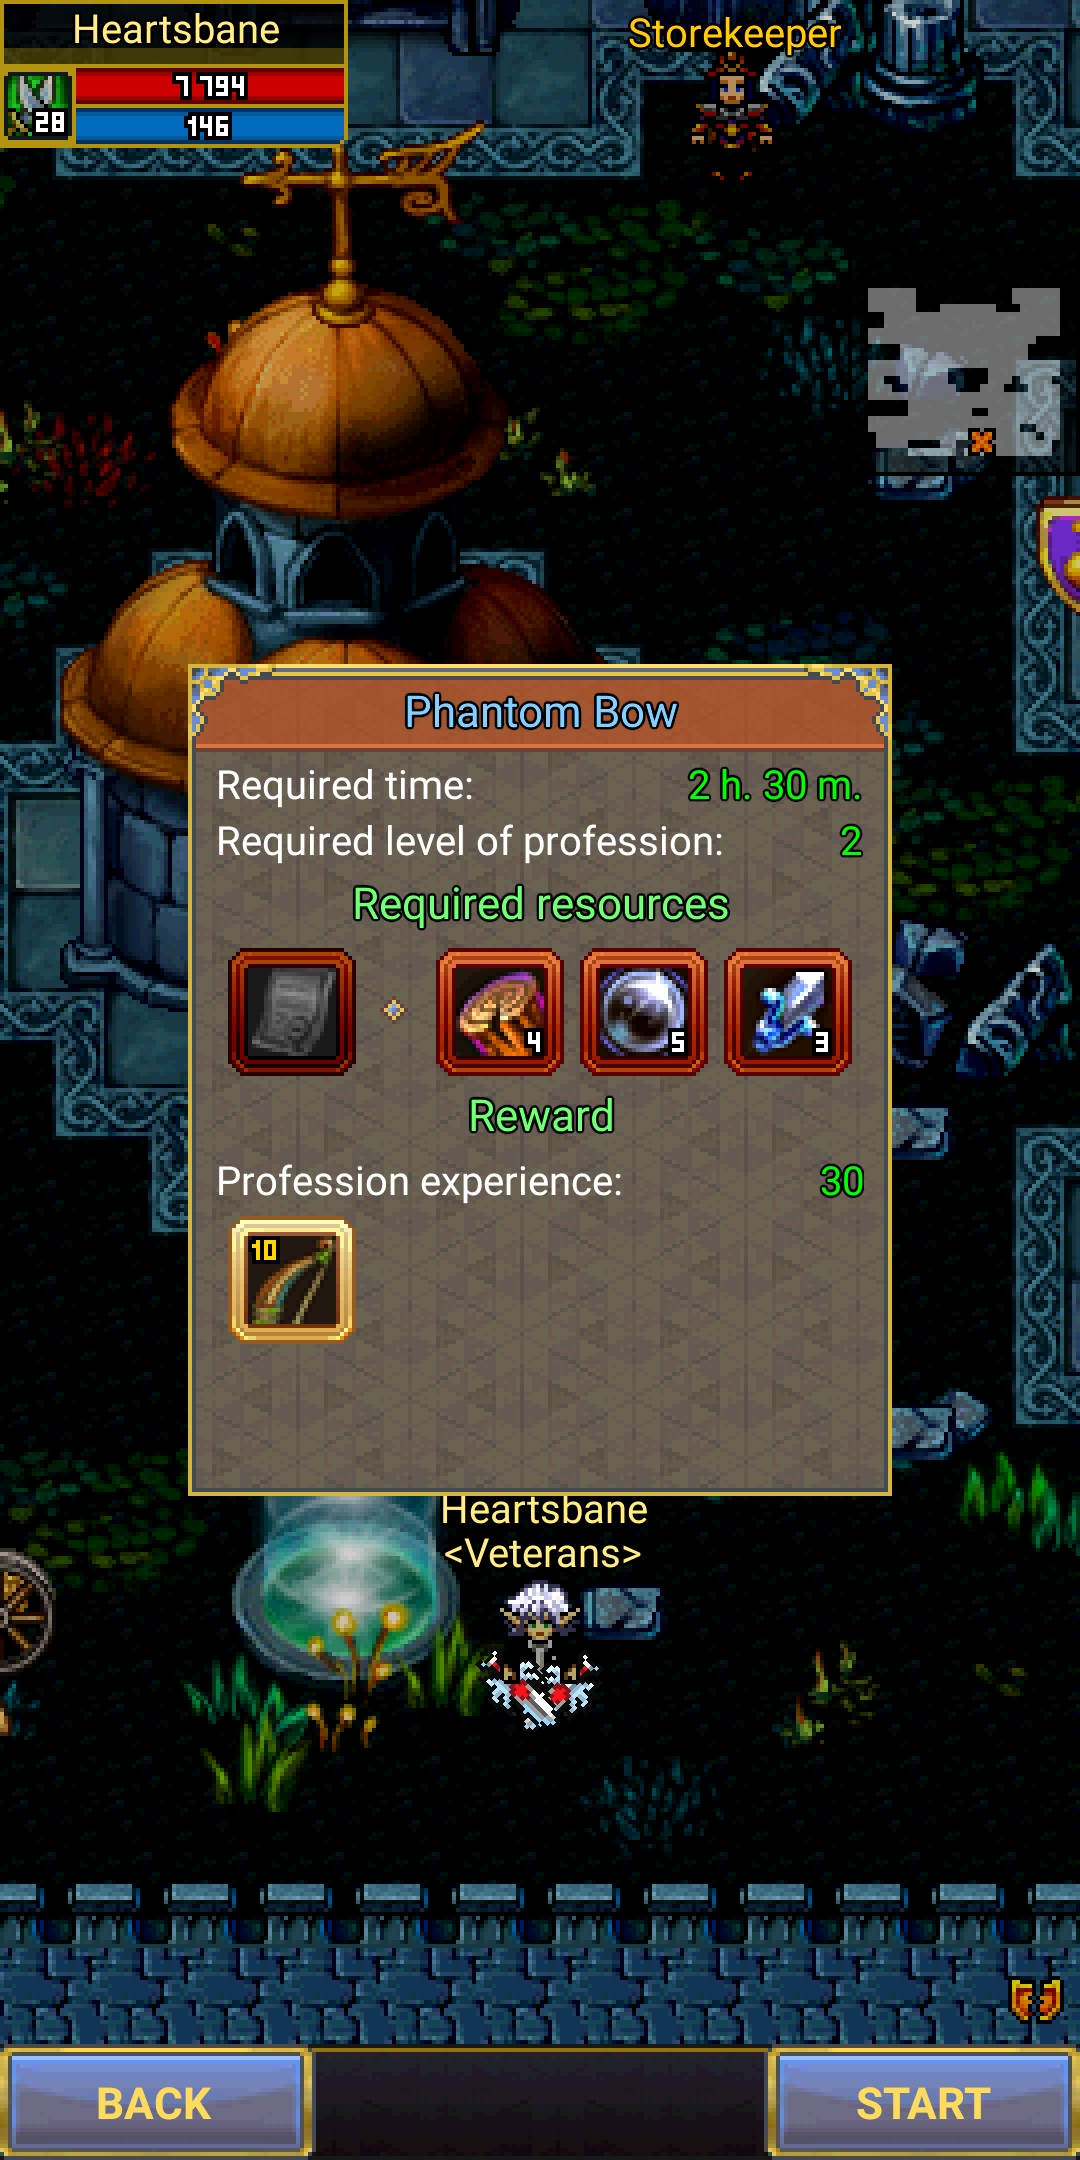
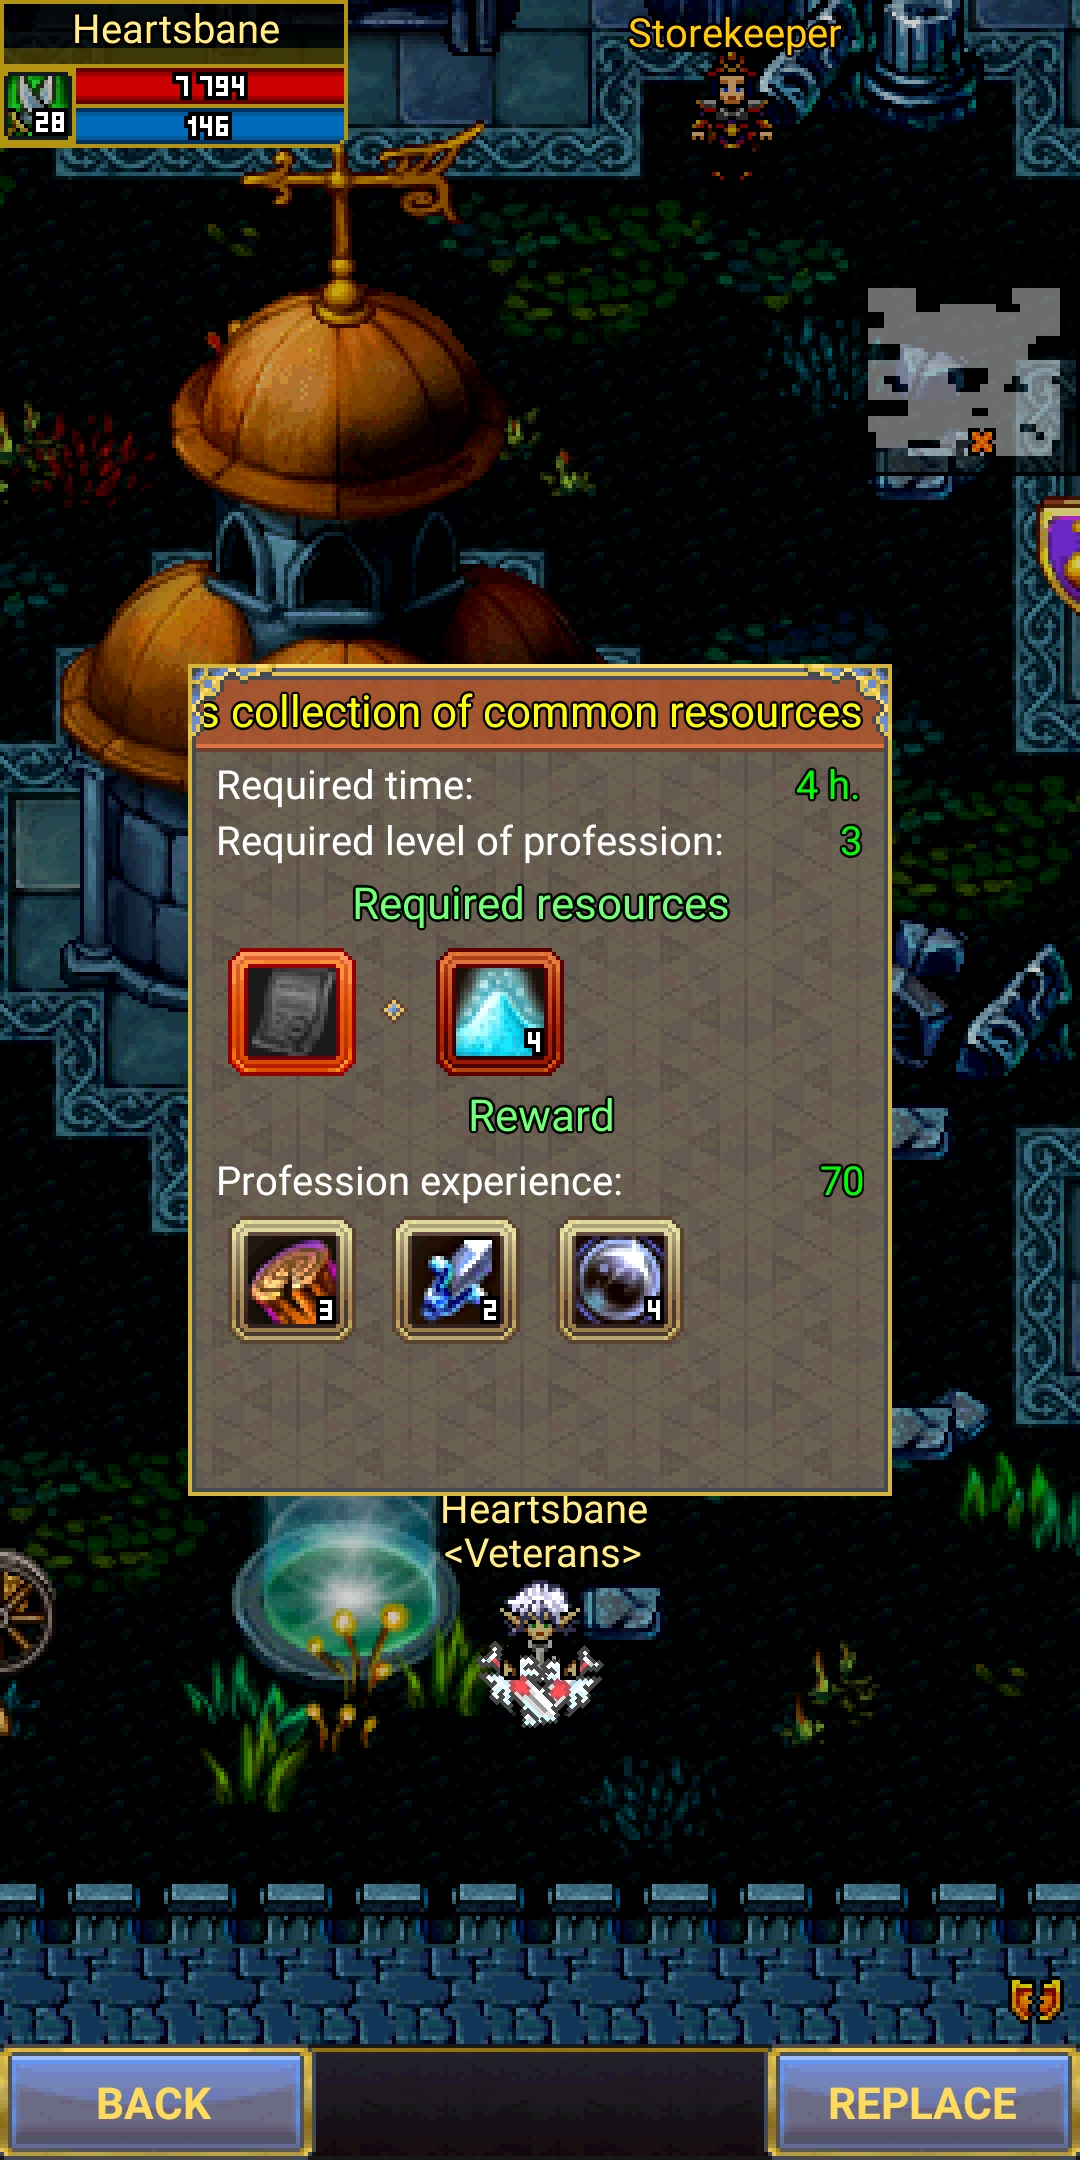
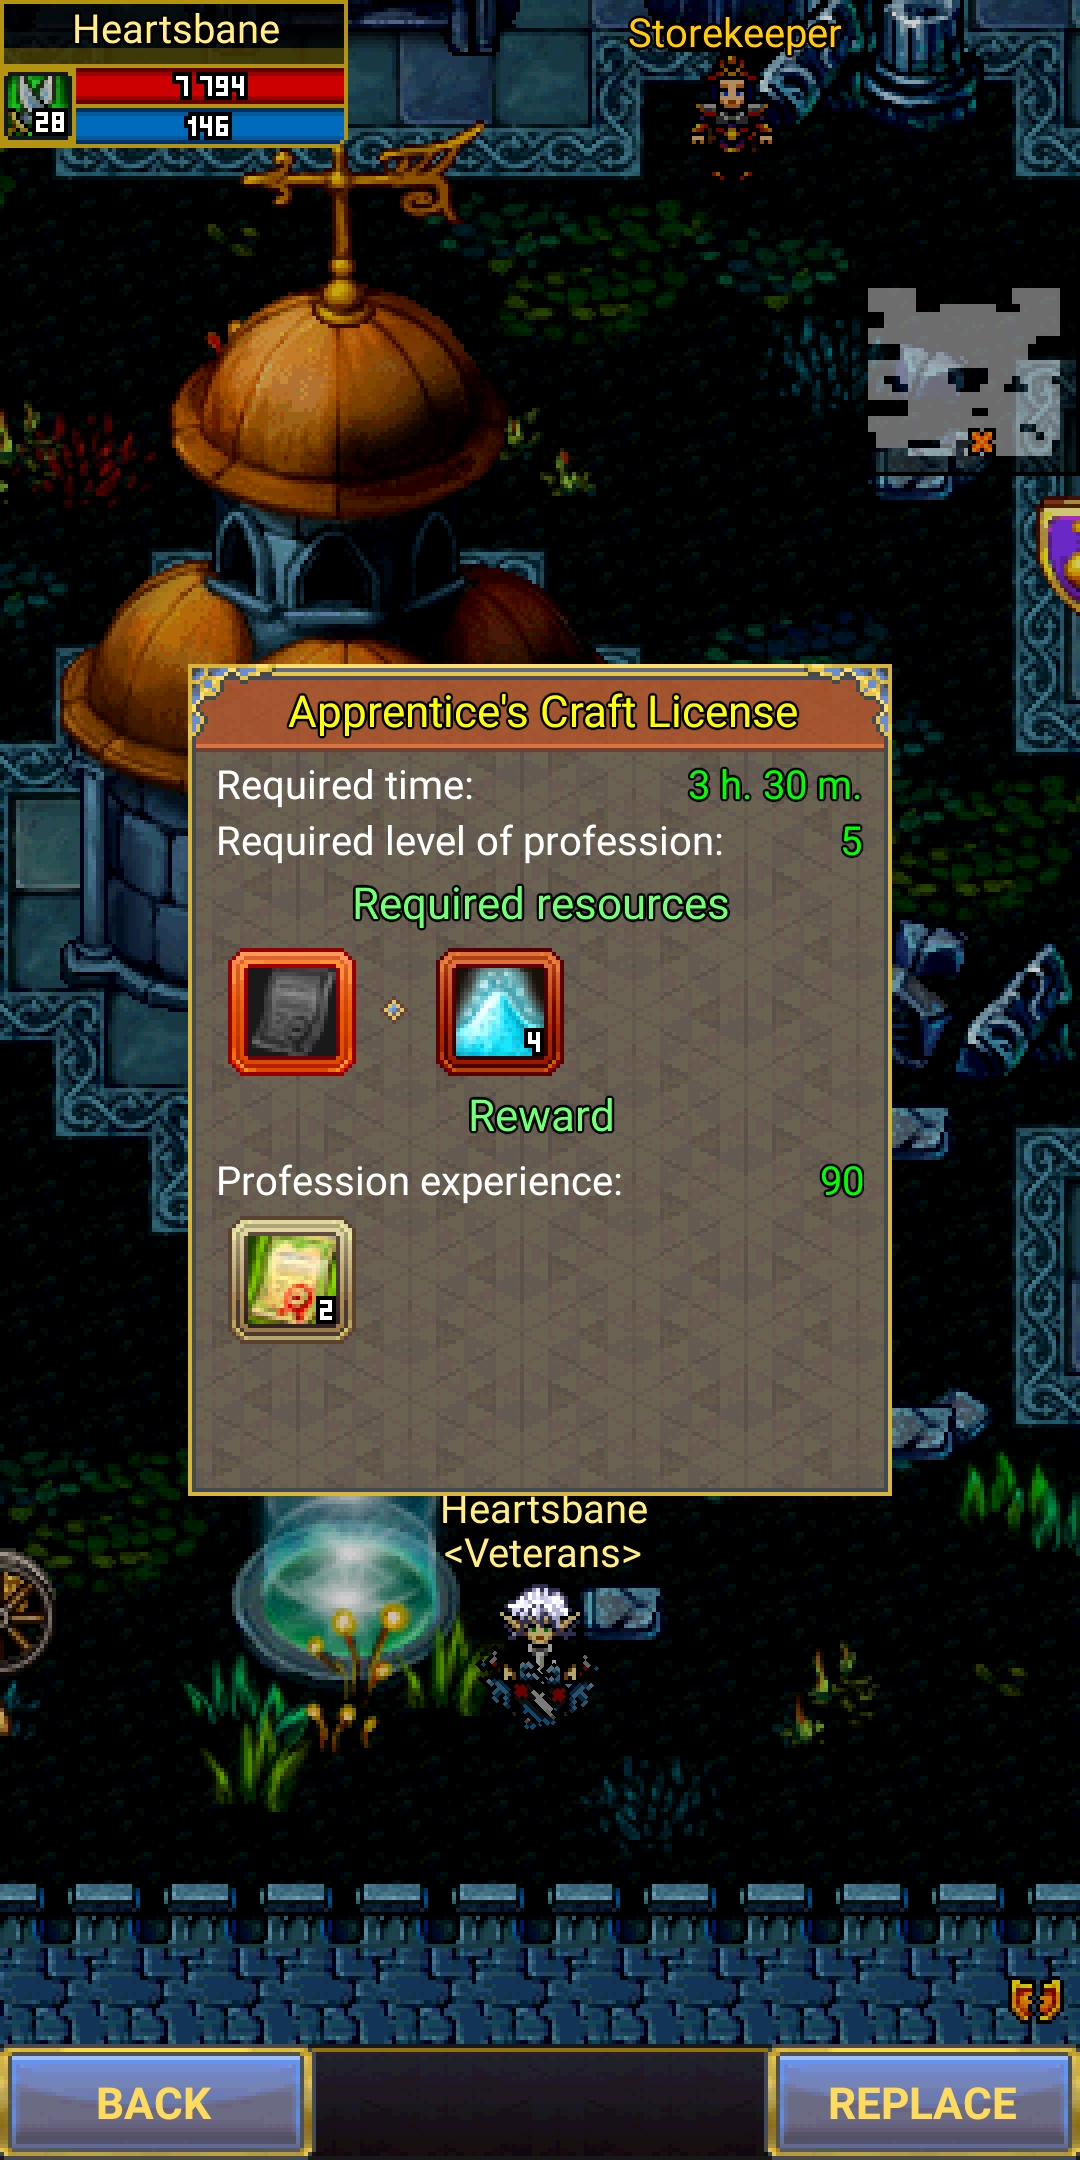
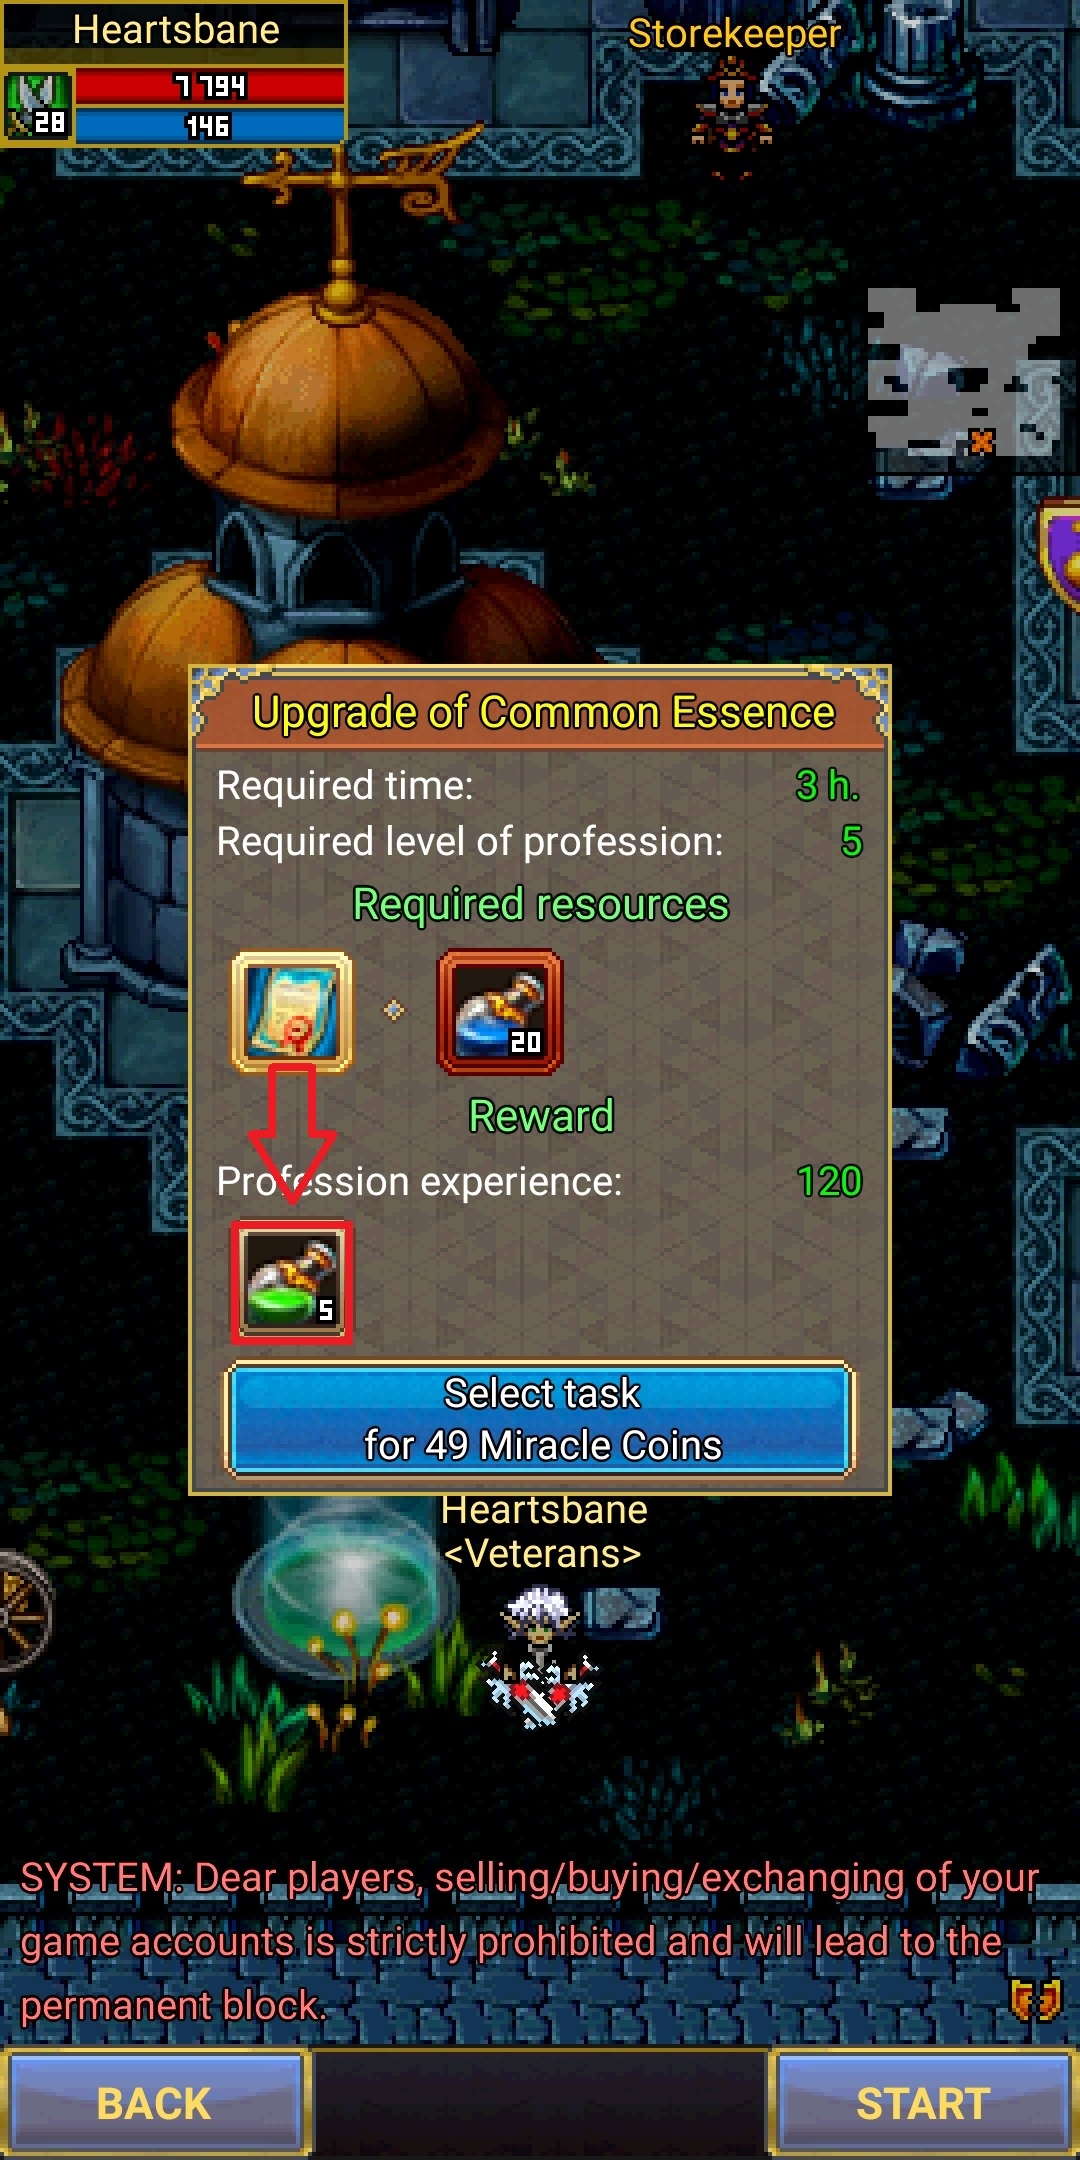
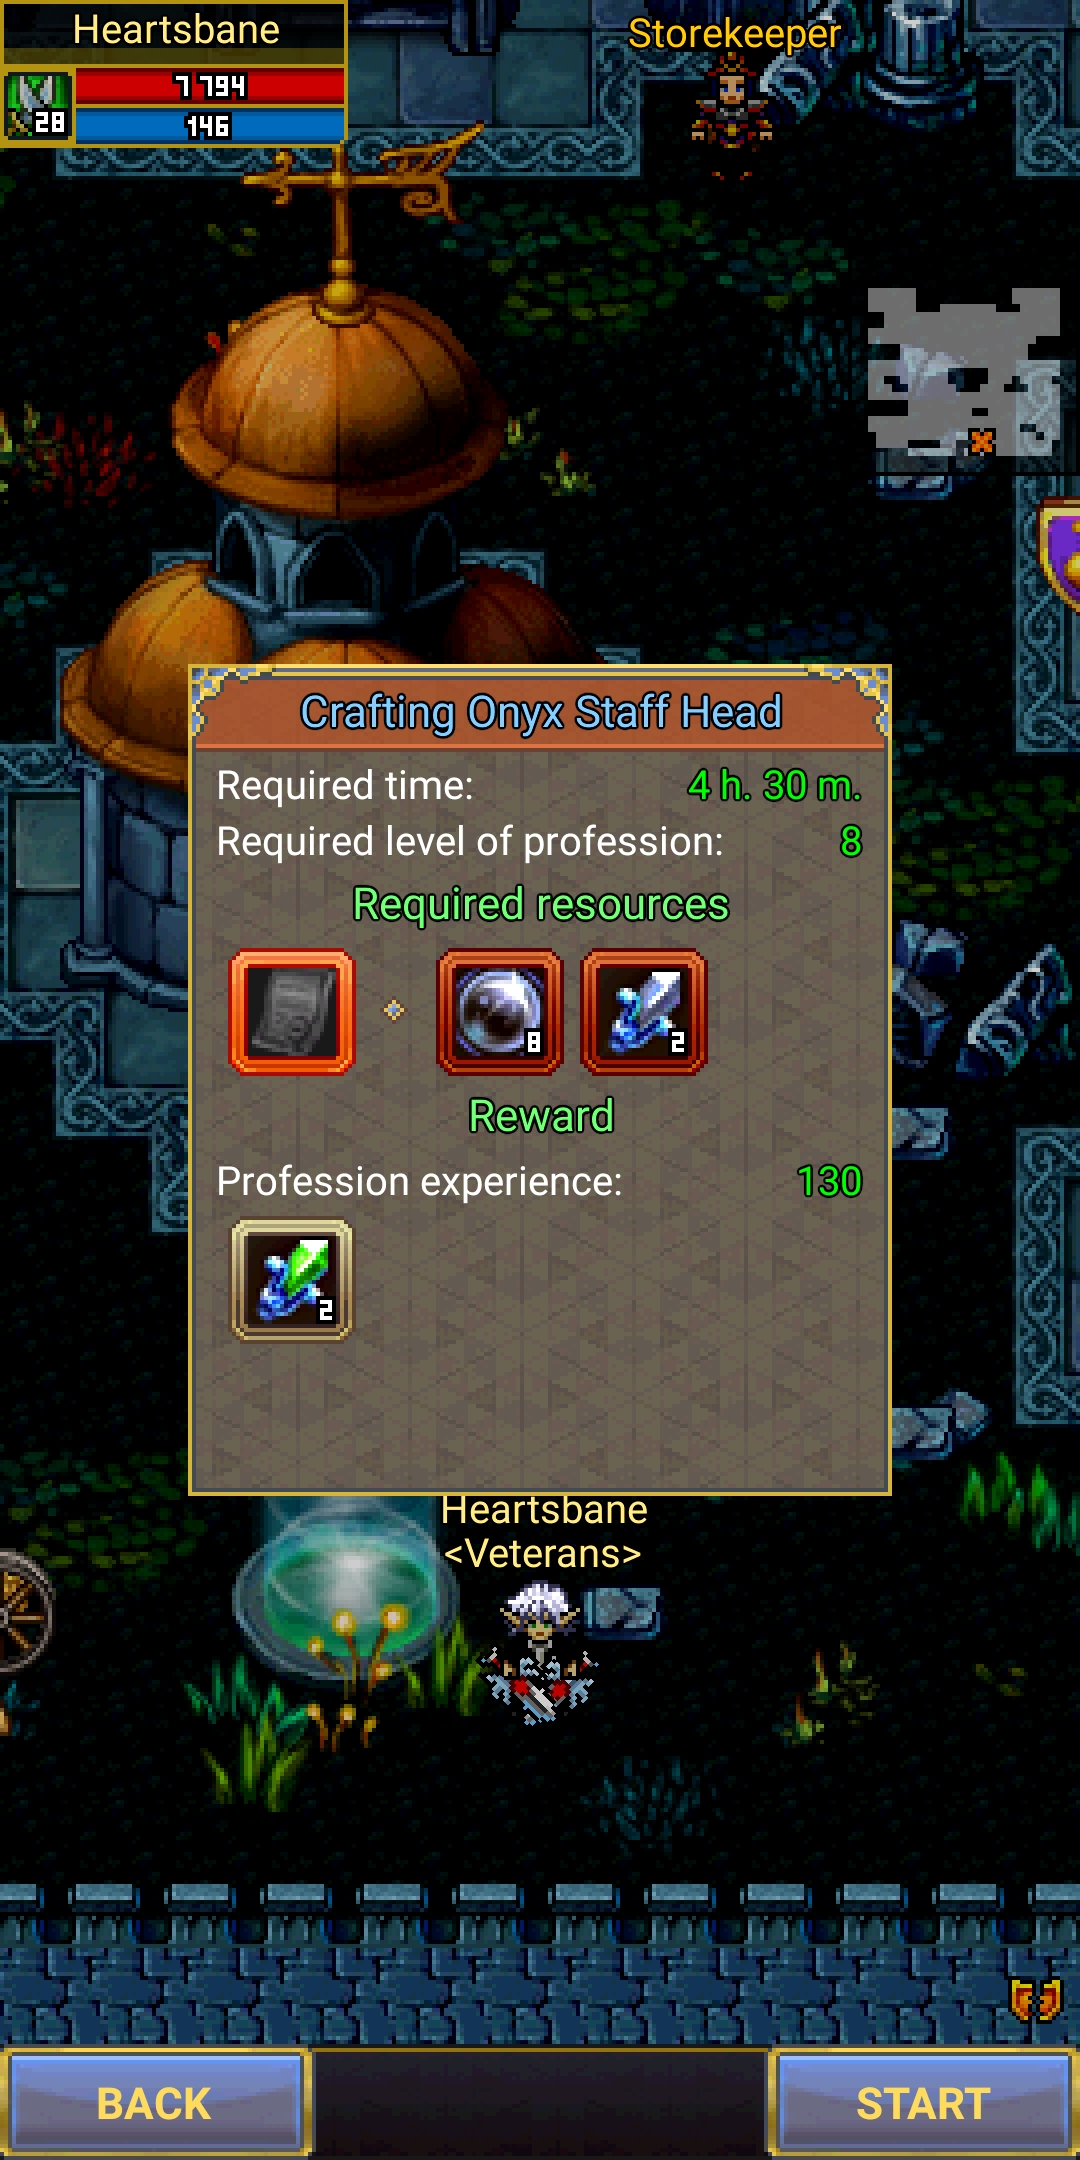
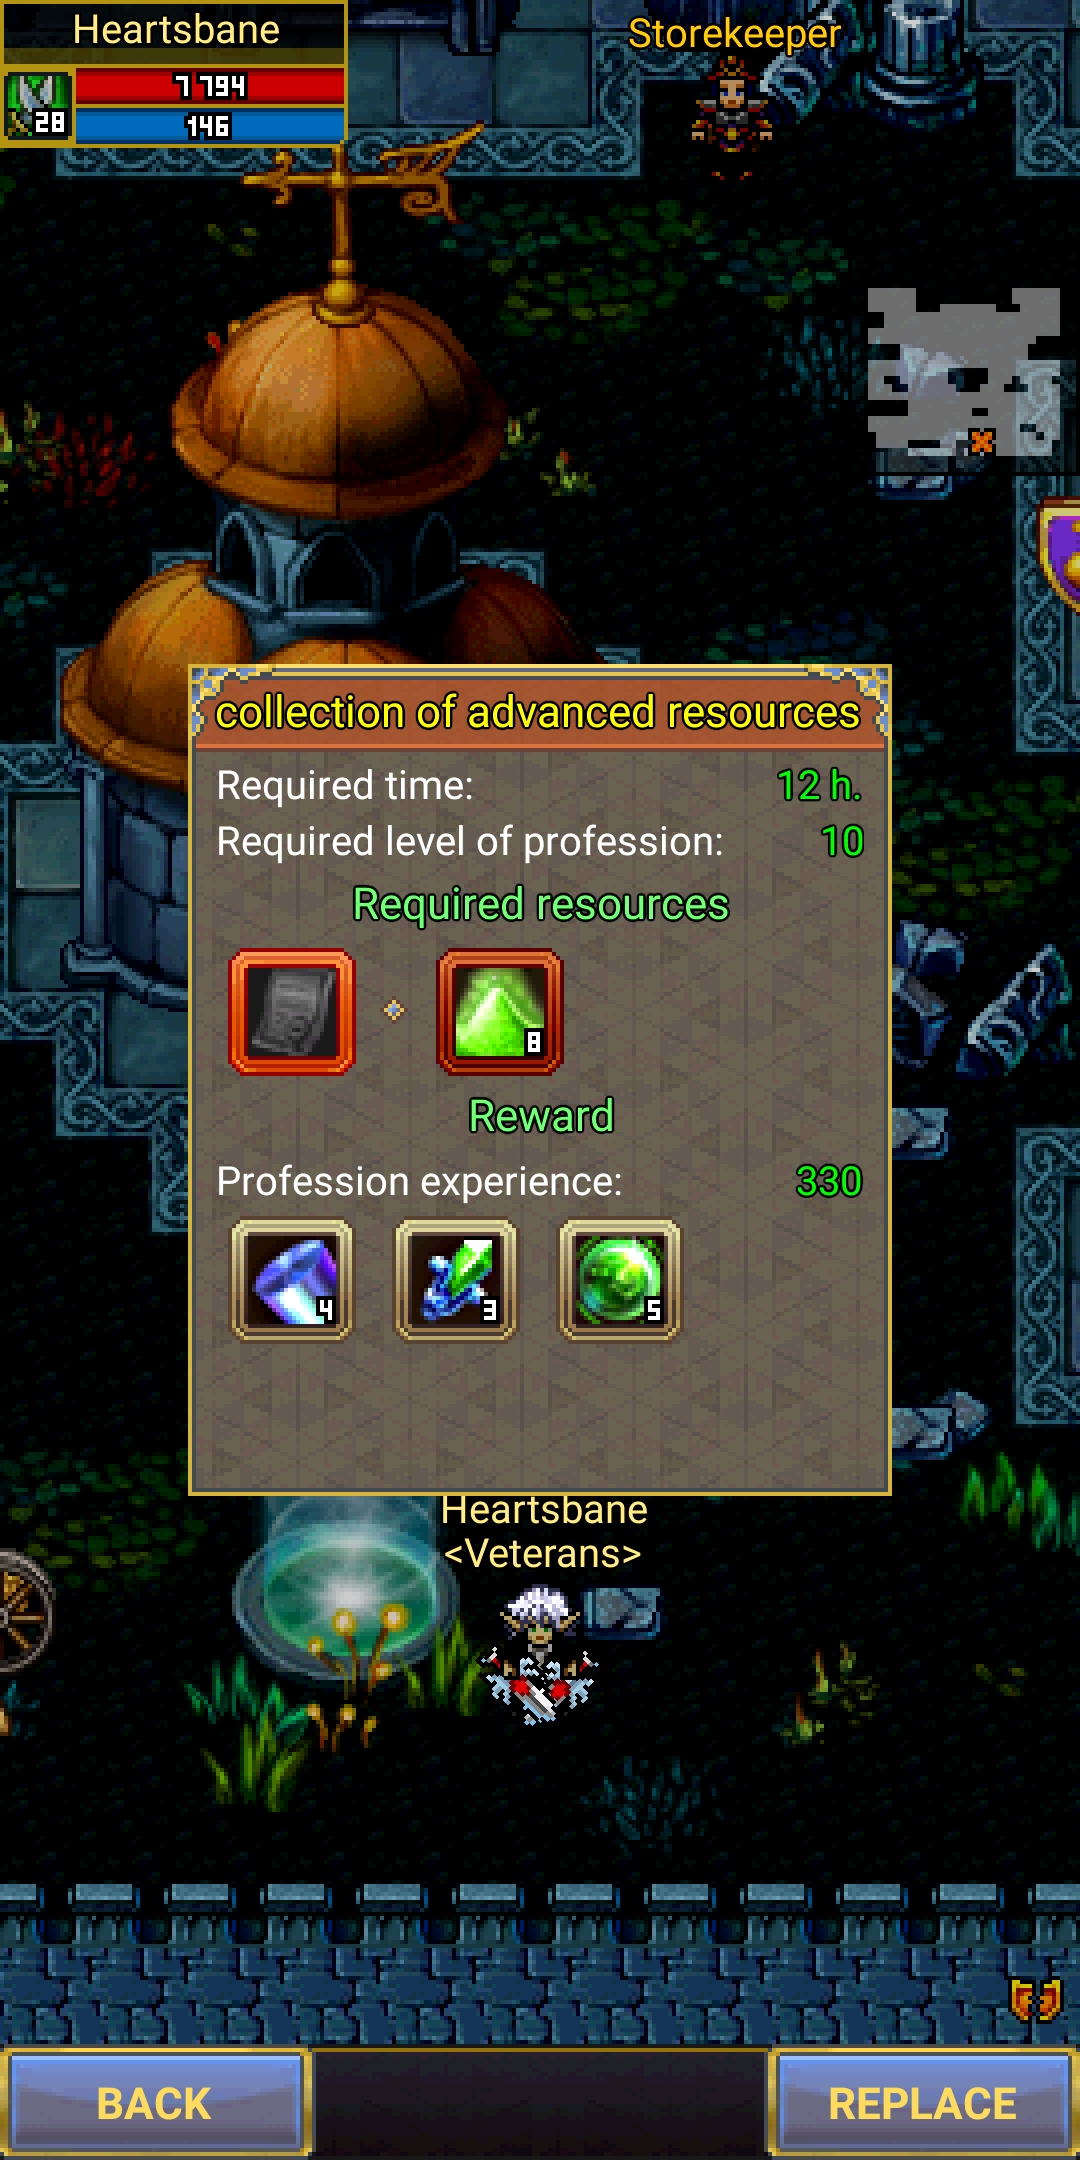
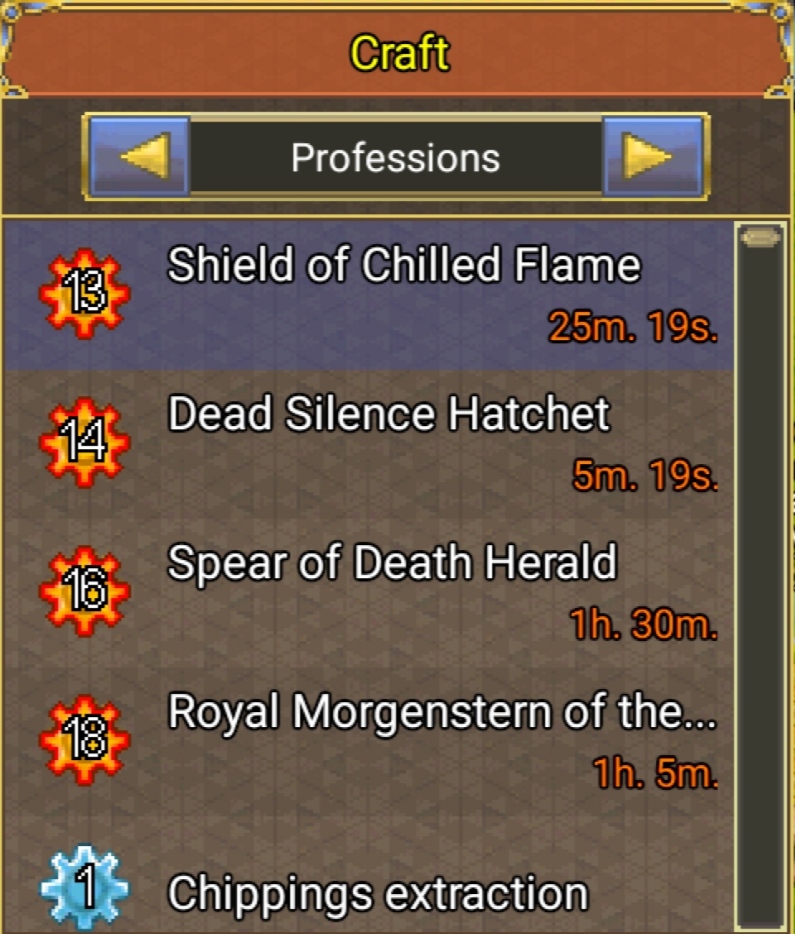
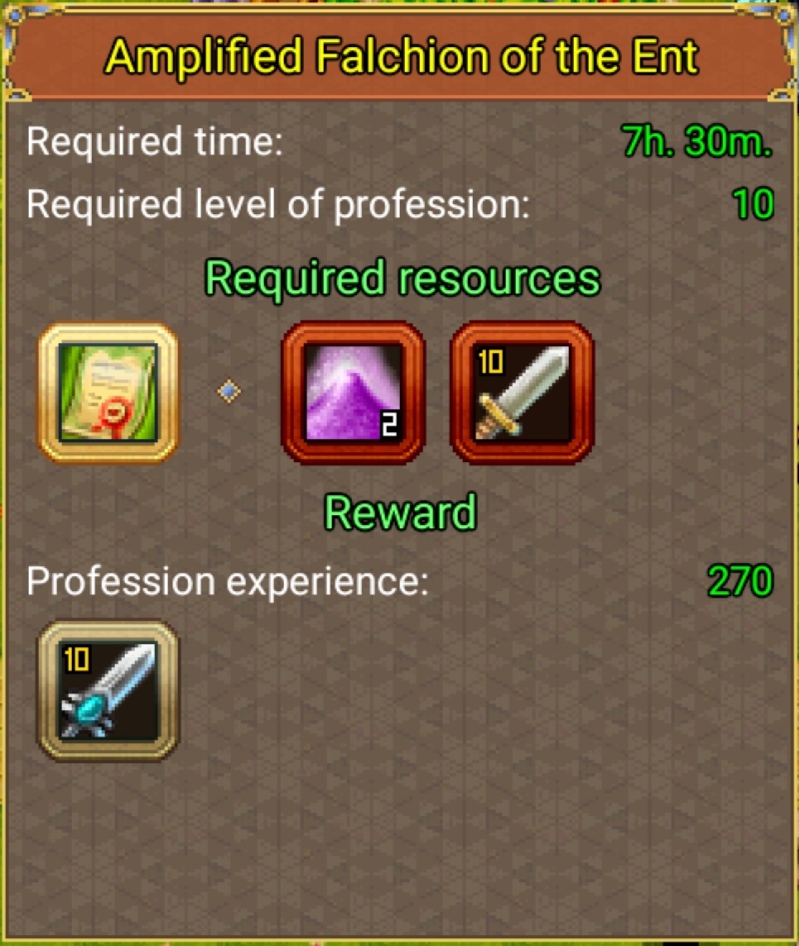
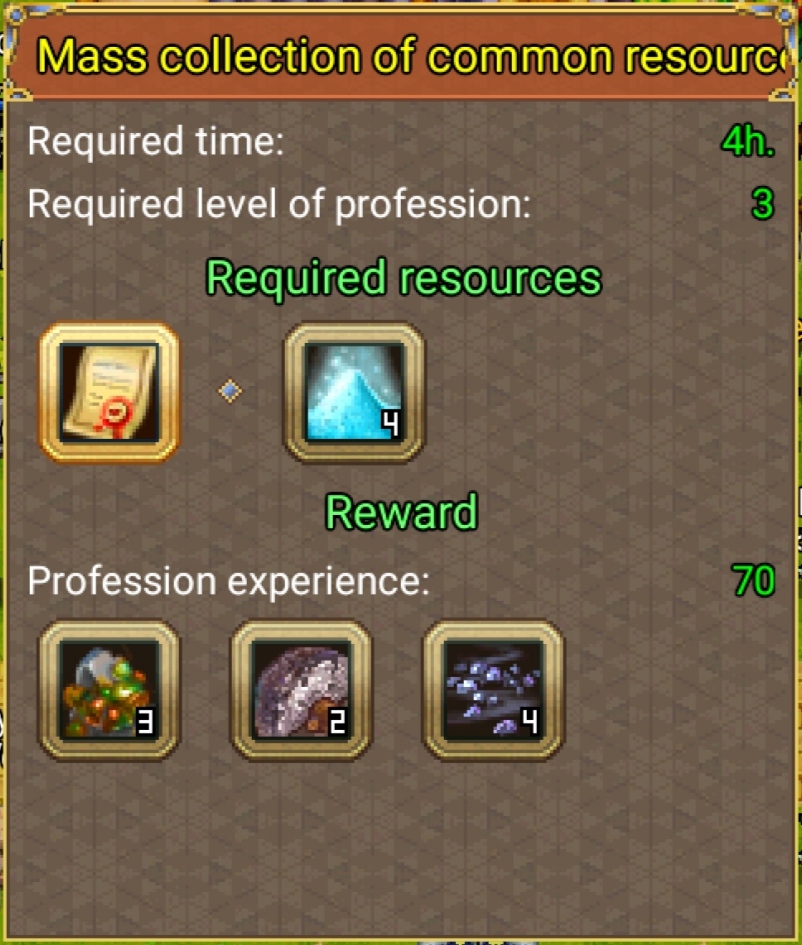
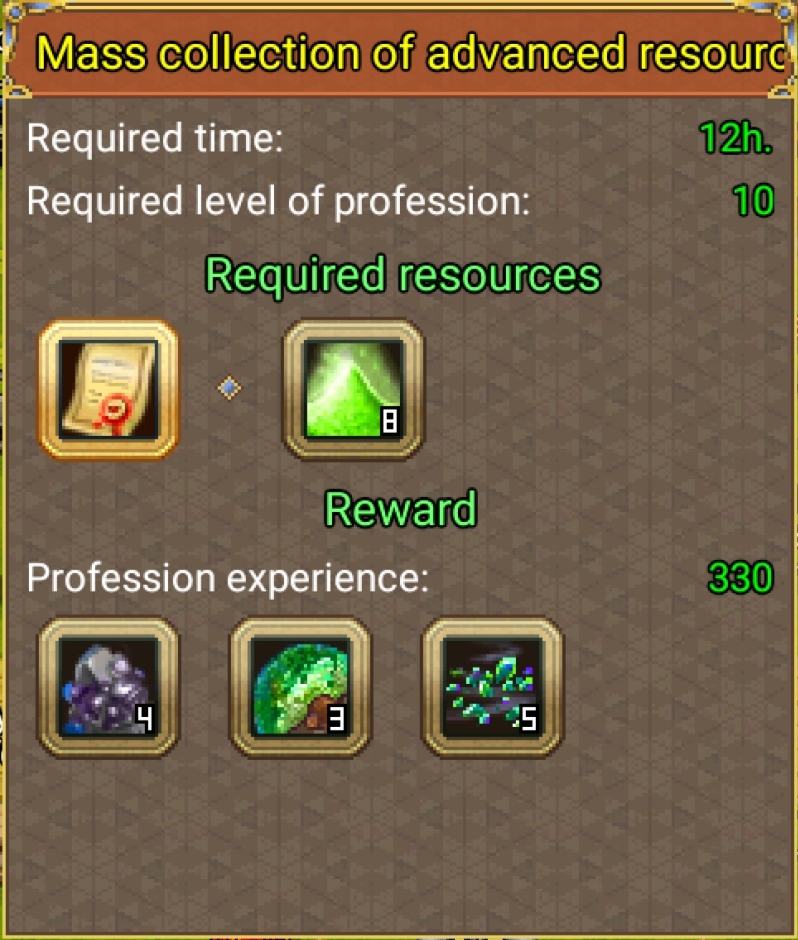
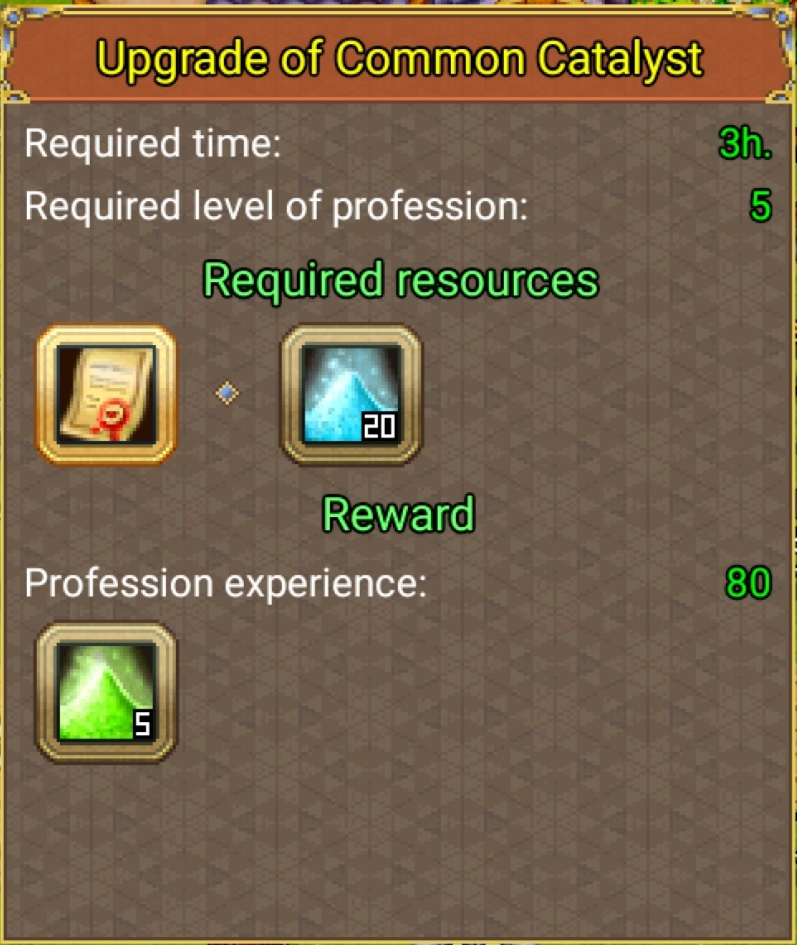
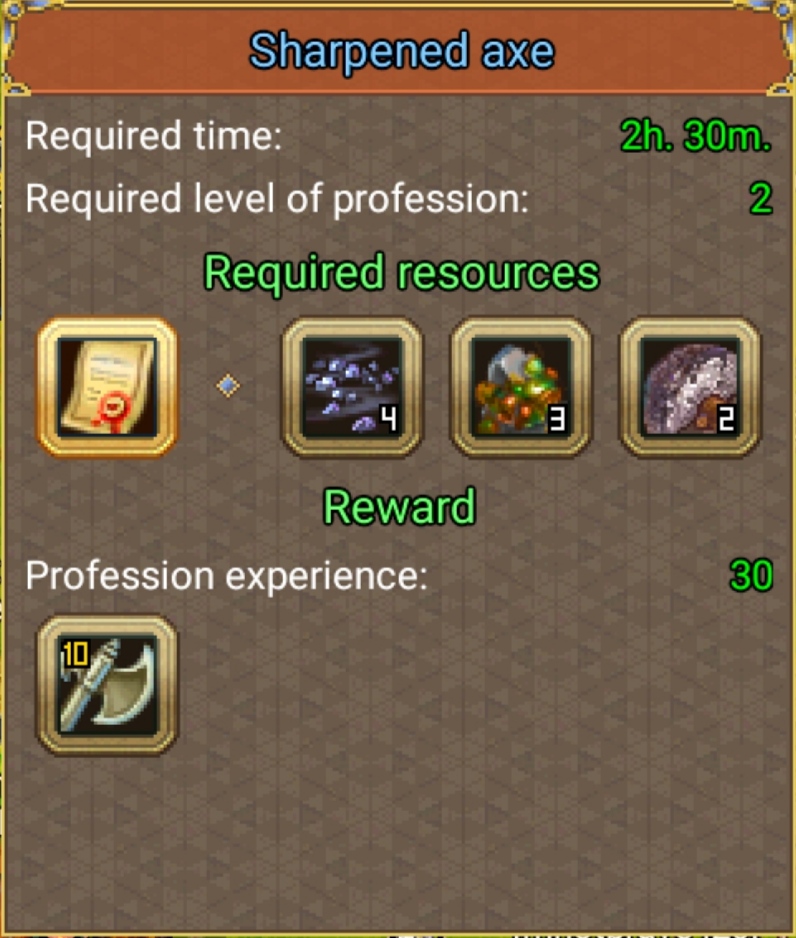
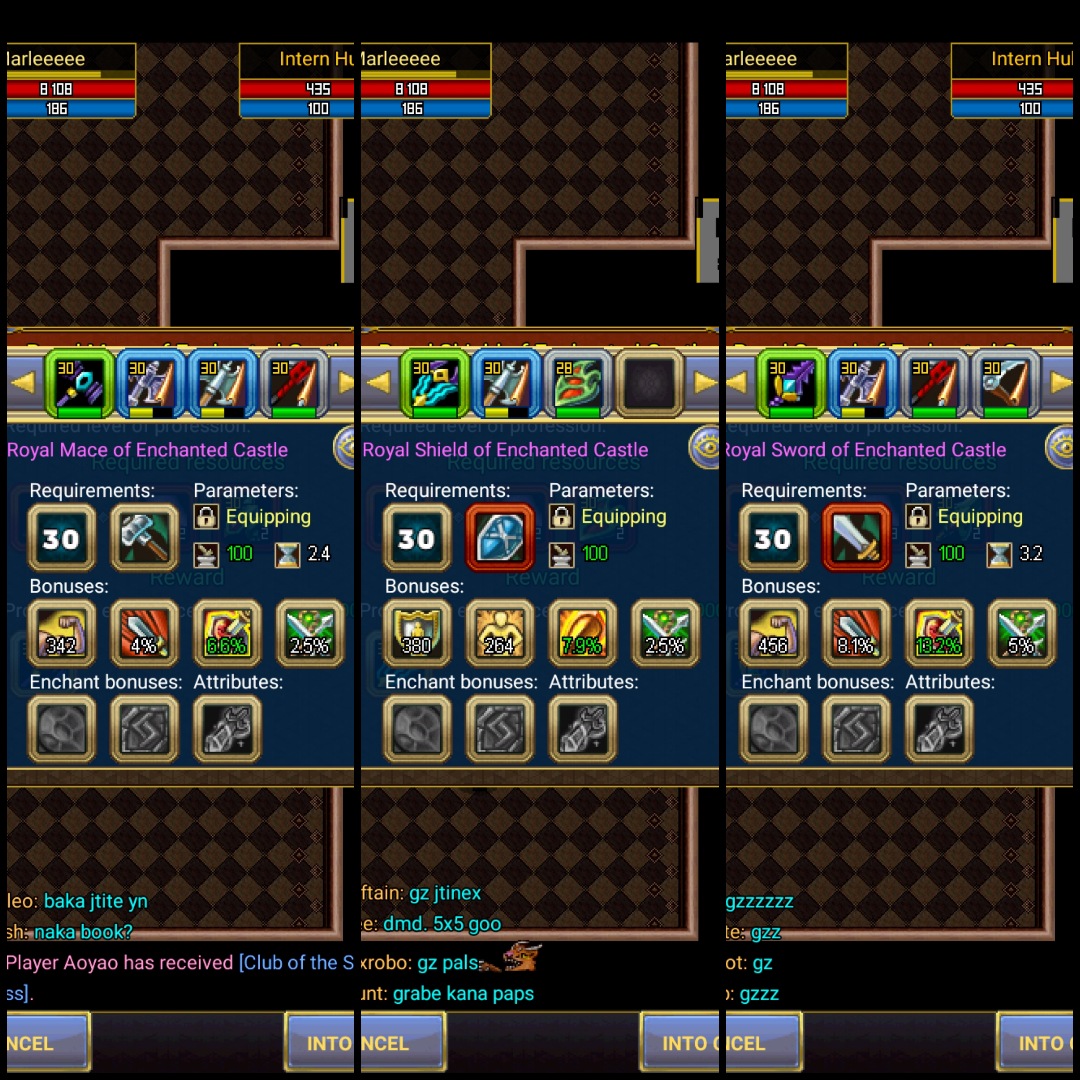
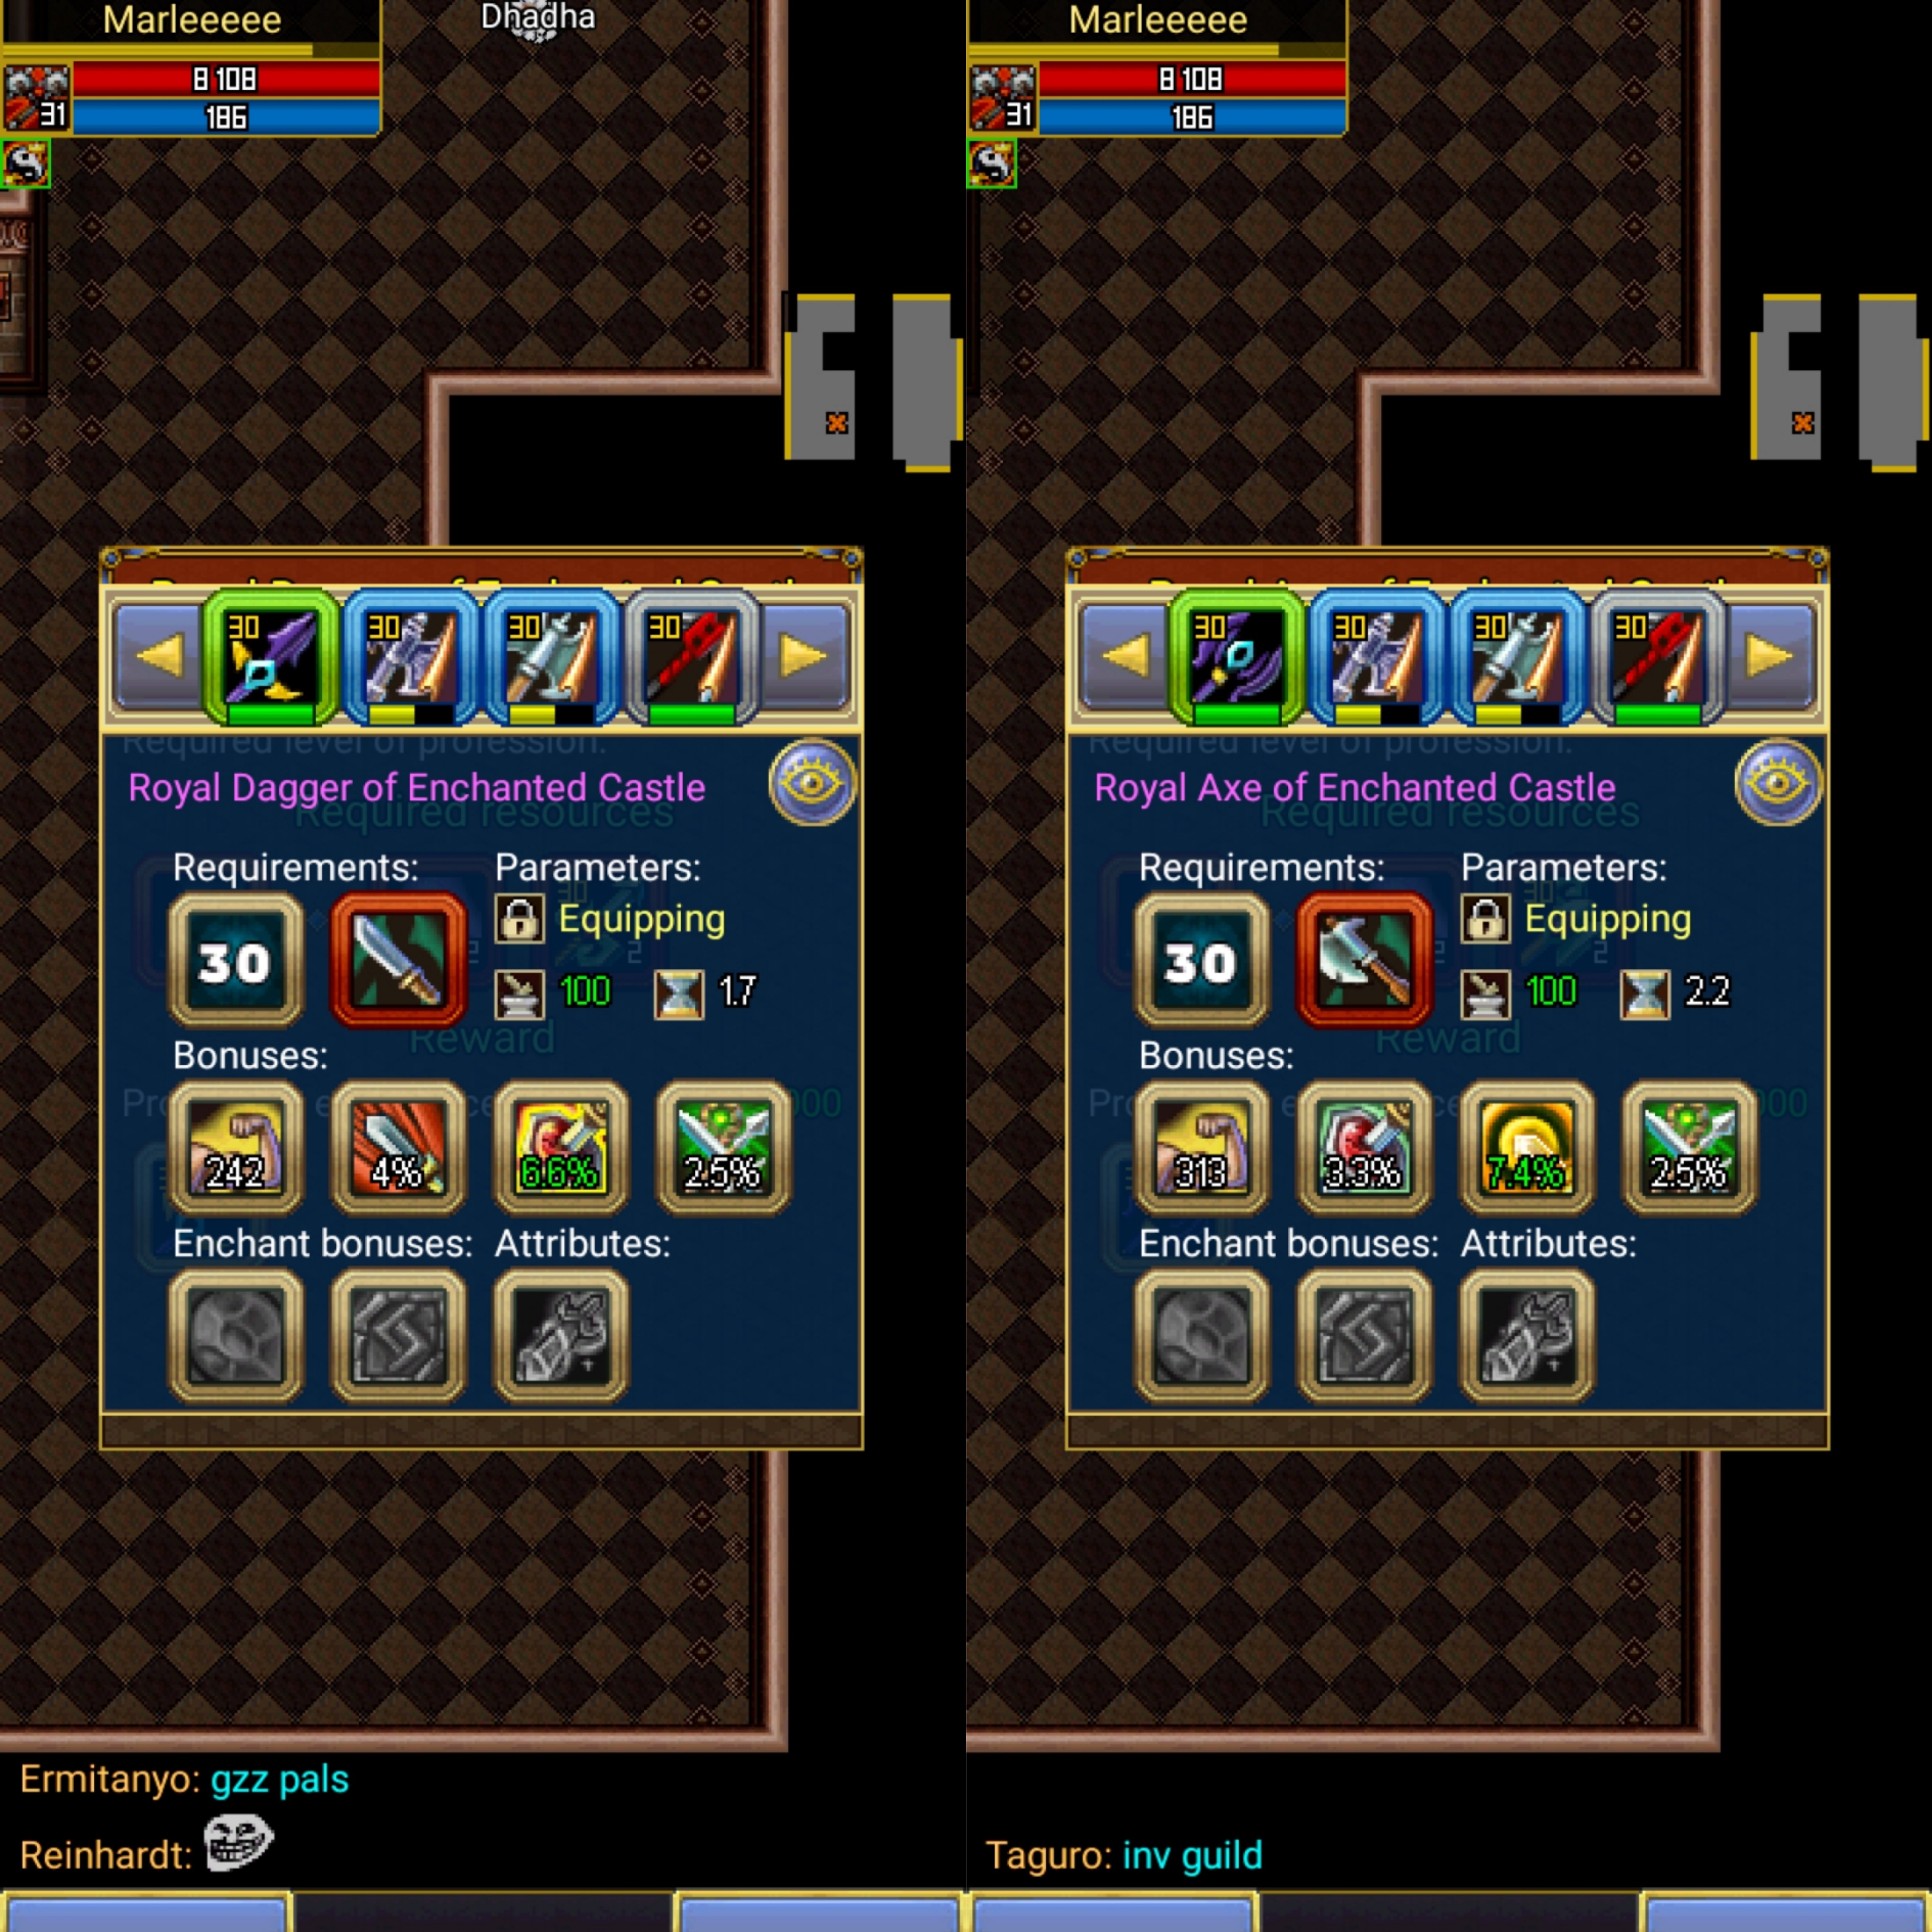
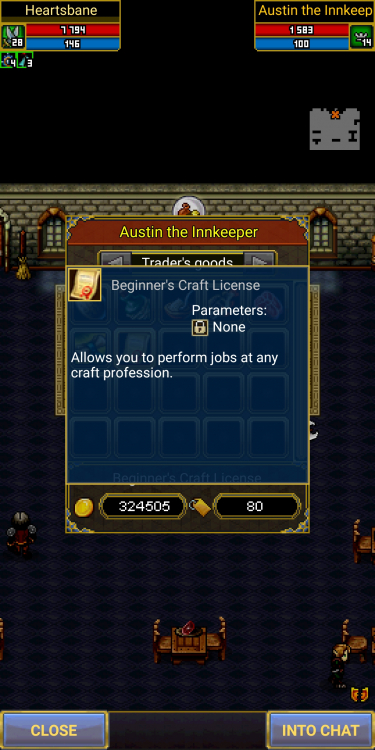
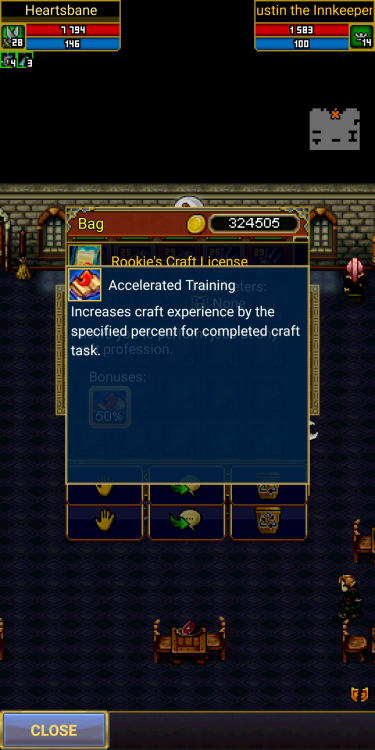
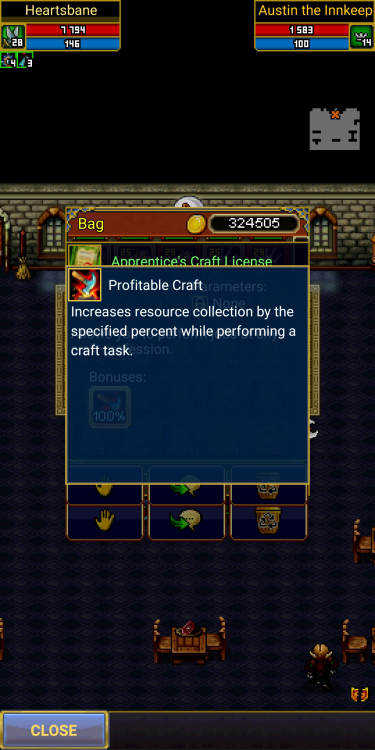
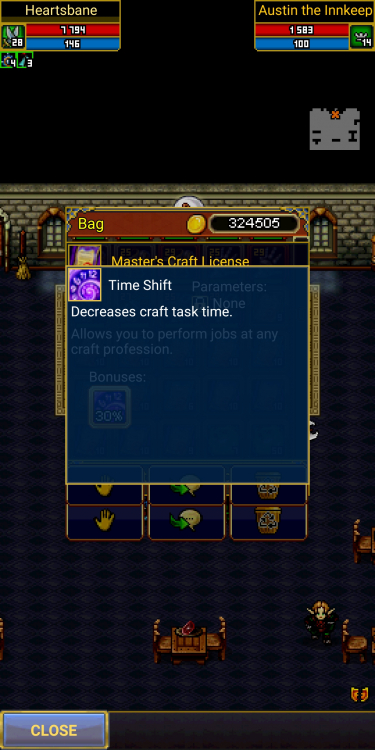
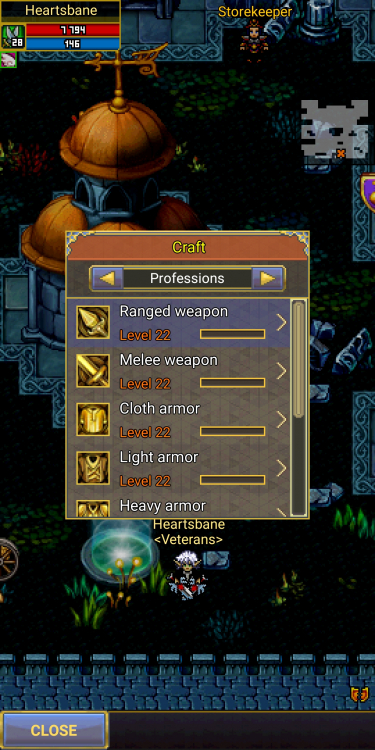
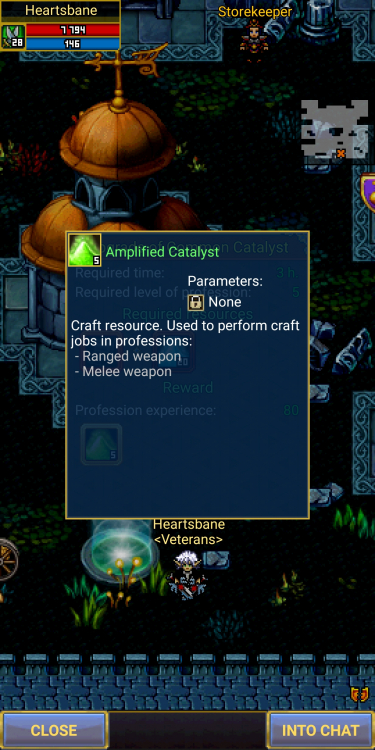
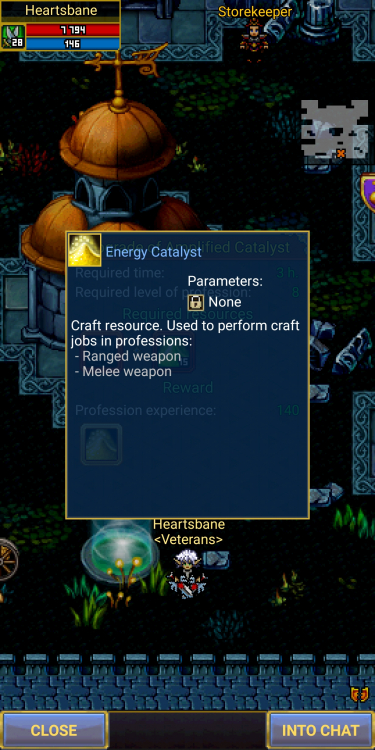
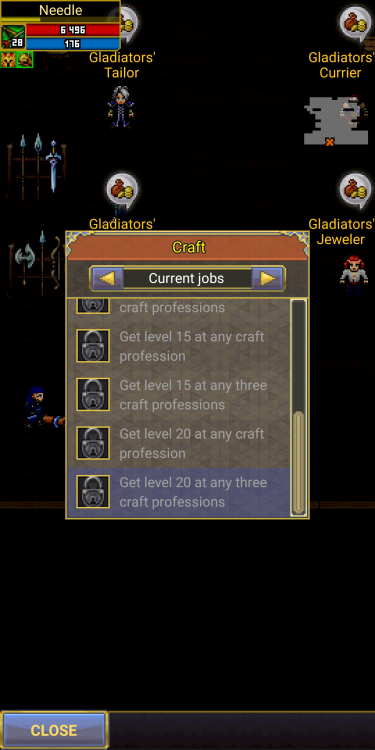
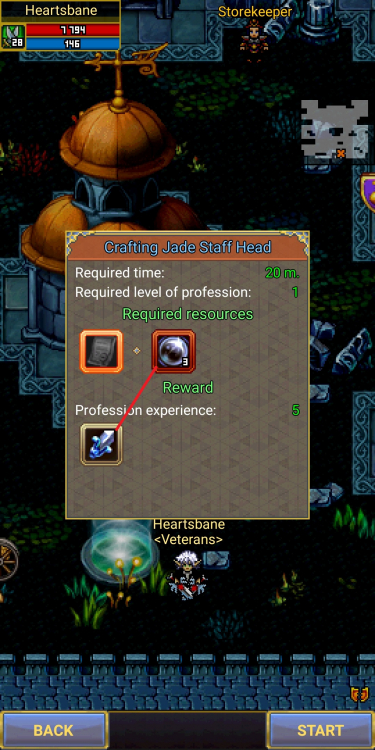
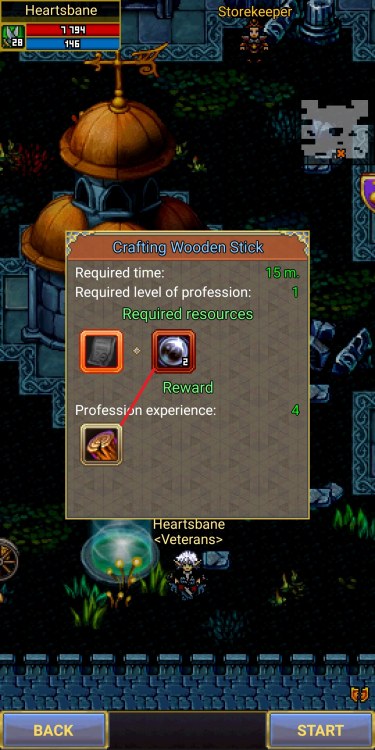
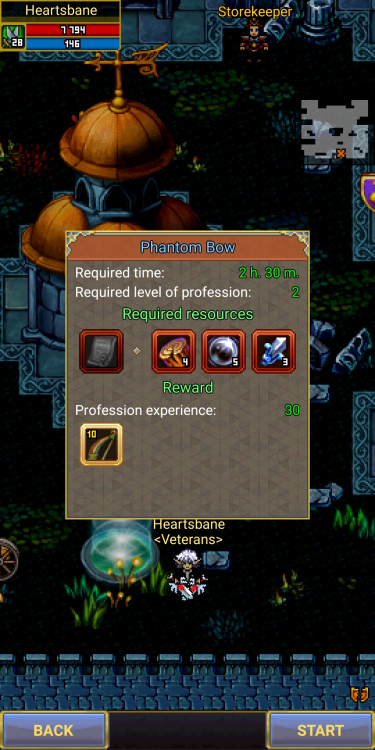
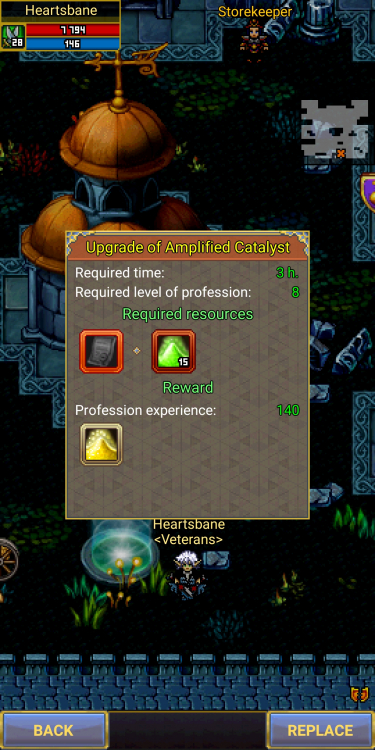
 Hello everyone! This topic contains detailed craft guide for beginners; What you have to do for start? -Craft section opens soon as you reach Level 10 . And for start you need get licenses. Licenses allows you to perform jobs at any craft profession. I said licenses so let’s talk about licenses,shall we? There’s 4 type of licenses; Beginner’s Craft License: You can find it in every town,inside Tavern shop. Price is 80 gold for per pcs.This is most license type you gonna use on your beginning of craft journey,because of its cheap. Since being a crafter requires alot supplies,you gotta save some up. Rookie’s Craft License: Allows you to get %50 more craft experience for each craft task you using; Apprentice’s Craft License: Allows you to get 2x more resources for to each craft task you using. Master’s Craft License: Decrease time of your craft task by %30. You can buy "Master's Craft License" and "Rookie's Craft License" from Miracle Coins Shop with Miracle Coins or can buy from Dealer inside towns with gold. "Apprentice's Craft License" is a craftable license. What can you make with craft? -You can make different type of powerful items and you have 8 type of craft professions fort that. Also you can earn gold by selling them but we will get to that point later. So let’s know about craft professions; Ranged weapon: Bow,Crossbow and 2 different type of Staff Melee weapon: Dagger,Blade,Axe,2 different type of Mace,Two-handed Sword,Two-handed Axes,Two-handed Mace(Hammer),Spear,Shield Cloth armor: Hood,Armor,Gloves,Boots and Belt for Mage,Priest,Druid,Shaman,Warlock,Necromancer and Charmer Light armor: Hood,Armor,Gloves,Boots and Belt for Paladin,Seeker,Blade Dancer,Ranger,Warden,Rogue,Barbarian,Hunter and Death Knight Heavy armor: Hood,Armor,Gloves,Boots and Belt for Paladin,Blade Dancer,Warden,Barbarian,Death Knight and Charmer Rings: Physical damage and Magical damage rings Amulets: Physical damage and Magical damage amulets Cloacks: Physical damage and Magical damage cloacks CRAFT MATERIALS Ranged and Melee weapon: Common Catalyst,Amplified Catalyst,Energy Catalyst,Etheral Catalyst Cloth,Light,Heavy armor: Common Substance,Composite Substance,Energy Substance,Etheral Substance Rings,Amulets and Cloacks:Common Essence,Compoiste Essence,Energy Essence and Etheral Essence You can farm all of these resources by doing dungeons,boss hunts,killing elite mobs of the Ship Graveyard (Town 5 of Ayvondil) and by disassambly items. RARE CRAFTS Crafts that you see at top of the each craft professions which keep changes for specified time. Also you can reach full list of rare crafts and can bring on which one you need with 49 Miracle Coins from here; → → Now let’s talk bit about craft task slots: For beginning you have 1 available craft task slot. So how to get more craft task slots? 2nd slot opens when you complete 20 craft tasks, 3rd slot opens when you get level 5 at any craft profession, 4th slot opens when you get level 10 at any craft profession, 5th slot opens when you get level 10 at any three craft professions, 6th slot opens when you get level 15 at any craft profession, 7th slot opens when you get level 15 at any three craft professions, 8th slot opens when you get level 20 at any craft professions, 9th slot opens when you get level 20 at any three craft professions. So far we learn everything that we gonna need for start. Let’s begin to craft. At the beginning It might be boring for you but later you’ll see that crafting is really fun. First of all let’s buy some "Beginner’s Craft License" and start crafting first resources as you gonna see down here; I said “Beginner’s Craft License” cause It’s cheap and not really necessary to use “Rookie’s Craft License” till you reach atleast level 5 but you can use “Rookie’s Craft License” too,that’s totally depends on you. You gotta craft a lot of these first resources cause you need them to craft next resources. As example down here; So It goes like that till you get level 2 then you can start make level 10 items. Which will give you more craft experience. After you reach level 3 “Mass collection of common resources” rare craft will be available for you. Mass collection of common resources: You can make Level 1 craft resources all in one craft together. But remember for to start this rare craft you need 4 pcs. of Common material (substance,essence,catalyst) As the craft level goes up there will be more rare crafts will be available for you,I will sort them below; When you reach Level 5 you will get “Upgrade of Common “Catalyst,Substance,Essence”” and "Apprentice’s Craft License" rare craft tasks. Apprentice’s Craft License: Allows you to craft 2 pcs. of "Apprentice’s Craft License" with using 4 pcs. of Common resources(substance,catalyst,essence) Just a reminder you cannot get 2x of that license with using license itself to start craft. Upgrade of Common (Catalyst,Substance,Essence): Allows you to trade 20 pcs. of Common resources with 5 pcs. of Composite Substance,Composite Essence and Amplified Catalyst. I recommend you to use "Apprentice’s Craft License" with Upgrade of Common (Catalyst,Substance,Essence) to get x2 more resources from it. When you reach Level 8 you will get “Upgrade of Amplified/Composite (Catalyst,Substance,Essence)” rare tasks and new “Advanced Craft Resources” tasks. Upgrade of Amplified/Composite (Catalyst,Substance,Essence): Allows you to trade 15 pcs. of Amplified/Composite (Catalyst,Substance,Essence) to 1x Energy (Catalyst,Substance,Essence) Advanced Craft Resources: Upgraded type of common resources which you make at level 1. Which you need common resources to craft “Advanced Craft Resources” at level 8. When you reach Level 10 you will get “Mass collection of advanced resources” rare task. Mass collection of advanced resources: Allows you to craft advanced craft resources all in one craft task. I recommend you to use "Apprentice's Craft License" with this craft task. Which will save your time. If you keep bring this craft with 49 Miracle Coins and keep craft them resources you can really boost your craft experience. When you get enough resources (depends on your bag slots and you) you can start craft items with using "Rookie's Craft License" for boost your craft experience. With Common/Advanced resources you can make items with 3 bonus that's the first step of making rare craft items.After you done it you can make next craft item with using Energy (Catalyst,Substance,Essence) at the next level of the craft profession. So for to do that you should pass to next level of craft profession. That needed aswell as for the last step of making rare craft item as they shown at top of every craft professions or you can bring them by using 49 Miracle Coins. There's an example down below; 20-03-18-01-13-25.mp4 20-03-18-01-13-25.mp4 After you maxed any craft profession of yours,you can make items and sell them to other players or you can ask them to bring their own resources and craft for them with fee. That's what I usually do. If you want farm gold in game I can honestly say this is one of the way for it. I hope this guide will help you on your journey to be a crafter. Best of the luck!
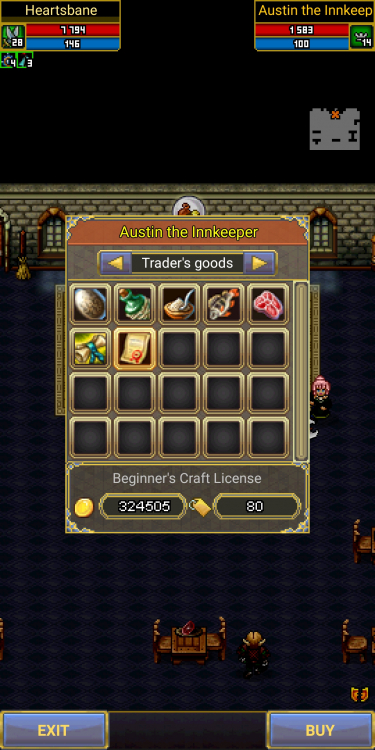


-
Warden Guide 1. Introduction 2. Class information 3. Skills 3.1 Warden class passives 3.2 Basic skills 3.3 Expert skills 4. PvE 4.1 Tank Warden 4.2 Speed Warden 5. PvP 5.1 PvP Tank 5.2 Support Tank 1. Introduction Warden is one of the most underrated classes in all the game due to his low damage and its never ending nerfs (#BuffWD) but this dosnt mean you shouldn't be scared of them. So today im here to teach you how it works, how to build it and even how to play/counter play a warden. Lets get started. 2. Class Information Warden is one of the strongest tanks in the game due to his heavy armor set and their high damage reduction abilities, but some people forget that a warden has a high variety of skills making it a very versatile class making it a very strong class in the hands of the people that know what they doing. Lets start by looking at the class skills 3. Skills The warden has a high variety of skill that allows them to play as tanks/damages/supports depending on the skill combinations they choose 3.1 Warden class passives 3.2 Basic skills Powerful Blow Type: Active Usage range: Melee Cooldown: 9 Seconds Energy expense: 12 / 13 / 14 / 15 / 16 Units Description: Blow that deals increased physical damage to an opponent. As the skill develops, the damage dealt from the skill increases. Damage amount also depends on the character's physical power and his level. Wave of Aggression Type: Active Usage range: 7 Yards Cooldown: 7 Seconds Energy expense: 9 / 10 / 11 / 12 / 13 Units Description: Applies the "Aggression" to the enemy for 5 / 6 / 7 / 8 / 9 sec. Enemy character or monster lose the current attack target, the monster also starts attacking the character and holds its attention on them. Every time the skill is used, a character gets a buff for 25 sec, when three buffs are recived, the character restores 4 / 6 / 8 / 10 / 12% of the maximun health. Warden's Spirit Type: Active Usage range: Melee Cooldown: 25 Seconds Energy expense: 14 / 15 / 16 / 17 / 18 Units Description: Applies a buff to the character for 15 sec. that counts the damage dealt by the character from any attacks. After the buff expires, the positive effect "Protective Field" is applied to the character for 6 / 8 / 10 / 12 / 15 secs. The protective field absorbs 30 / 40 / 50 / 65 / 80% of the damage dealt when the buff was in effect. Shocking Blow Type: Active Usage range: Melee Cooldown: 14 Seconds Energy expense: 12 / 14 / 16 / 18 / 20 Units Description: Blow that applies the negative effect "Stun" to the enemy for 3 / 3.5 / 4 / 4.5 / 5 sec. The opponent cannot move or apply skills, damaging the target does not obvliate the efect. As the skill delelops, the effect duration time increases. Punishment Type: Active Usage range: Melee Cooldown: 15 Seconds Energy expense: 13 / 14 / 15 / 16 / 17 Units Description: Blow that reduces the enemy's "Accuracy" parameter by 15 / 25 / 35 / 45 / 55% for 3 / 7 / 9 / 12 / 15 sec. As the skill develops, the power and duration of the effect increase. 3.3 Expert skills Guard´s Fury Type: Active Cooldown: 14 Seconds Energy expense: 14 / 16 / 18 / 20 Units Description; Applies the effect "Aggresion" to all enemies within 2 yards from the character for 6 / 7 / 8 / 9 sec. and reduces their physical and magical power by 20 / 25 / 30 / 35% for 6 / 7 / 8 / 9 sec. The maximun number of player targets 4 / 5 / 6 / 7, the number of monsters target is unlimited. As the skill develops, the power of the effects, their duration time and the number of player targets increase. Fortification Type: Active (permanent skill) Cooldown: 8 Seconds Reduced energy regeneration: 8 / 10 / 13 / 15 units Energy expense: 20 / 22 / 24 / 26 Units Description: Reduces all incoming damage against the character by 13 / 18 / 25 / 30% while the skill is in effect. As the skill develops, the power of the effect increases. Permanent skill. Powerful lunge Type: Active Usage range: Melee Cooldown: 13 Seconds Energy expense: 18 / 20 / 22 / 24 Units Description: Blow that deals physical damage to the target and a 40 / 50 / 60 / 70% of this damage to all enemies within a few yards from the target. Block Master Type: Pasive Description: Restores 8 / 10 / 13 / 18% of the character´s missing health when blocking an attack. Cannot trigger more often than once per 2 sec. As the skill develops, the power of the effect increases. Shield Throw Type: Active Usage range: 3 yards Cooldown: 14 Seconds Energy expense: 18 / 20 / 22 / 24 Units Description: Shield throw that deals 90 / 100 / 110 / 120% of physical damage to an enemy and has 30 / 45 / 60 / 75% chance to stun the enemy for 2 / 2.5 / 3 / 3.5 sec. As the skill develops, the effect duration and the damage dealt from the skill increase. Damage amount also depends on the character´s physical power and his level. Warden's Protection Type: Active Usage range: 4 yards Cooldown: 30 Seconds Energy expense: 14 / 16 / 18 / 20 Units Description: Applies the Warden´s Protection buff to an ally for 10 / 15 / 20 / 25 seconds. Warden´s Protection reduces the incoming damage to an ally by 15 / 25 / 35 / 55%, but 80 / 70 / 60 / 50% of this damage is taken by the character. When the current health level of the character is reduced to 20% of the maximun, the effect no longer works. Power of the effect and its duration increase, and the damage recived decreases as the skill develops. Switcheroo Type: Active Usage range: 6 yards Cooldown: 16 Seconds Energy expense: 16 / 18 / 20 / 22 Units Description: Swaps the character and the enemy, while slowing the enemy down by 15 / 30 / 45 / 60% for 3 / 4 / 5 / 6 seconds. Effect and debuff duration increase as the skill levels up. Natural Resistance Type: Active Cooldown: 25 Seconds Energy expense: 22 / 24 / 26 / 28 Units Description: Increases the character´s "Resistance" parameter by 10 / 15 / 20 / 30% for 8 / 10 / 12 / 15 sec. The effect´s power and duration increase with skill level. Stealing power Type: Active Usage range: 3 yards Cooldown: 18 Seconds Energy expense: 20 / 22 / 24 / 26 Units Description: Reduces physical and magical power of the enemy by 15 / 20 / 25 / 40% and increases the Attack Strenght parameter by 15 / 25 / 35 / 60% for 3 / 6 / 9 / 12 sec. As the skill develops, the power of the effect and its duration also increase. 4. PvE In this section of the guide im going to show you a couple of skill builds you could use as a Warden to archieve different goals or fulfill different roles for your party or play style. 4.1 Tank Warden This is the normal and traditional warden, the one that the game wanted us to use. your goal is to keep alive your party (and your self ofc) in a dungeon or a boss. the way we are going to achieve this goal is by getting the max amount of BLOCK (max 25%) we can get and the max amount of PARRY (max 30%), as well as getting the highest Health Points as we can. Your main goal right here its to not let anyone die (even your self!) 4.2 Speed Warden Now here is where the fun beggin. As you saw before (if u readed the skill part of this post) you will see a very interesting skill (you know what im talking about) a single skill that makes this build even posible. Yes! its the Stealing Power skill!. as you read before (pls do if you didnt this took a lot of time ) this skill gives to the warden an amazing 60% Attack Strenght (more than a seeker!) and in this section im going to show you a couple of builds to make this boring class very fun! Your goal here its to do a lot of damage and have fun (note that you wont be better than a ranger or a seeker, if you want a pure dmg class make one of em and not a warden lol) 5. PvP (im making this section becouse i've seen many wardens (at least on eu) not doing the PvP aspect of the game (maybe becouse the bad skill kit wds have for pvp or maybe becouse the never ending nerfs) 5.1 PvP Tank This section its gonna be very similar as the "PvE normal Tank" section of this guide but with the difference that now you are useing resilience ferocity and of course you will be fighting players (which they have a lot of skills movements and they not just an auto minion like mobs) Your goal as this type of warden is to annoy the enemy´s dds (forcing them to use stuns,fears,etc) wile doing damage to them, and kinda win the arena by forcing multiple PJS to focus you, giving your party members to acomplish their role without worring about being killed. 5.1 Support Tank I though of this type of play style a lot but it dosnt seems very convincing since there are many better supports in the game (palas druids, etc). Its the same as the "PvP Tank" previously mentioned before but this time with a slightly change of skill Your role as this type is to protect your dds/healers from anyone who comes to annoy them I guess thats it Thank you for reading this and #BuffWD ty


-
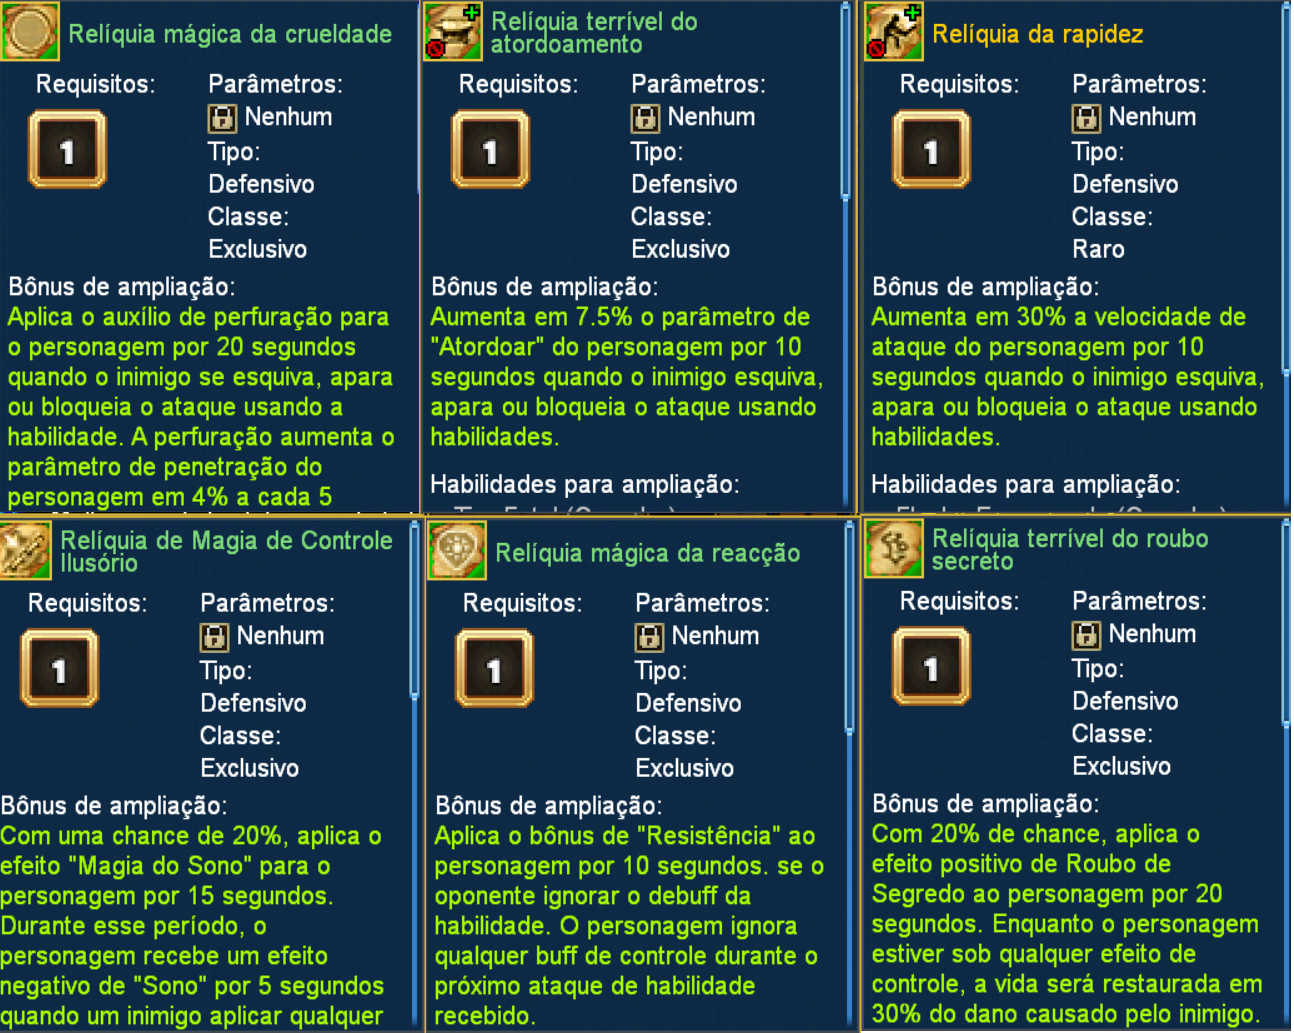
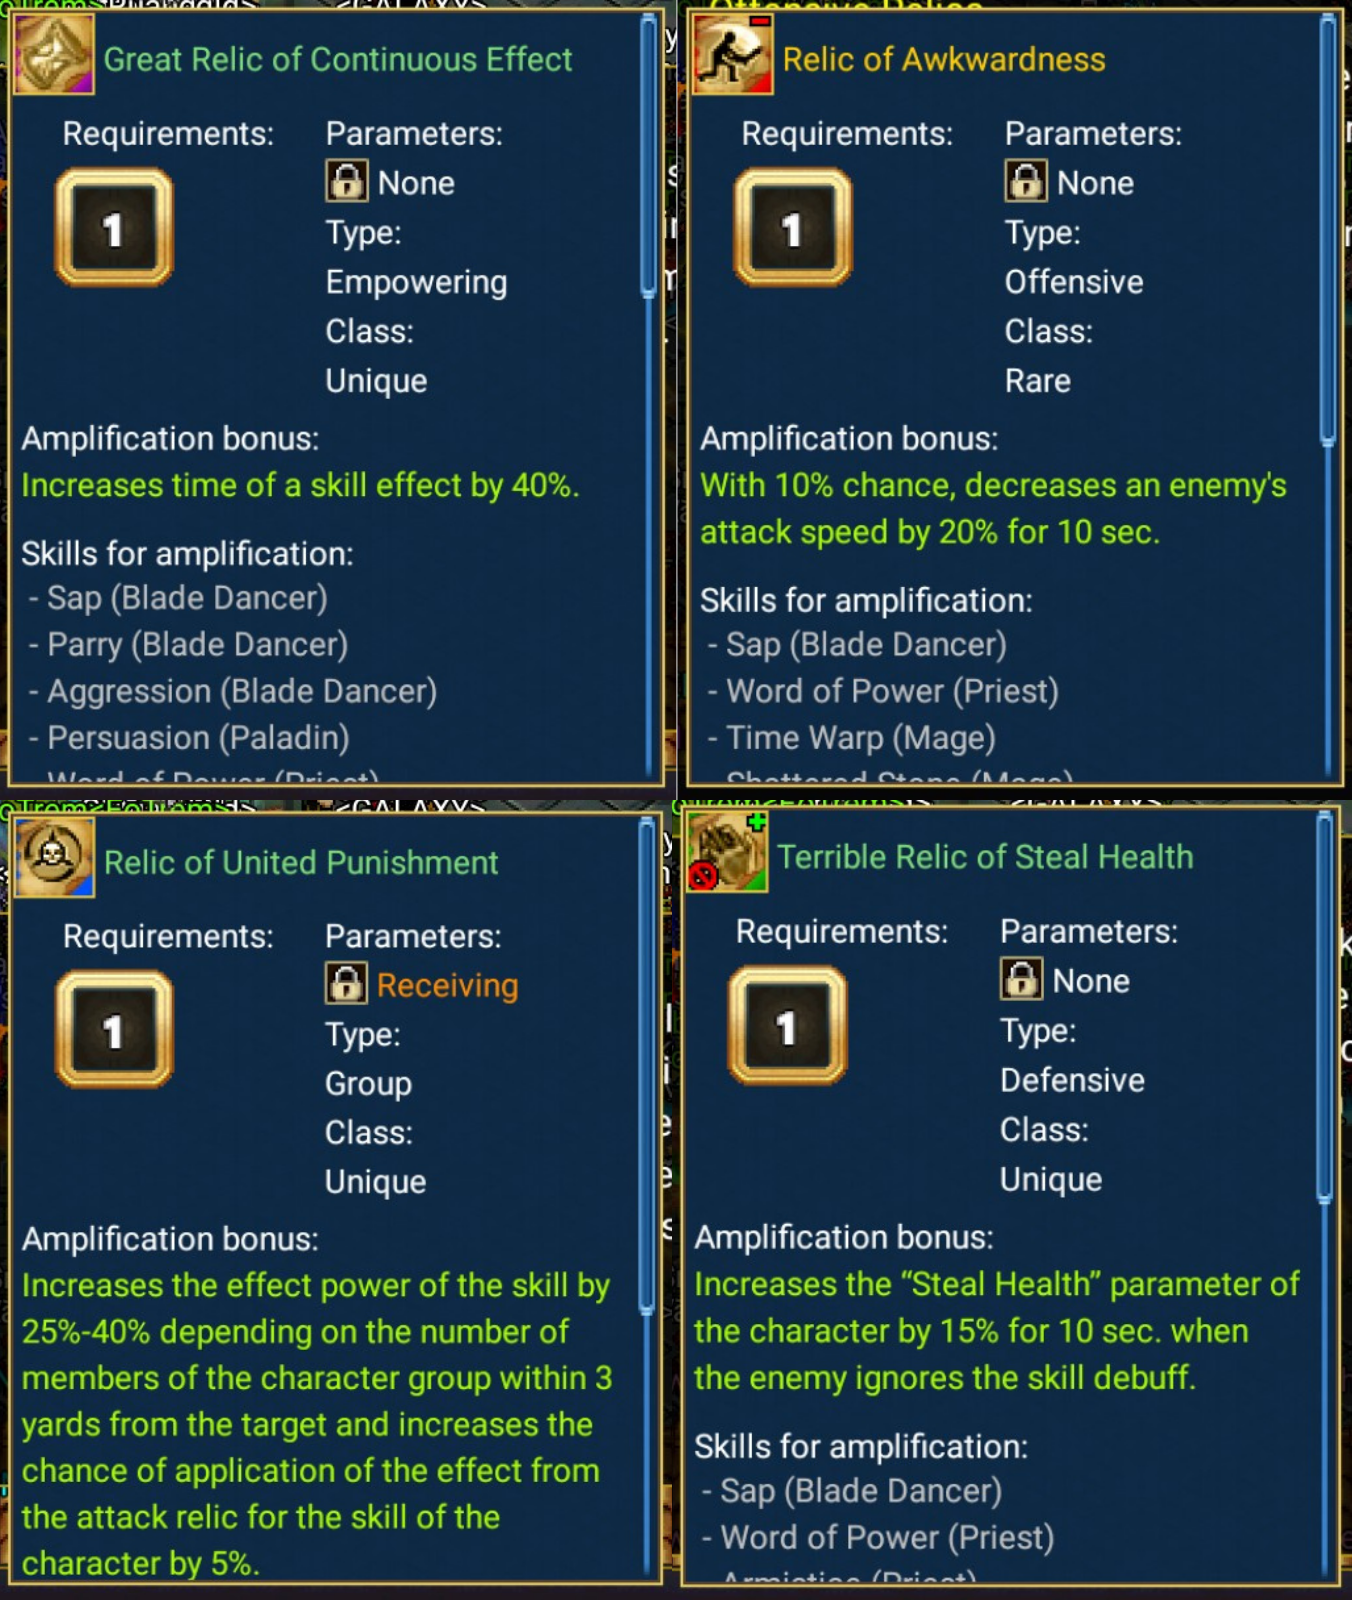
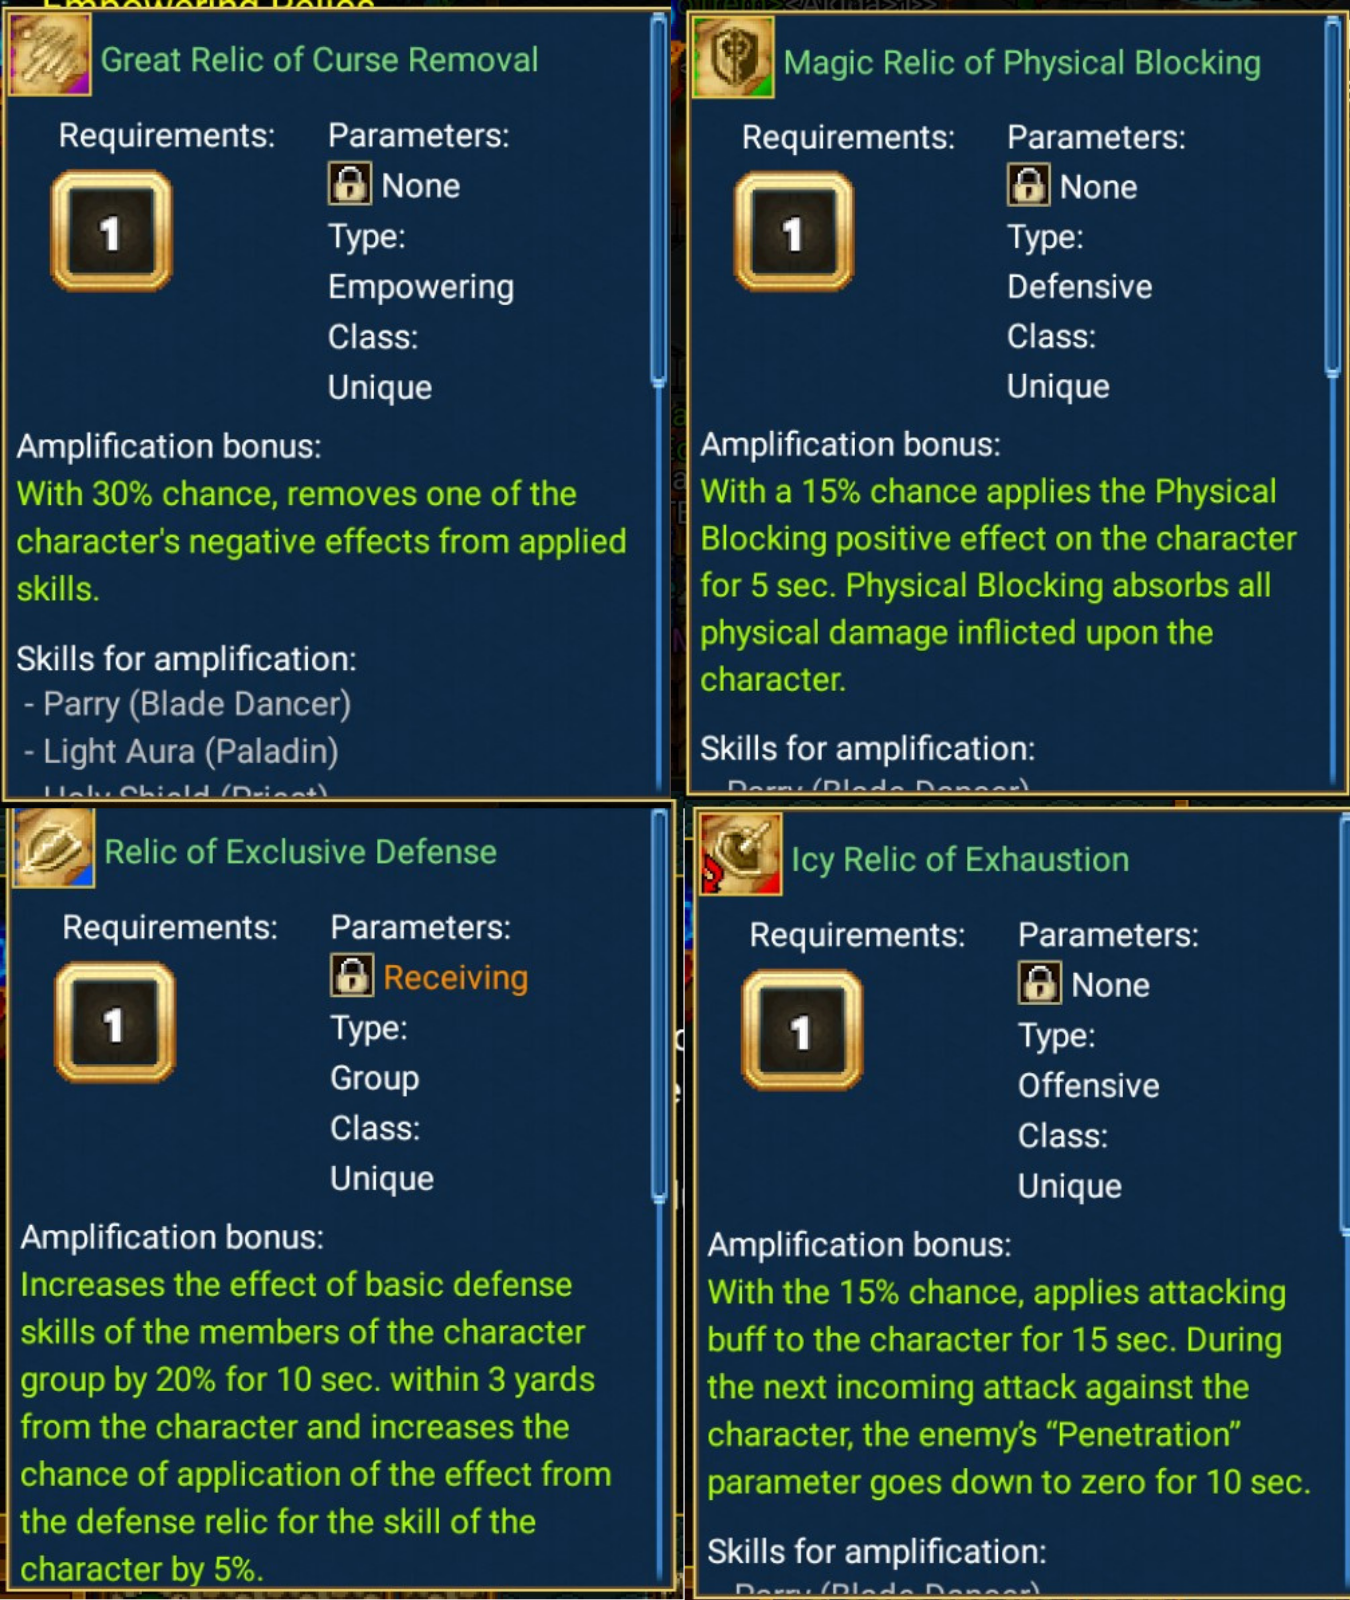
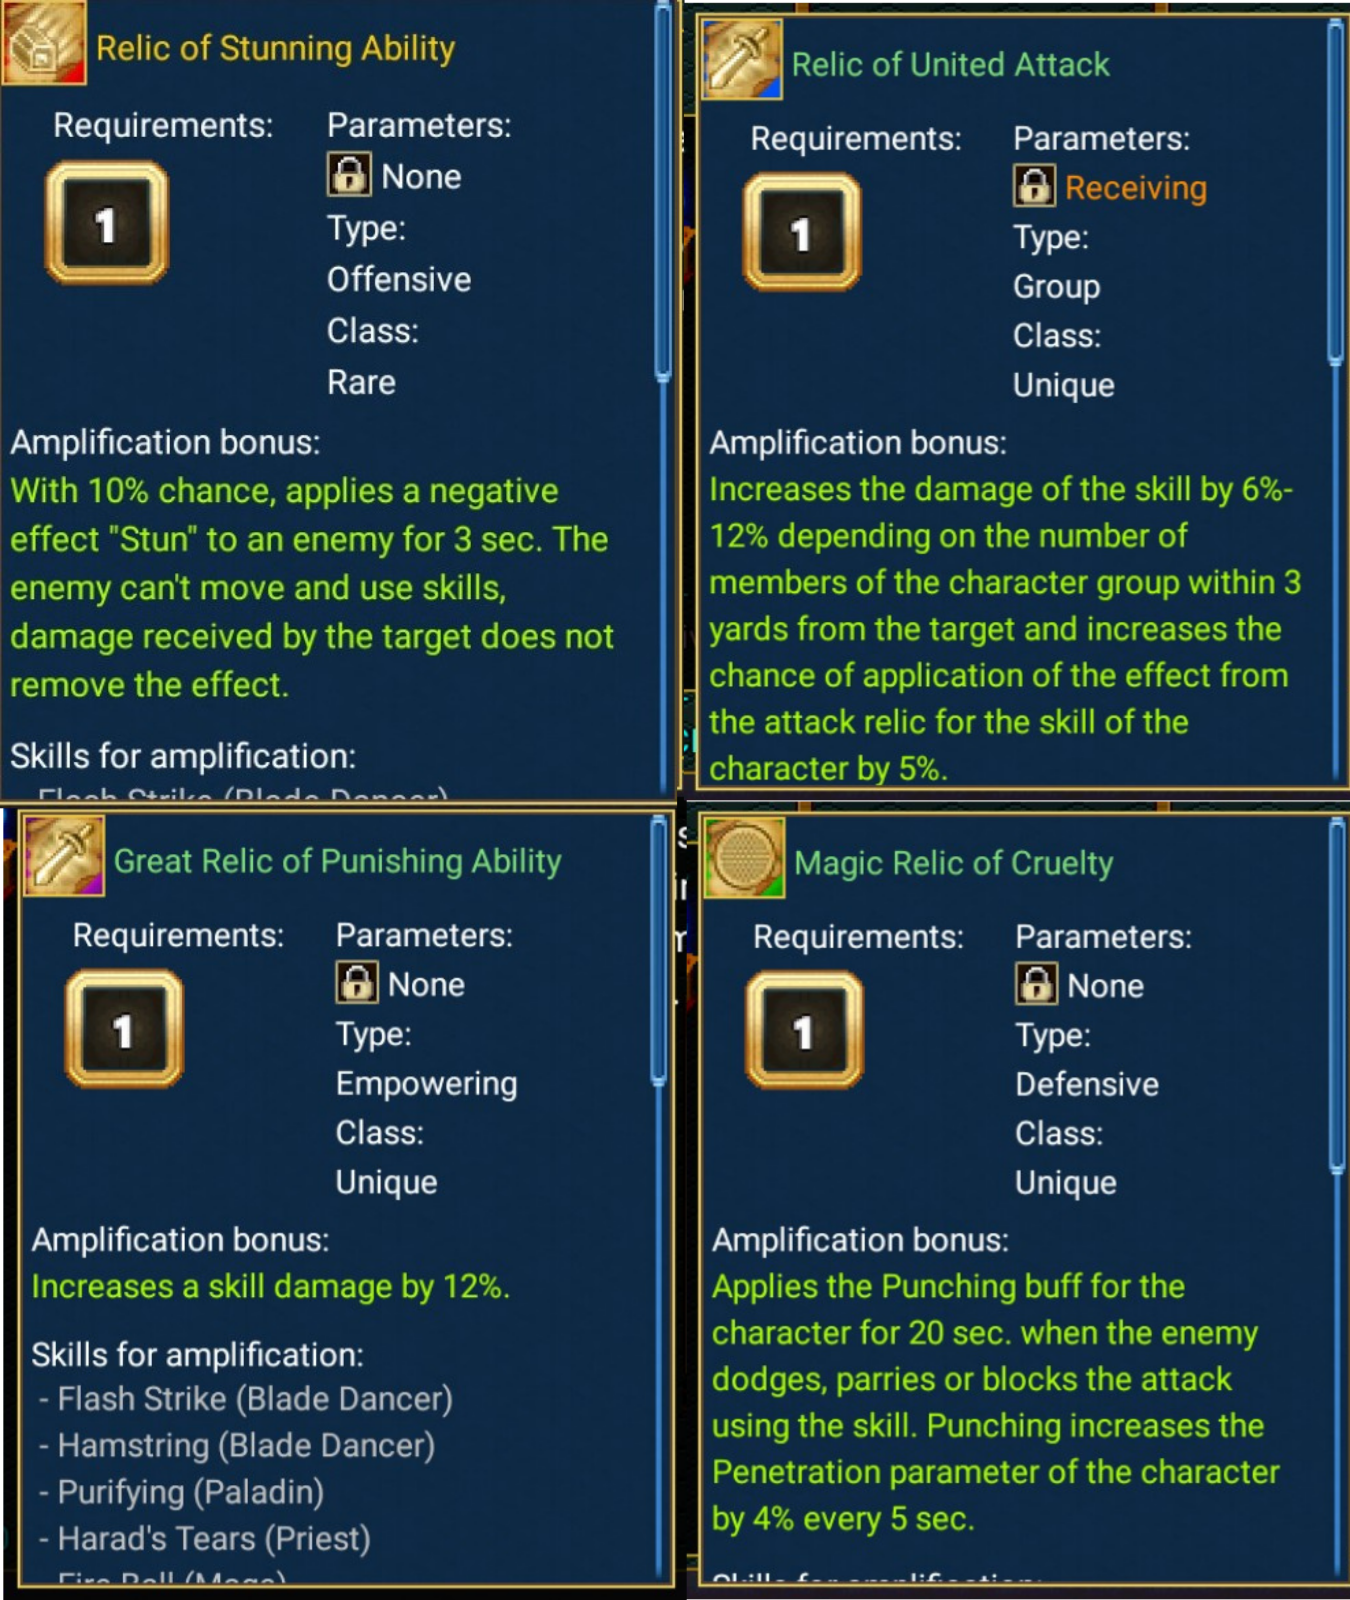
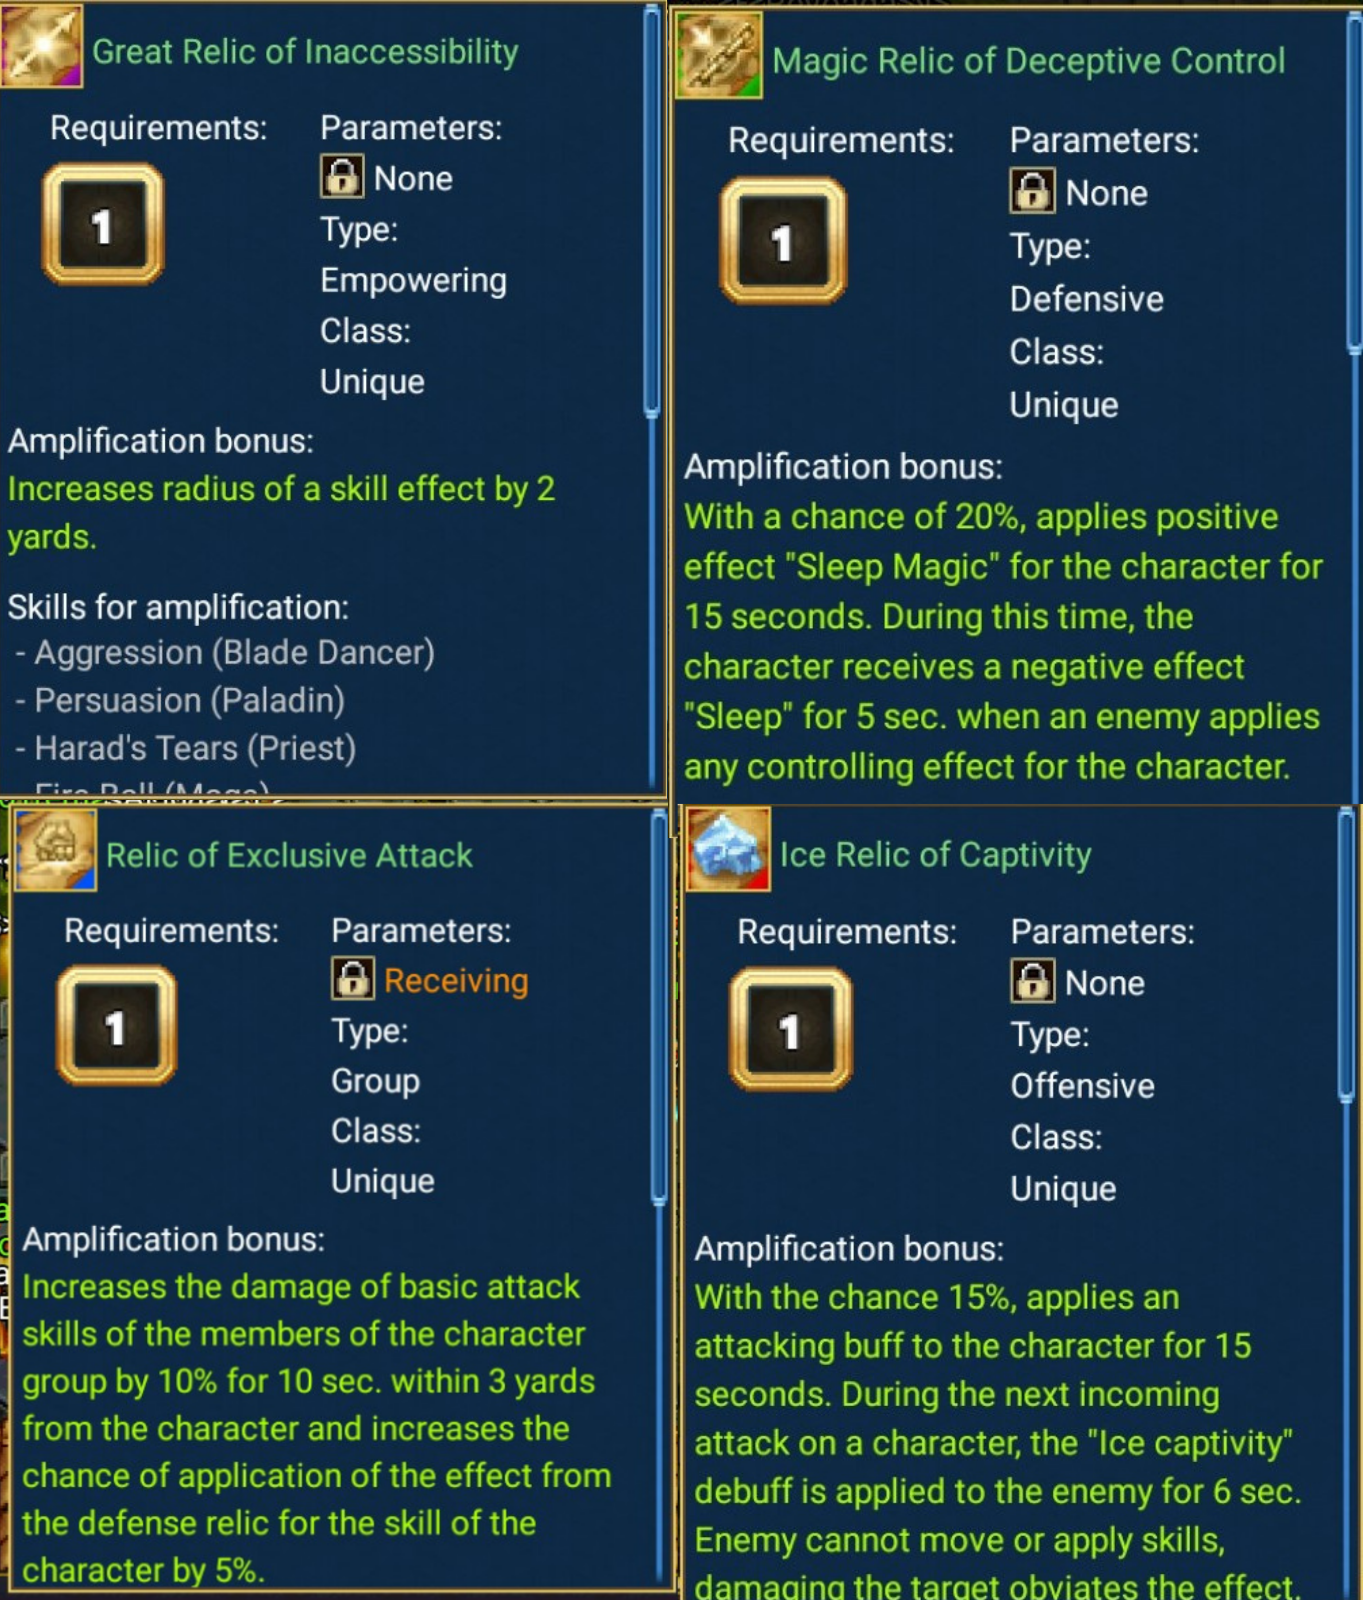
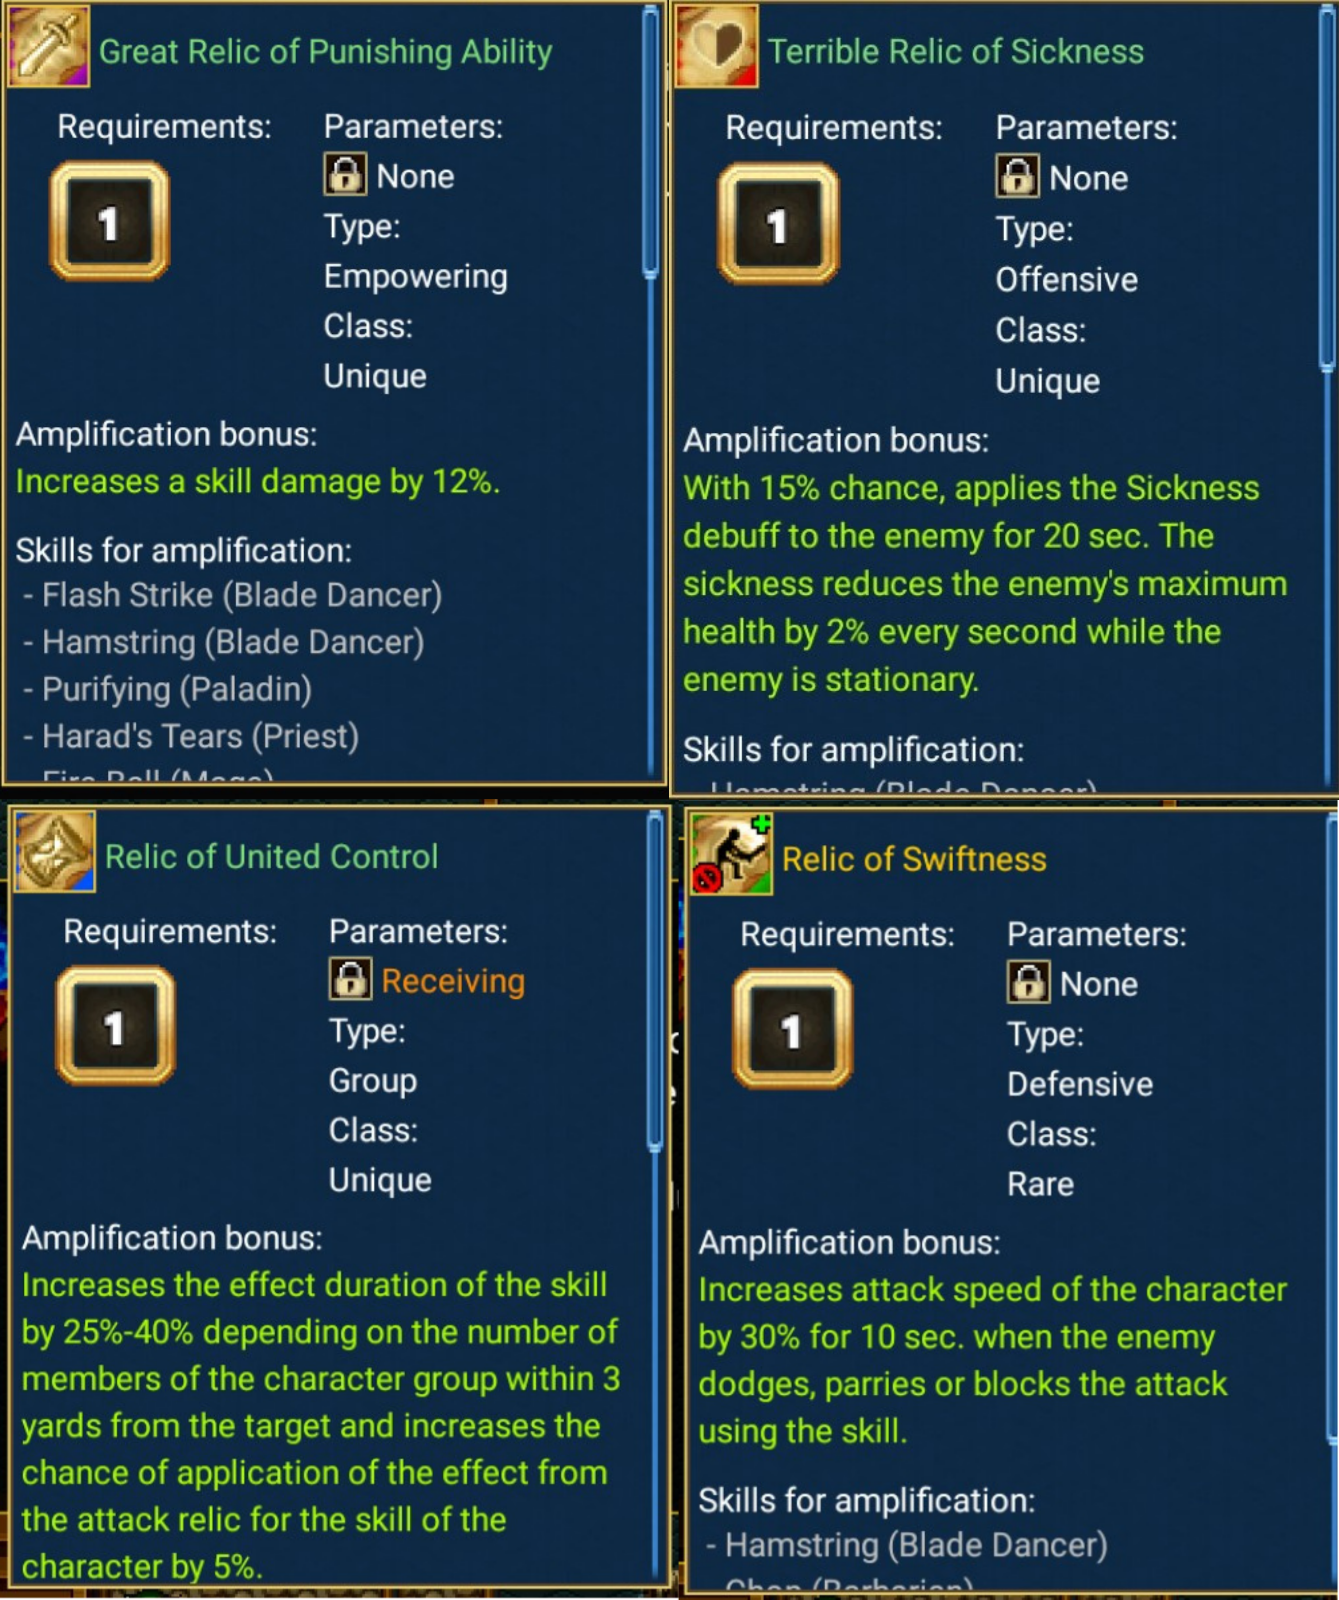
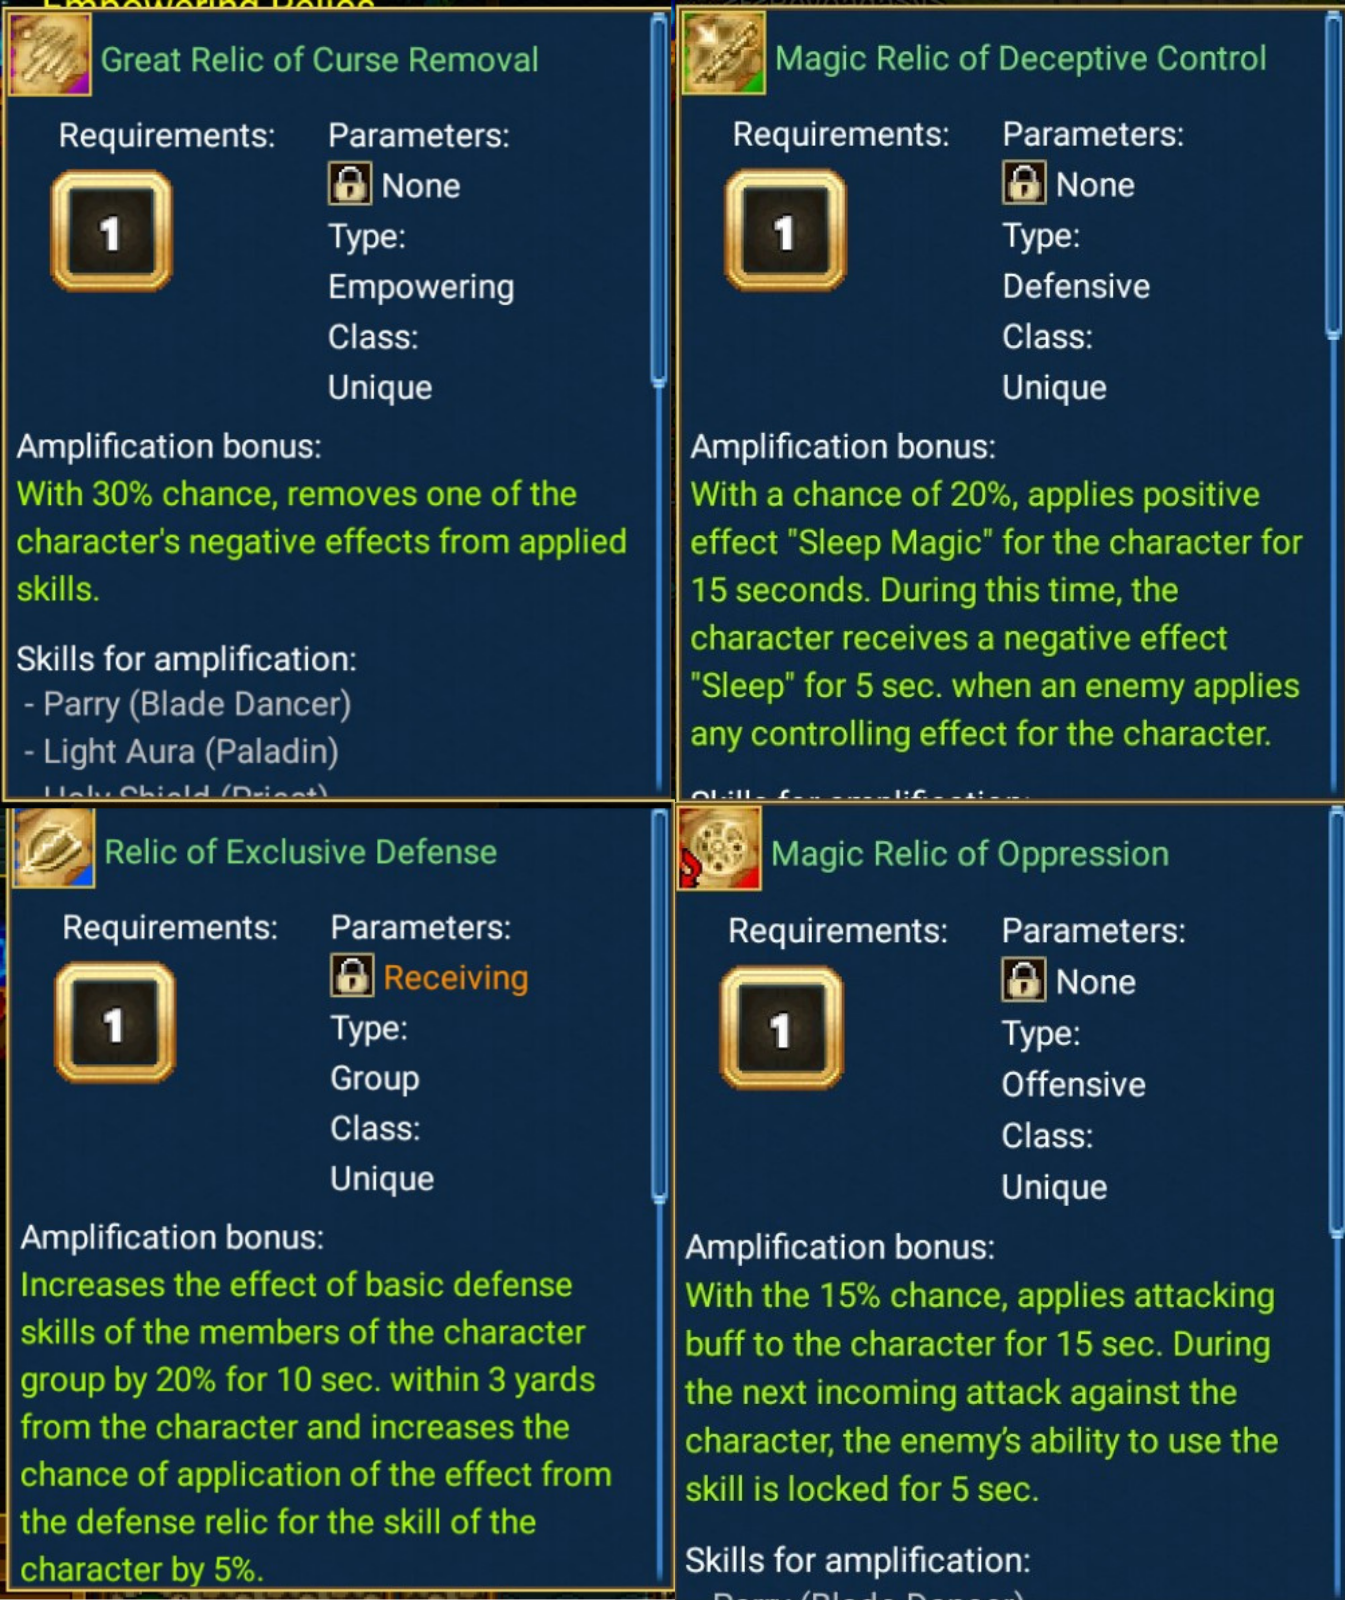
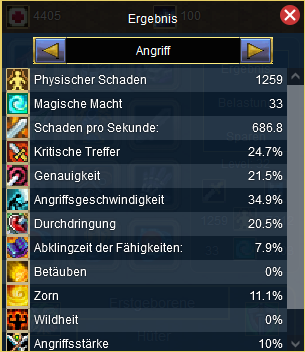
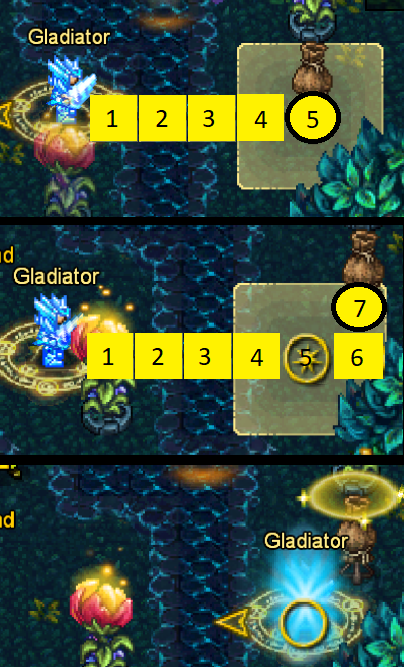
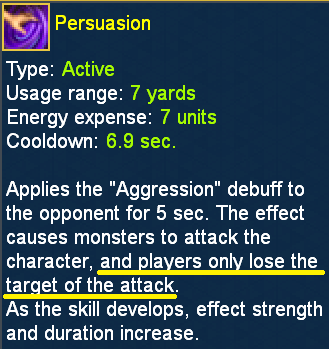
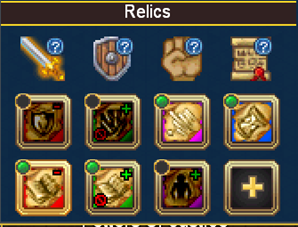
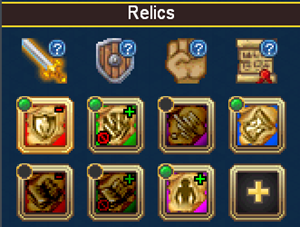
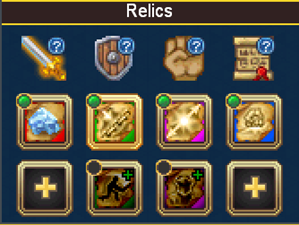
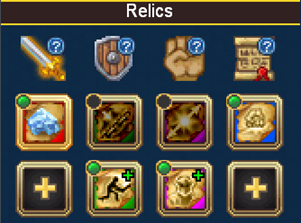
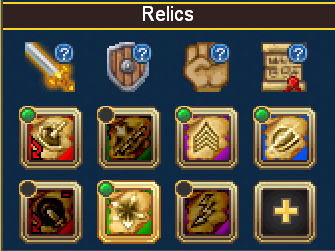
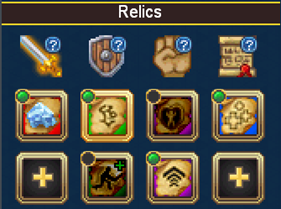
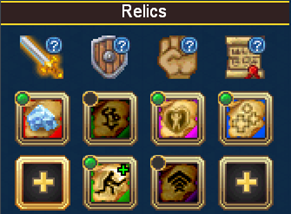
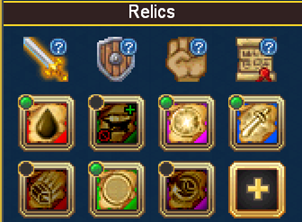
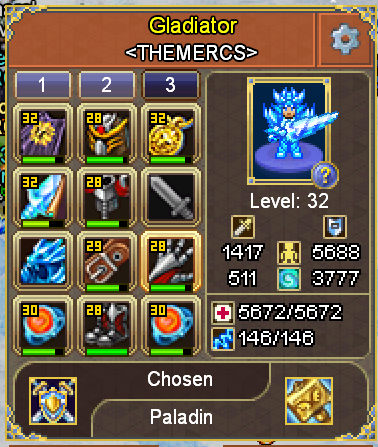
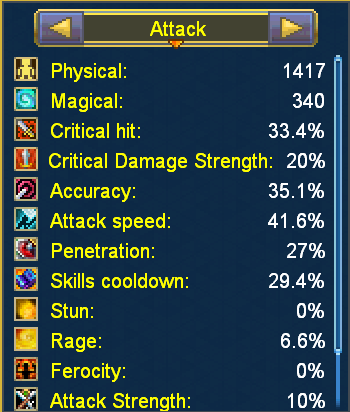
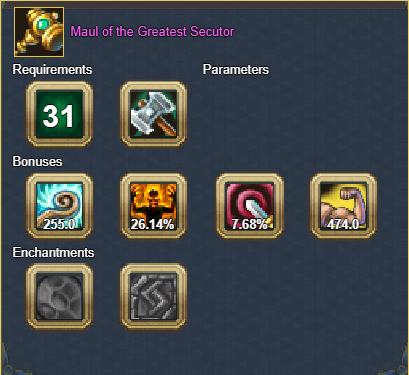
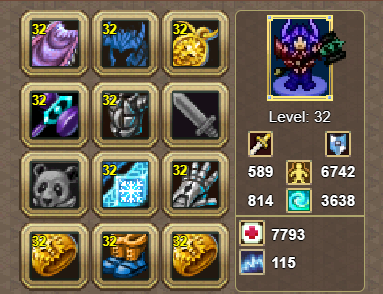
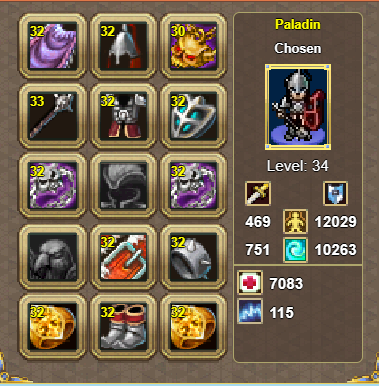
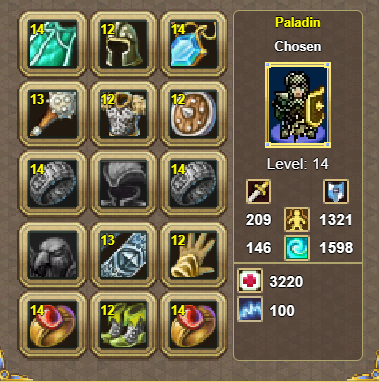
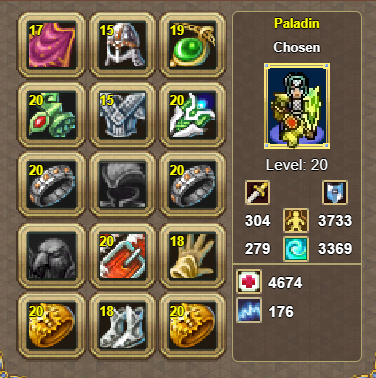
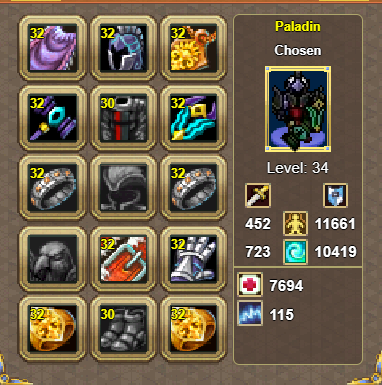
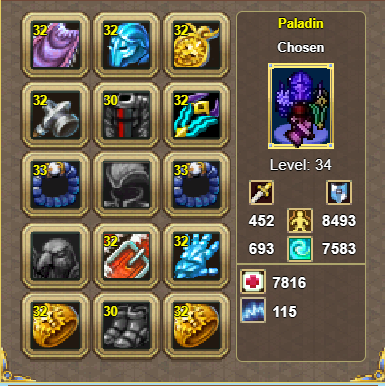
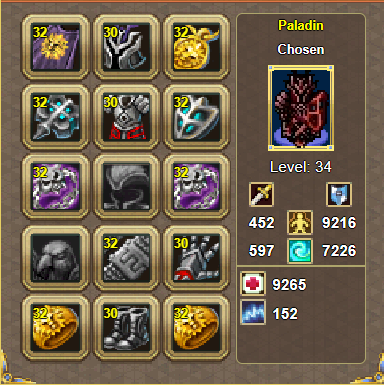
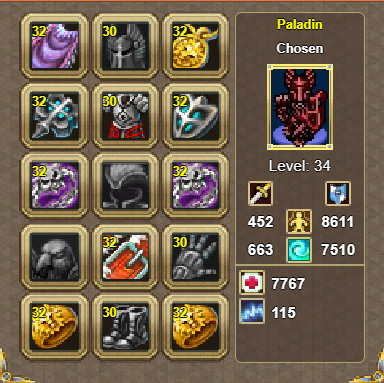
The Master Paladin Comprehensive Guide By Gladiator - US Sapphire !!!This guide is up-to-date as of Warspear Version v12.1.0!!! Table of content: I. Introduction II. Novice Paladins III. General Skill Tips IV. Relics V. Builds 1. Tank Paladin 1.1. Solo Tank 1.2. All-Round Party Tank 2. Hybrid Paladin 2.1. Support/Damage Hybrid - The META 2.2. Crowd Control Master 2.3. The Ultimate PvE Paladin (Spoiler Alert: Spear!) 3. Arena Paladin 3.1. The One True PvP Build 3.2. Master of Duels - 1v1 VI. Talent Branches VII. Summary I. Introduction II. Novice Paladins III. General Skill Tips IV. Relics V. Builds VI. Talent Branches VII. Summary


-
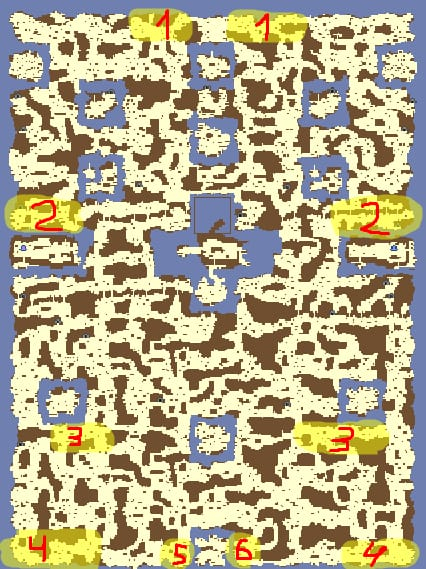
Hello, I'm Noro and I been exploring the desert island to find out every dynamic that exist and how to activate them . This is still too early and most of what i write is speculation but it's better to have more ppl to help than doing it myself so here is my knowledge about them!The one's that are speculation will be marked with question mark. if you know more about them let me know down in comments. Desert Gang Extermination Location: Duration: 24h Cooldown: 0h Activation: Always on Task: Kill mobs in area to spawn mini bosses and kill 2 of them to access the tent where final boss is Access: from finishing story quests Notes: This dynamic is reseted with daily quest and have 3 entrances which lead to the same boss. Power and Freedom Location: Duration: 3h Cooldown: 1h Activation: automatically after cd Task : Kill 15 scorpions and boss Access: from finishing story quests Poisonous Research Location: Duration: 24h Cooldown: 0h Activation: always on Task: Finish research by getting items and fight a boss Access : from finishing story quests Fallen Comrades Location: Duration: 1h 30min Cooldown: 1h 30min Activation: In the 2 areas there will be mob 12k hp walking on road killing him will activate dynamic Task: Collect 10tokens and hand it to npc Access: Experienced assassin Treasure of Ancient Kings Location: Duration: 1h 30m Cooldown: 2h? Activation: upon entering after cooldown Access: novice assassin Task: Collect 3 relics Notes: this dynamic is inside building Scorpion Relic Location: Duration: ? Cooldown: ? Activation: ? Access: Experienced assassin Notes: This one is known from announcement but that's only location , never saw it either in test or real server (eu) active Help for the Rebels Location: Duration: 1h 30m Cooldown: 2h? Activation: killing sand spirit? Access: Novice assassin Task: collect 3 different supplies Notes: Metal in down right corner after killing mobs (12k hp), supplies in down left corner after killing the squad, water in mid left after killing the squad. PS. Adventure side i add later but they are similar just different tasks but activation conditions should be same? not sure


-
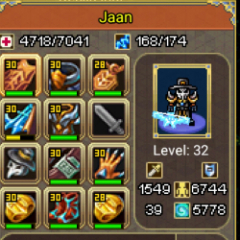
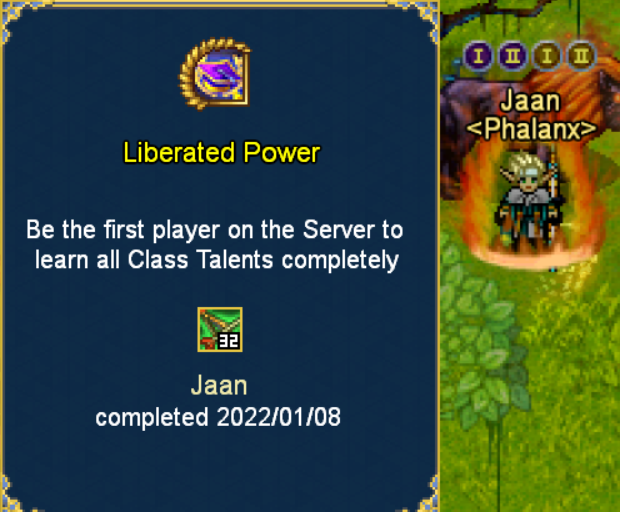
Knowledge Guide Collecting Knowledge seems hard for some people, in this guide I'm trying to show you how I have done my Legendary achievement, the easiest way how to finish Knowledge talents, how to get Knowledge the fastest, how much Knowledge you can get in a single day and way more. First of all, What is Knowledge? Knowledge is a ressource you need to level up the Class Talent. Each class is divided into a category, for example, there are 4 Categories. Each Category has their own Special Talents: Damage Dealing -Blade-Dancer, Ranger, Seeker, Mage, Hunter, Rogue, Chieftain & Warlock Tanking -Warden, Barbarian, Paladin & Deathknight Hybrids Templar & Charmer Healing Druid, Shaman, Priest & Necromancer Class Talentes are splitten into 3 different Sections. ( Offensive, Defensive and Auxiliary) Offensive: Defensive Auxiliary Since we spoke about the talents, lets speak about, what you need to do to get Knowledge, how to gain Knowledge & where to get Knowledge. You can get Knowledge from : - Dungeon (900 limit daily) - Dynamics in Underwater Map - Raid Bosses - Quests (900 Limit daily) - Guild Events - Daily Login Awards - Battlepass Dungeons: You can get Knowledge from dungeons. The higher the difficulty of the dg, the more Knowledge you get. In my opinion the easiest and fastest way to get Knowledge in dg is Easy Tree. The Dungeon is located at Marakosh(t3). The dg takes 2 minutes solo as damager, in a party of 3 people, it takes less than 90 seconds to finish this dg. 8 runs needed to finish the daily limit of Knowledge in Easy tree. That way, it will only take you around 10mins to finish the daily dg. - Easy 120 Knowledge each run. - Normal 135 Knowledge each run. - Hard 150 Knowledge each run. - Heroic 165 Knowledge each run. - Mythical 180 Knowledge each run. Dynamics in Underwater map: There are 6 dynamics daily, every single one of them gives Knowledge. The upper ones are easier than the down ones. You are only able to do them if they are activated. How to activate them? How to finish the dynamics? Dynamics 1-4 has no cooldown to activate. Dynamic 5-6 do have a cooldown of 3h. Once it's activated, you got 90 minutes to finish the dynamic. You can receive 450 Knowledge daily from Dynamic. - 1. Blowfish Monster. Reward 75 Knowledge - Kill 6 Elite Mobs at the upper part to activate this dynamic. - Kill 20 Horros of the Deep. - Kill Blowfish Melanodon. - 2. Infamy of the White Sharks. Reward 75 Knowledge - Kill 5 Pirate Baits to activate this Dynamic. - Kill 15 Pirates - Kill Captain Thomas the White Shark. (300k Boss) - 3. Will of the Swashbuckler of the deep. Reward 75 Knowledge - Kill 12 Sea Baits in down part of Underwater Section to activate this Dynamic. - Kill 15 Gladiators - Kill Arsinus the Swachbuckler of the Deep. - 4. Oath of the Crimson Waters . Reward 75 Knowledge. - Kill 10 Elite mobs in bottom row to activate this Dynamic. - Kill 20 Crused Octopus. - Kill Mytion Purplewater. - 5. Airless Frigate. Reward: 75 Knowledge. - Kill the Diver in the location to activate the event. - Kill 10 Coral Nauplius. - Collect Cage with small fish at the barrels near the mobs. - Place the bait. - Enter the Lower Deck, Touch the shark and swim to the Ruby. - 6. Merchant's Treasures. Reward 75 Knowledge - Kill the Diver in the location to activate the event. - Kill 10 Creepy Ampullaria. - Kill Crustacean Mutant - Collect Faceless’ Amulet, Eastern Coin and Golden Turban. (Down left, up right and up left.) Raid Bosses: This is the hardest thing to keep track on. Every Raid Boss gives Knowledge. The Raid Bosses die pretty fast, so you have to be prepared to get to them in time. You don't have to attack the raid boss or do anything. You'll receive Knowledge just by standing there. Max Knowledge you can get from Ayvondil Raid Bosses are 400 daily. The Black Elm - Located at Marakosh/Anzu-iri (T3) - You will receive 100 Knowledge after it's dead. Engineer - Located at Pelion/Tom-Lugu (T4) - You will receive 100 Knowledge after it's dead. Captain Giant Octopus - Located at the Underwater Map, up from Doom Island. - You will receive 100 Knowledge after it's dead. Orcinus - Located at the Underwater Map, up from Lonely Island. - You will receive 100 Knowledge after it's dead. Event Raids - There are usually Event raids at Horror, Snow and Spring Event. - Each of them usually gives 60 Knowledge. Quests: Quests are the one of the easiest thing to get Knowledge from. Each town in Ayvondil gives different amount of Knowledge. The harder the town, the more Knowledge you get. For me, as mcoin user, the fastest way I finished quests was. Get Quest at Marakosh, (T3) Take the collecting quests and buy the items from the Miracle coins shop, after you've done that.. you only need to finish 5 more quests to gain the max Knowledge after that. Easiest way to finish Knowledge.. Finish Pelion (t4) quest. Kronus's Labyrinth/ Astral Labyrinth - 60 Knowledge each Quest Norlant Swamps - 60 Knowledge each Quest Maliat (T1) - 60 Knowledge each Quest Tlaskoe (T2) - 60 Knowledge each Quest Marakosh/Anzu-Iri (T3) - 70 Knowledge each Quest Pelion/Tom-Lugu (T4) - 70 Knowledge each Quest Albatross Harbor/Thunderbird Port (T5) - 80 Knowledge each Quest Guild Events To be able to get Knowledge from Guild Events, you should try to join a higher level guild, the chances to get the max Knowledge daily is very high there. Being in a lower level guild, would make it more difficult to gain Knowledge, since higher level ones are more active. My guild has finished this event daily, So I was able to get 1400 Knowledge daily just from Events. (2x Music of Magic, Wild Hunt) 4 GP Events daily. How to do them? Wild Hunt - 12 Hours Cooldown, can be done twice a day. - You will receive 100 Knowledge after the event was completed, (200 Knowledge max a day) - Find Rottung in Castle's and kill it. Music of Magic - 12 Hours cooldown, can be done twice a day. - You will receive 100 Knowledge after the event was completed. (200 Knowledge max a day) - Kill Nocturna Filth's Dungeons (Maliat t1 Event) - 16 Hours cooldown, can be done twice a day. - You will receive 100 Knowledge in the first stage, 150 Knowledge in second stage. - Creatures of the Gray Hollows (First Stage): Kill Hornets/Cavers - Satraps Lair (Second Stage): Kill 8 Satraps (300k Bosses) - Max Knowledge each Event: 250 Knowledge Lord of the Depths (Tlaskoe T2 Event) - 16 Hours cooldown, can be done twice a day. - You will receive 100 Knowledge in the first stage, 150 Knowledge in the second stage. - Cave Predators (First Stage): Kill Ayotls and 2 Chupacabras. - Pontifices Abode (Second Stage): kill 8 Pontifices (300k bosses). - Max Knowledge: 250 Knowledge (500 if done twice a day) Grove of Black Elm (T3 Marakosh Event) - 16 Hours cooldown, can be done twice a day. - You will receive 100 Knowledge in the first stage, 150 Knowledge in the second stage. - Dangerous Plants (First Stage): Kill Faiding Flowers/Malefibloom - Putrid Lands (Second Stage): kill Mistress of the Swarm, Rotten-Bud Ashud, Five-mouthed Goose and Moon-Maned Shandon - Max Knowledge: 250 Knowledge (500 if done twice a day) Rusty Wastelands (T4 Pelion Event) - 16 Hours Cooldown, can be done twice a day. - You will receive 100 Knowledge in the first stage, 150 Knowledge in the second stage. - First stage: Kill 6-8 Baits. You don't need to kill different baits, even killing the same bait, will finish the Stage. - Second Stage: Kill 200k Bosses(Steam & Horse) and Petriks. - Max Knowledge: 250 Knowledge (500 if done twice a day) Special Event During the Spring Event, you can receive Knowledge from Magister Avaris(NPC). You must gain spring reputation to be able to buy Knowledge. You will receive 250 Knowledge for 400 Spring Reputation. Daily Log in Rewards: This Feature is pretty new. You have to log into the game to claim the awards daily. In 20 days, you can get 2000 Knowledge. Day 3: - 500 Knowledge Day 8: -500 Knowledge Day 13: -500 Knowledge Day 18: -500 Knowledge Battlepass In the Battlepass, you get the most Knowledge at once, you will get around 9500 Knowledge from the Battlepass if you buy it, if you don't buy the Battlepass, you will only get 4500 Knowledge. After reaching 850 Points in the Battlepass, you are able to receive a Knowledge buff "Great Knowledge" which increases your gained Knowledge by 20%. In my Opinion, the "Great Knowledge" buff is very needed. You should try to get it shortly. However, the maximum Knowledge you can get in a day is 5050 Knowledge without the Battlepass buff. You need around 500k Knowledge to finish all talents. However, to finish talents in a fast and not stressful way, you should find a very active guild. If you want try to finish Knowledge talents on your own, it will take way longer to finish. Thanks for your attention, I hope this will help some people. Jaan, Eu-Emerald

.gif.435803e734613e439a4207e527ae0393.gif)
.gif.85fc14c706cb117b782a2ec5550bd75a.gif)
.gif.88a181b24002a179dc7a1d01e620fd18.gif)
.gif.7bfd1893a76eae84a1d2a521b528bc3c.gif)
.gif.7657646d0ad3cf8712f717a5b9958826.gif)
.gif.033ba5a6b1d077da46433cfcba6aaafc.gif)
.gif.48dc4a569814cb0394df0d96261b2f39.gif)
.gif.08798197c5c09c414c5e322c4af8bc7a.gif)
.gif.c5a70d430b8df9ce01d36e7834323135.gif)
.gif.c2e0980498ad6ec792345805832ef973.gif)
.gif.011553194958202bb972881d71306a0d.gif)
-
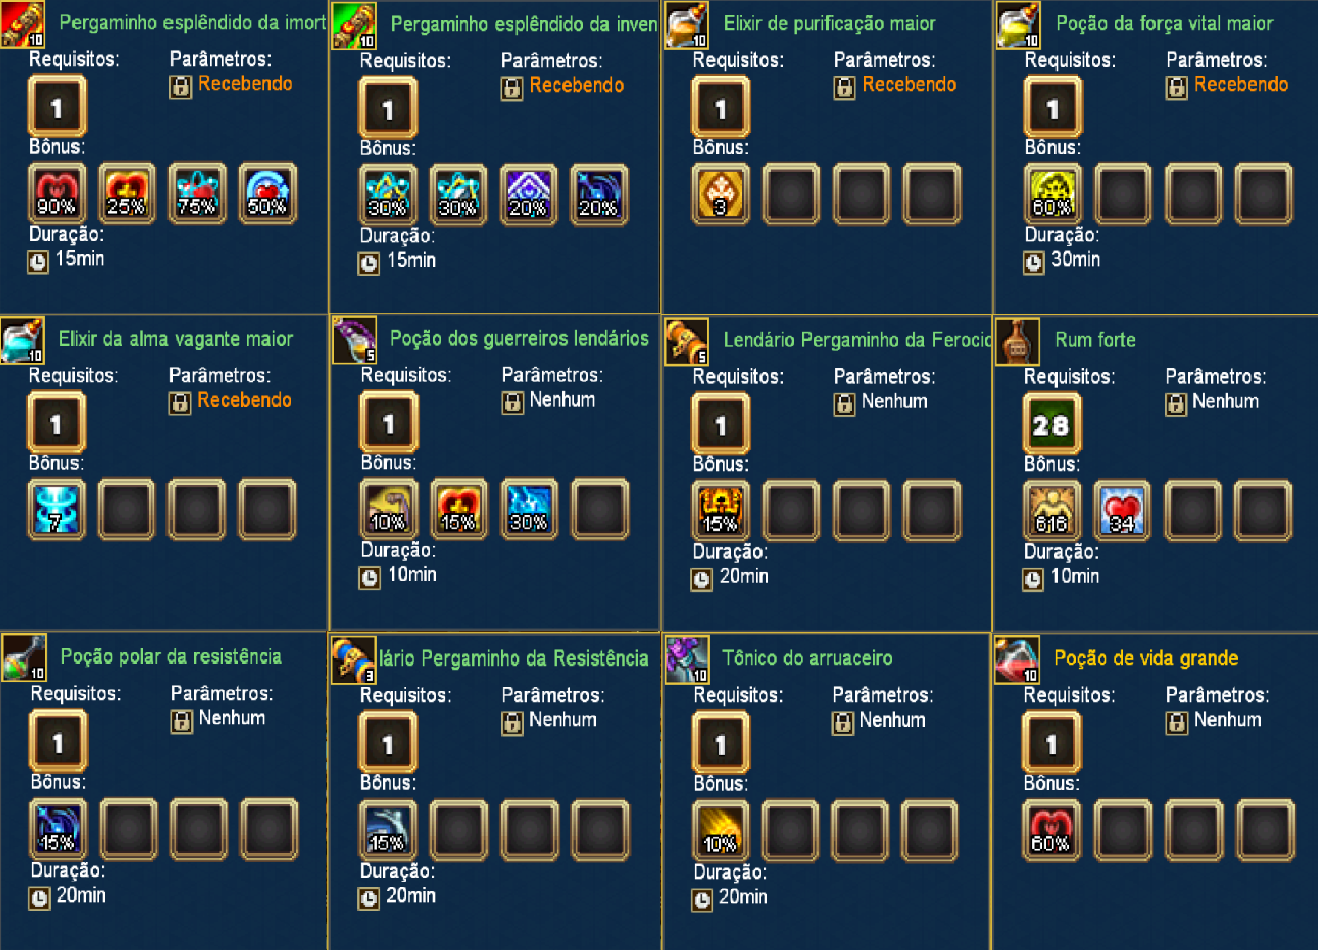
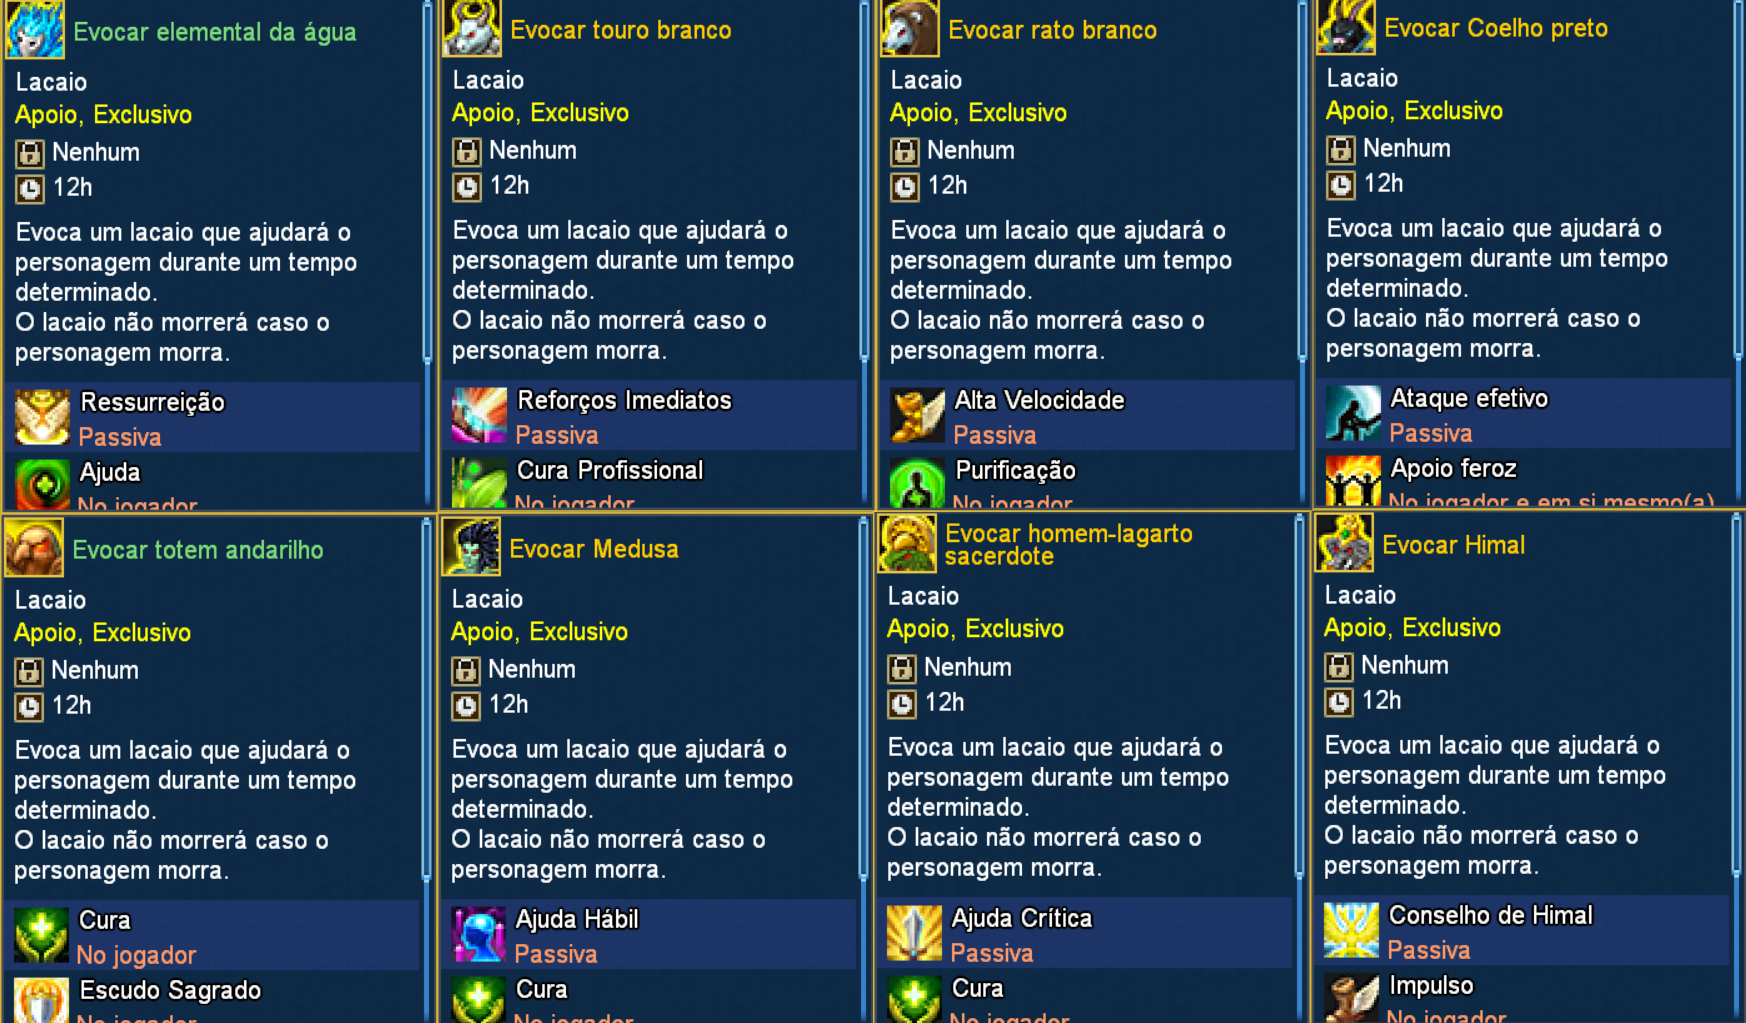
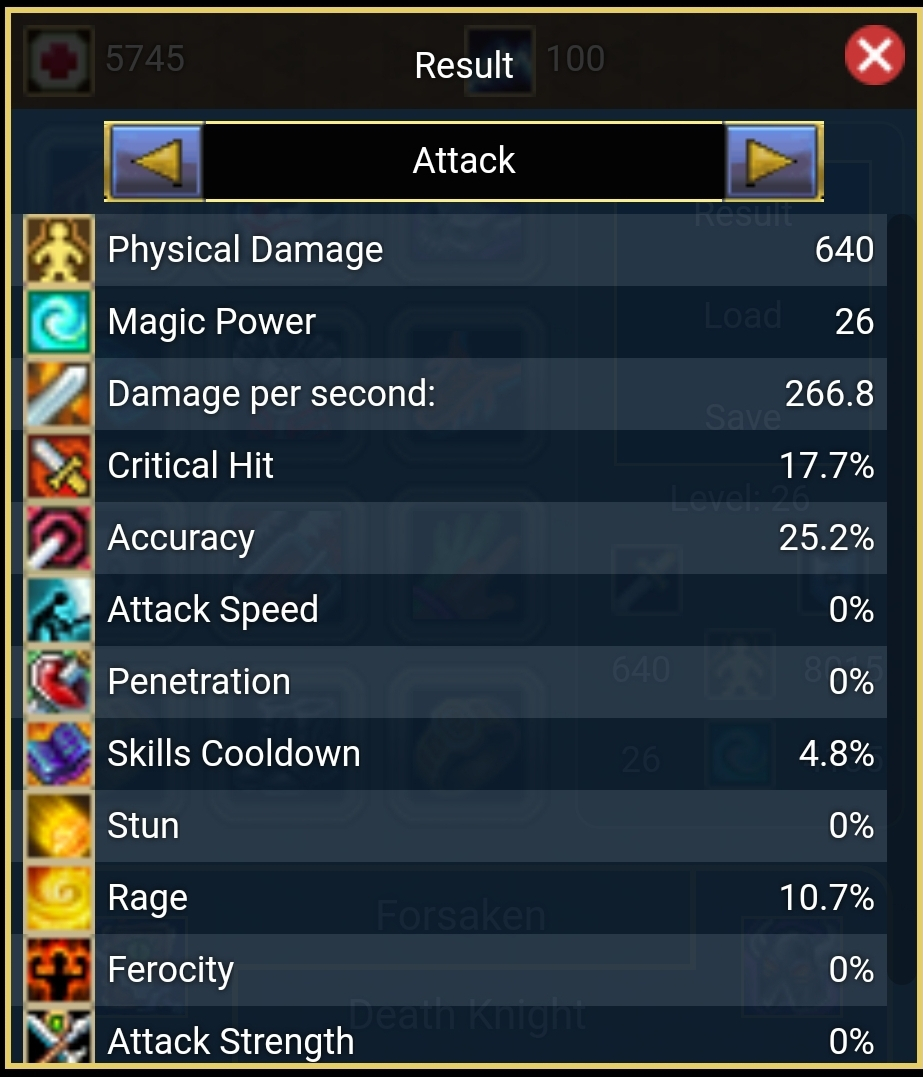
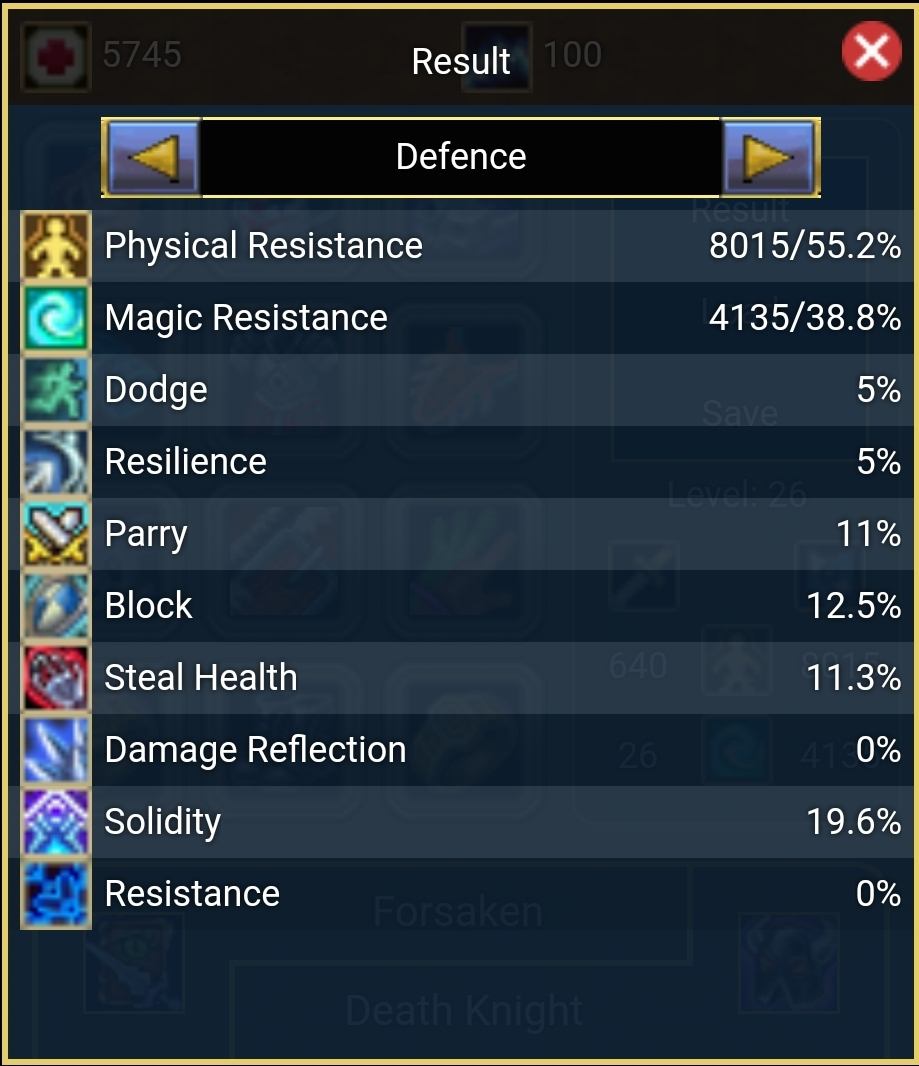
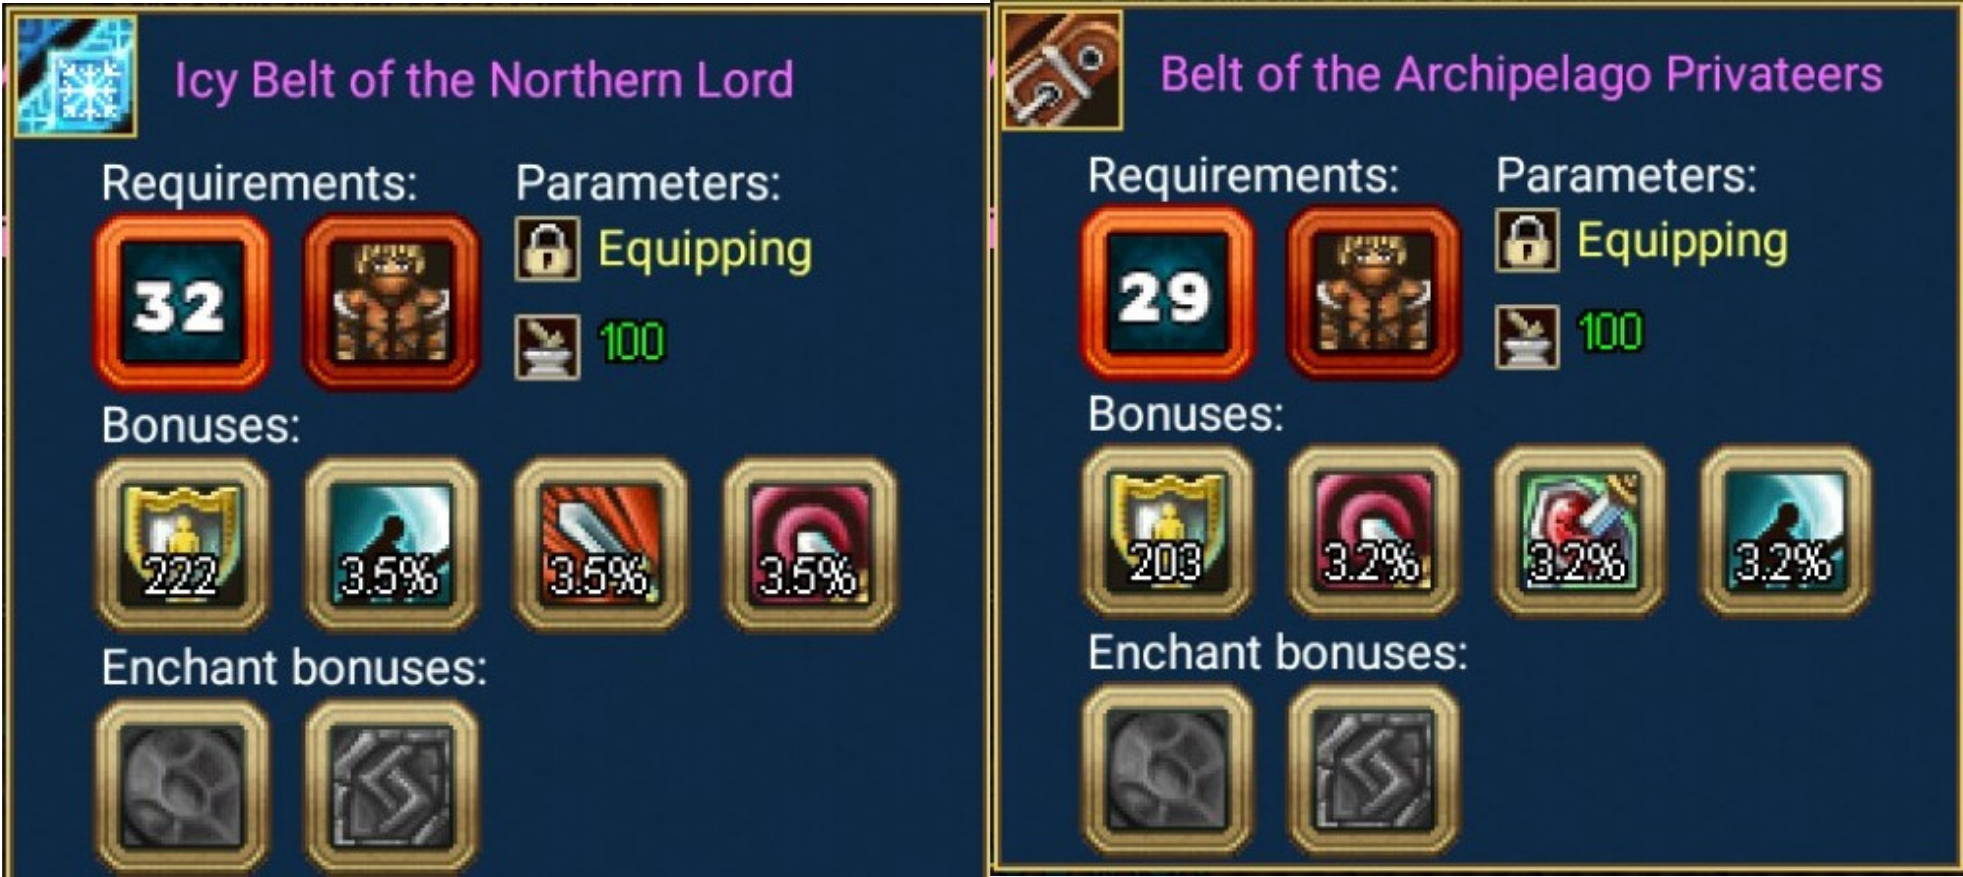
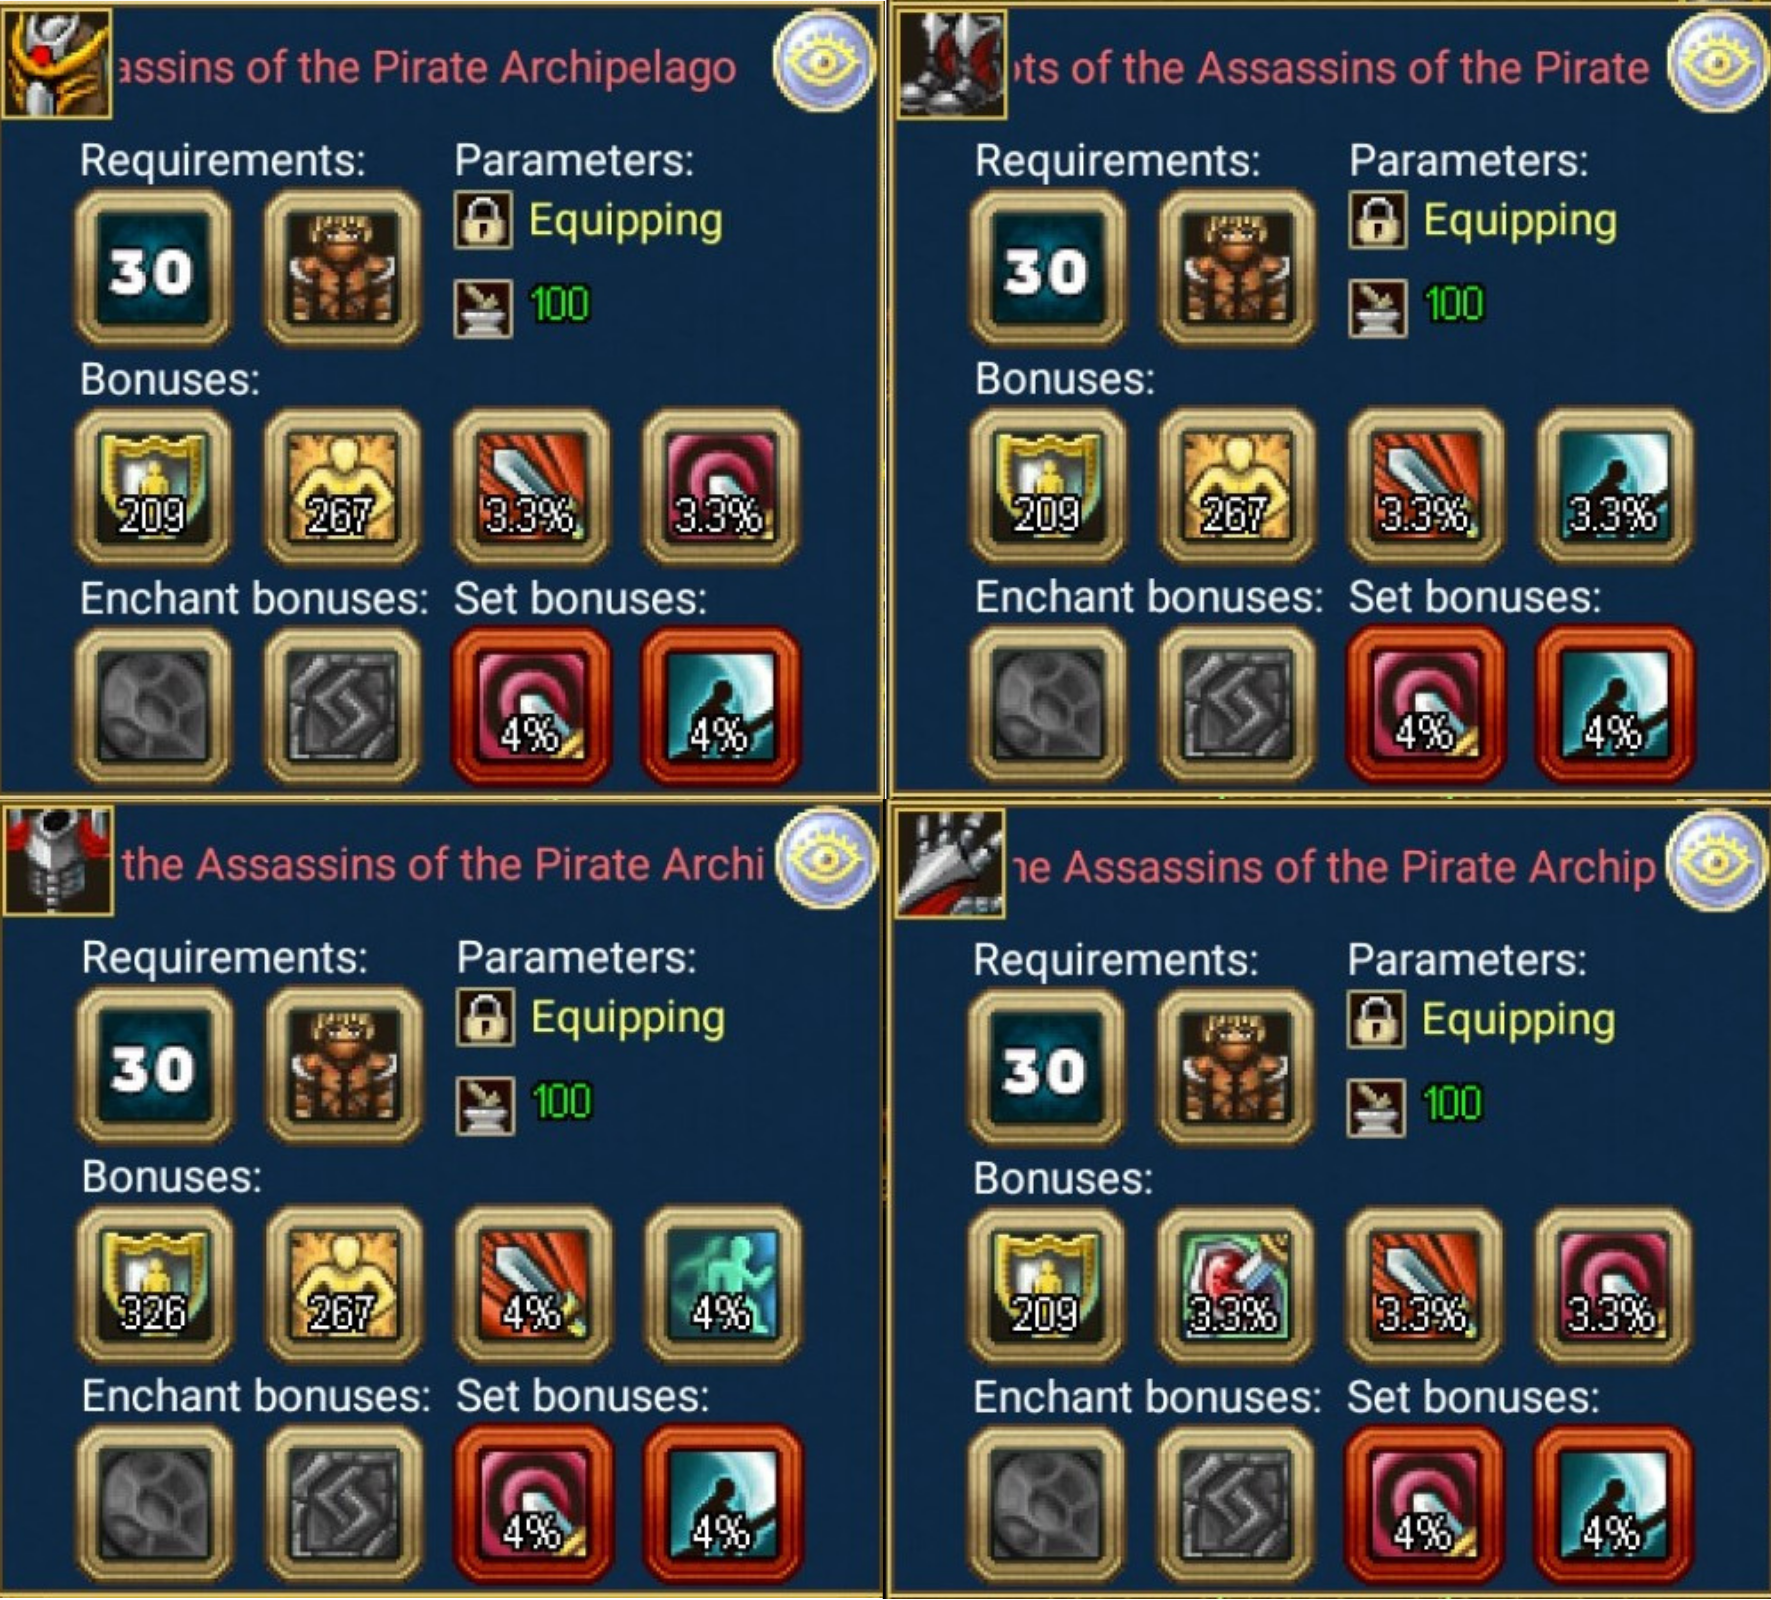
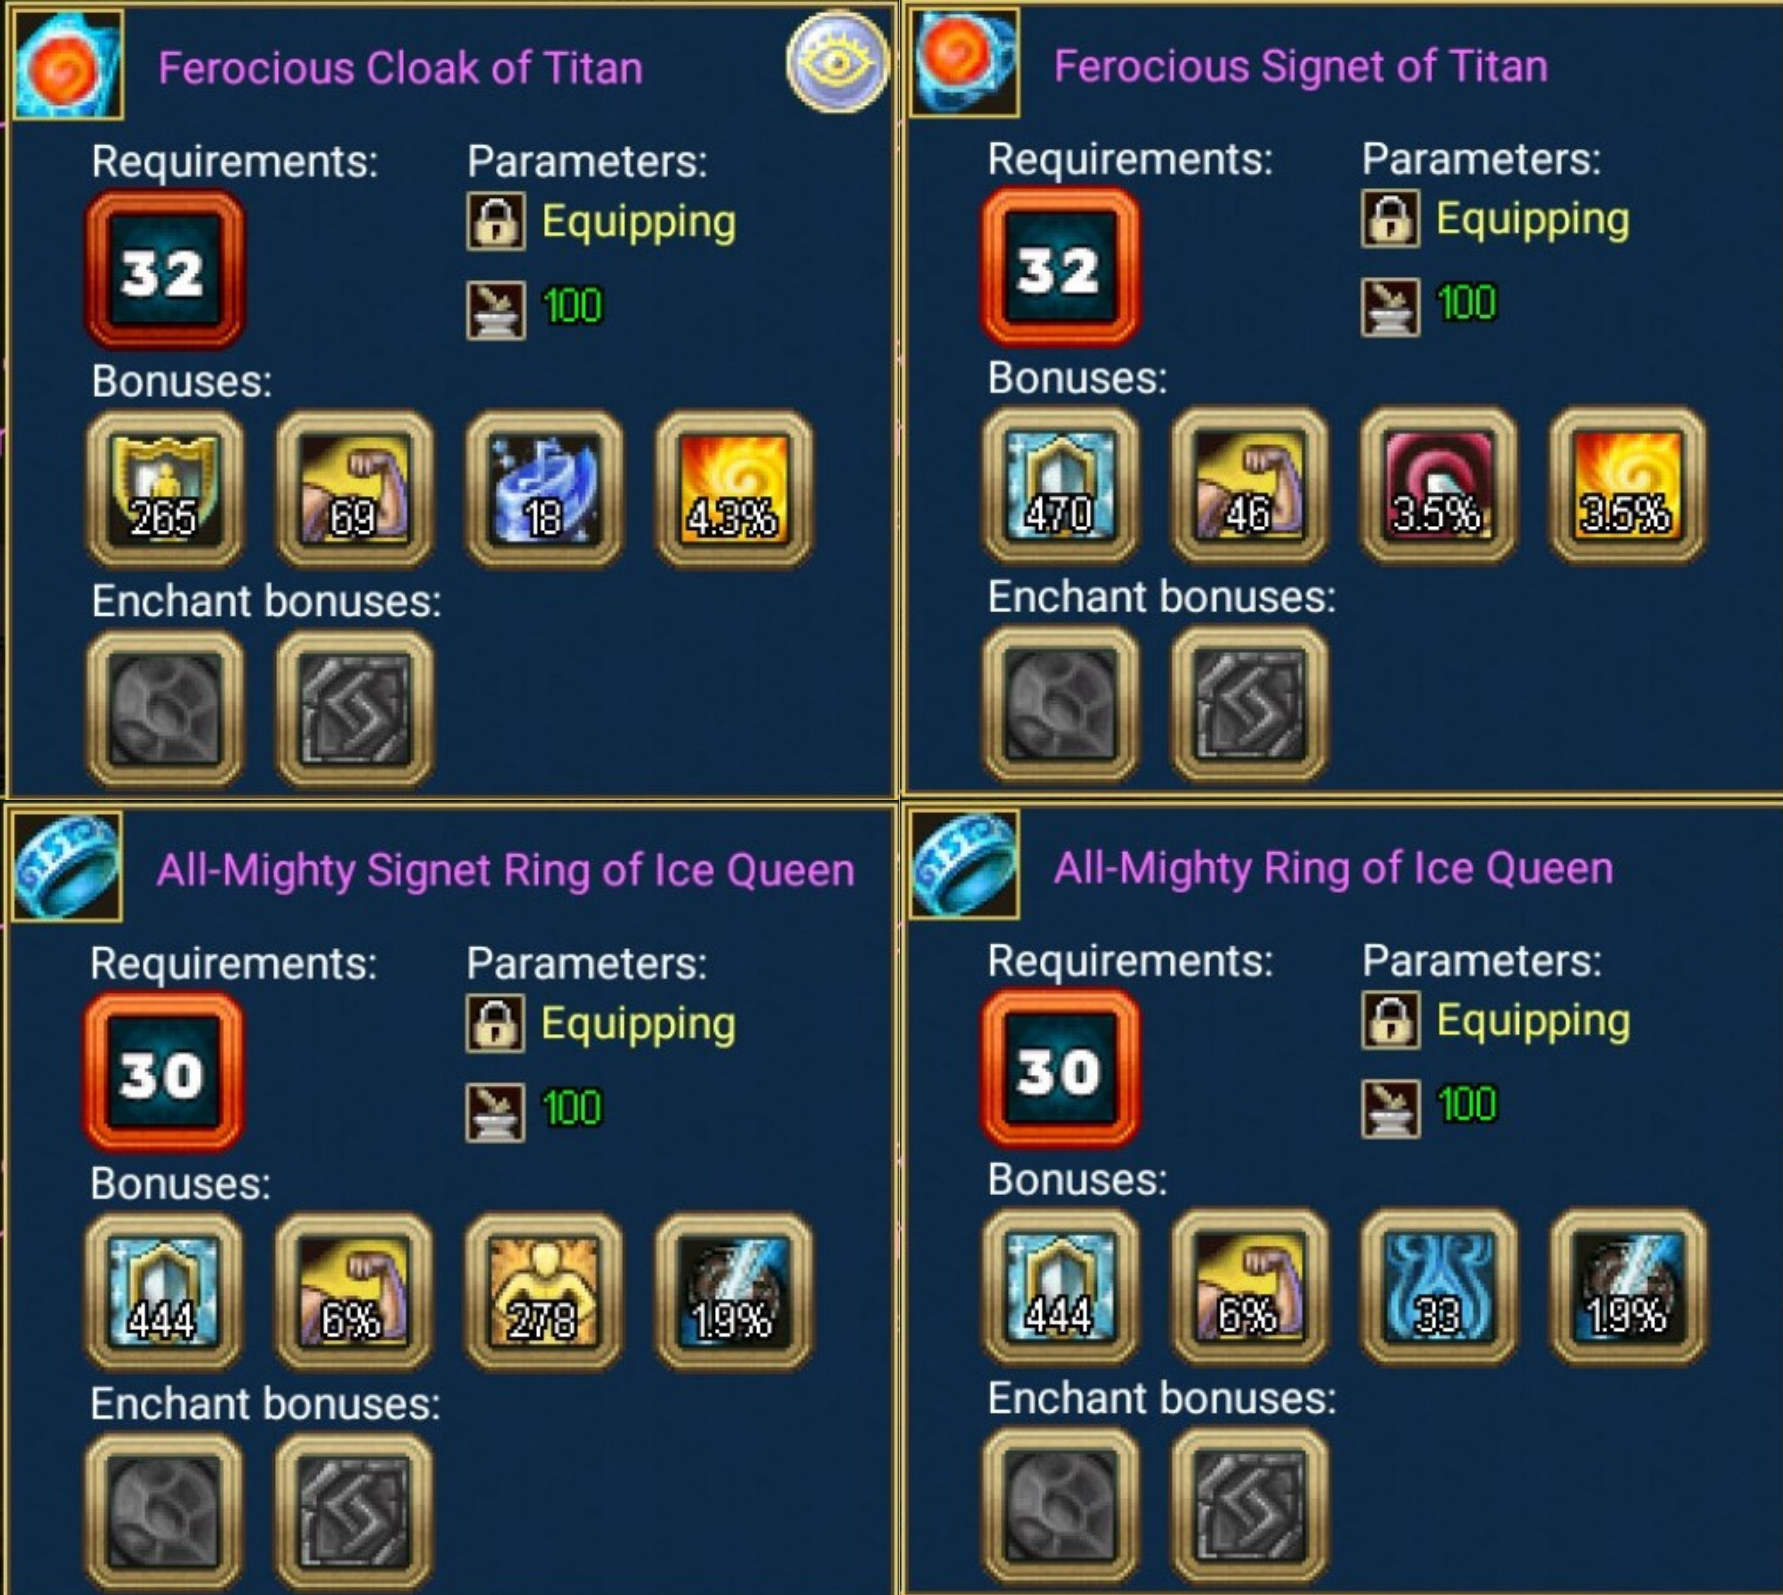
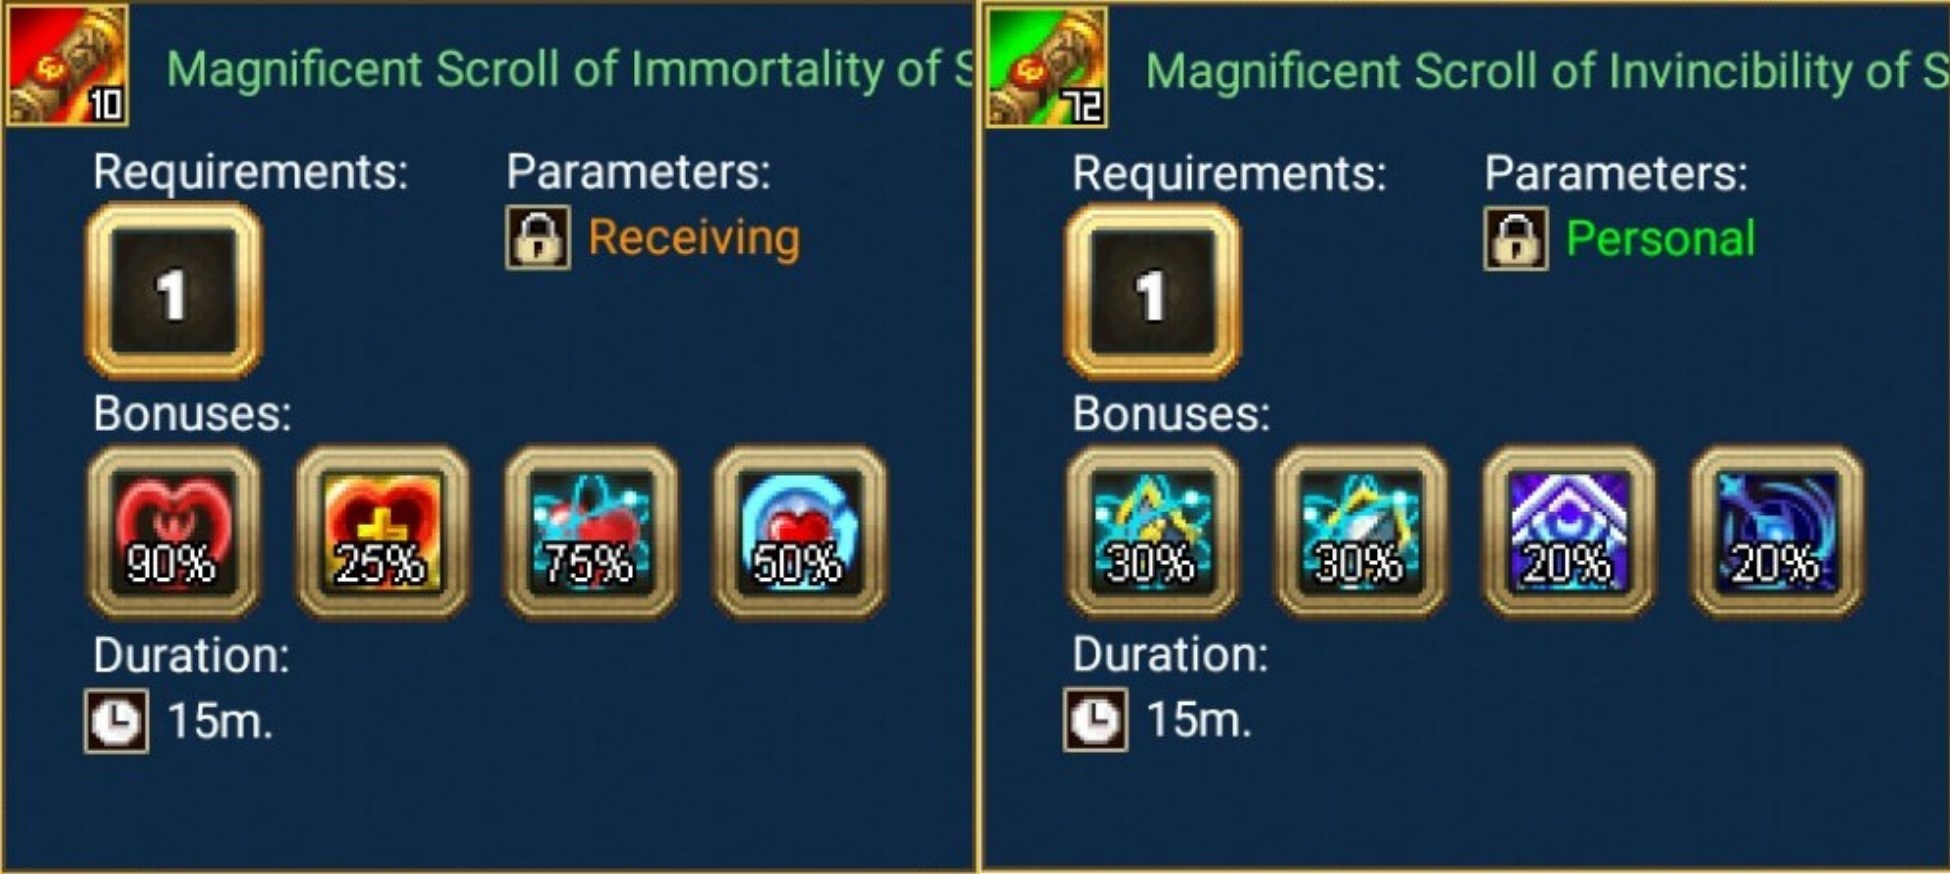
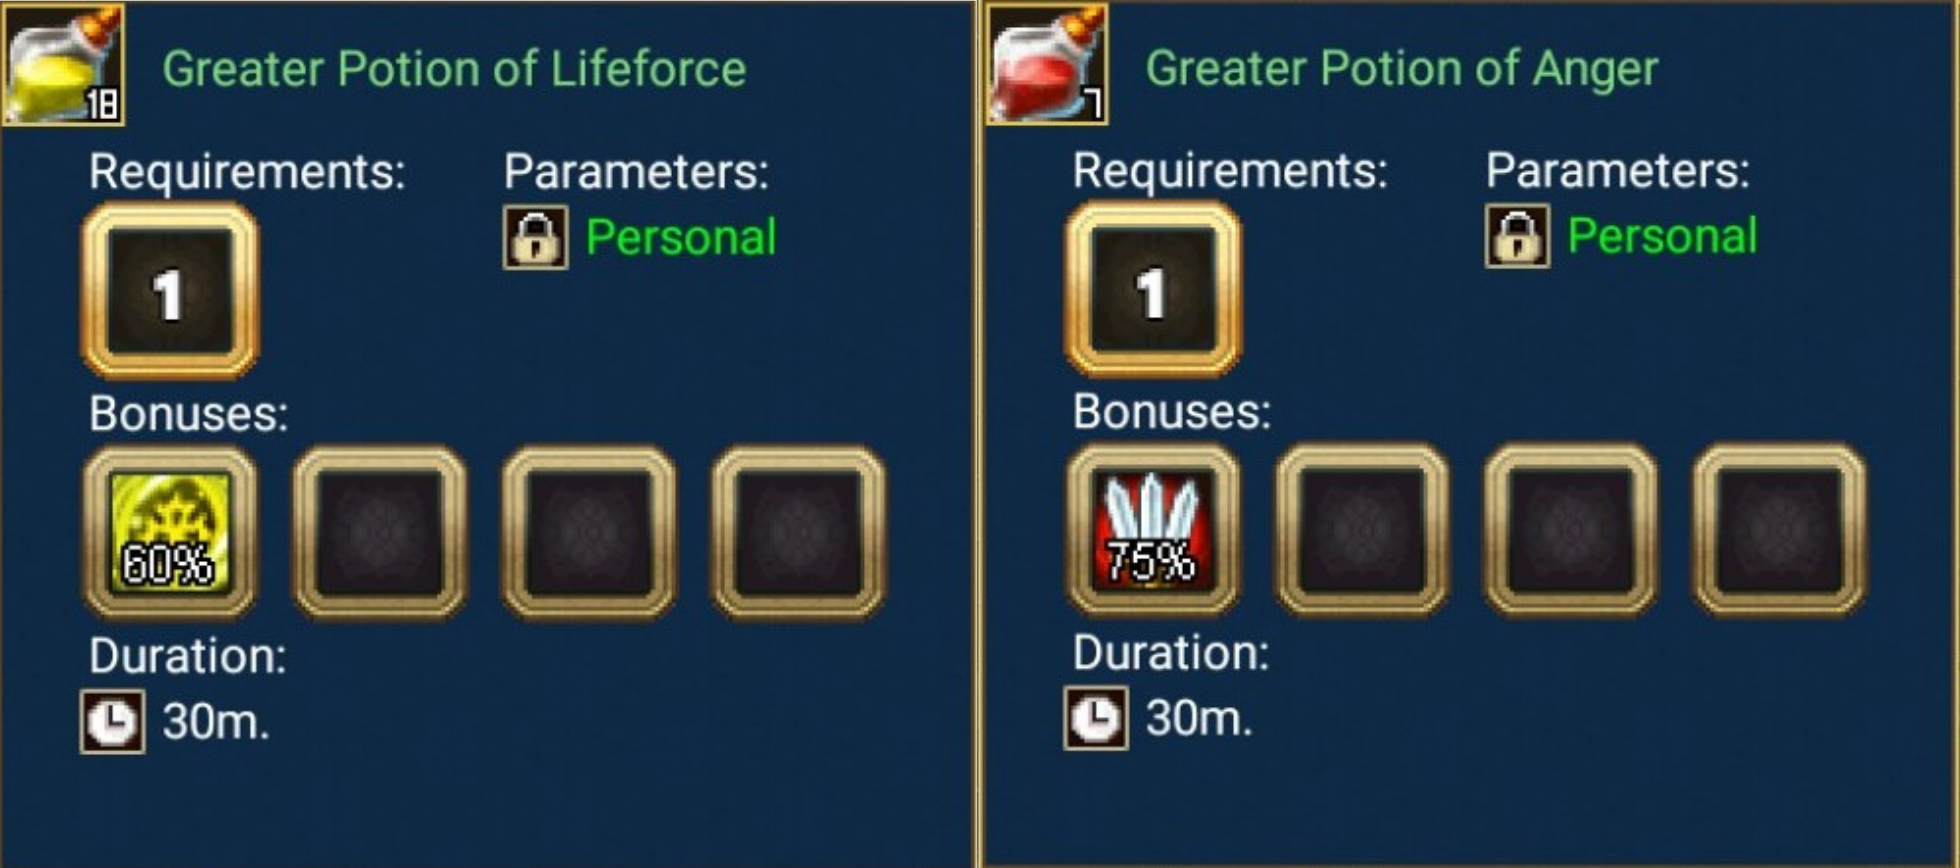
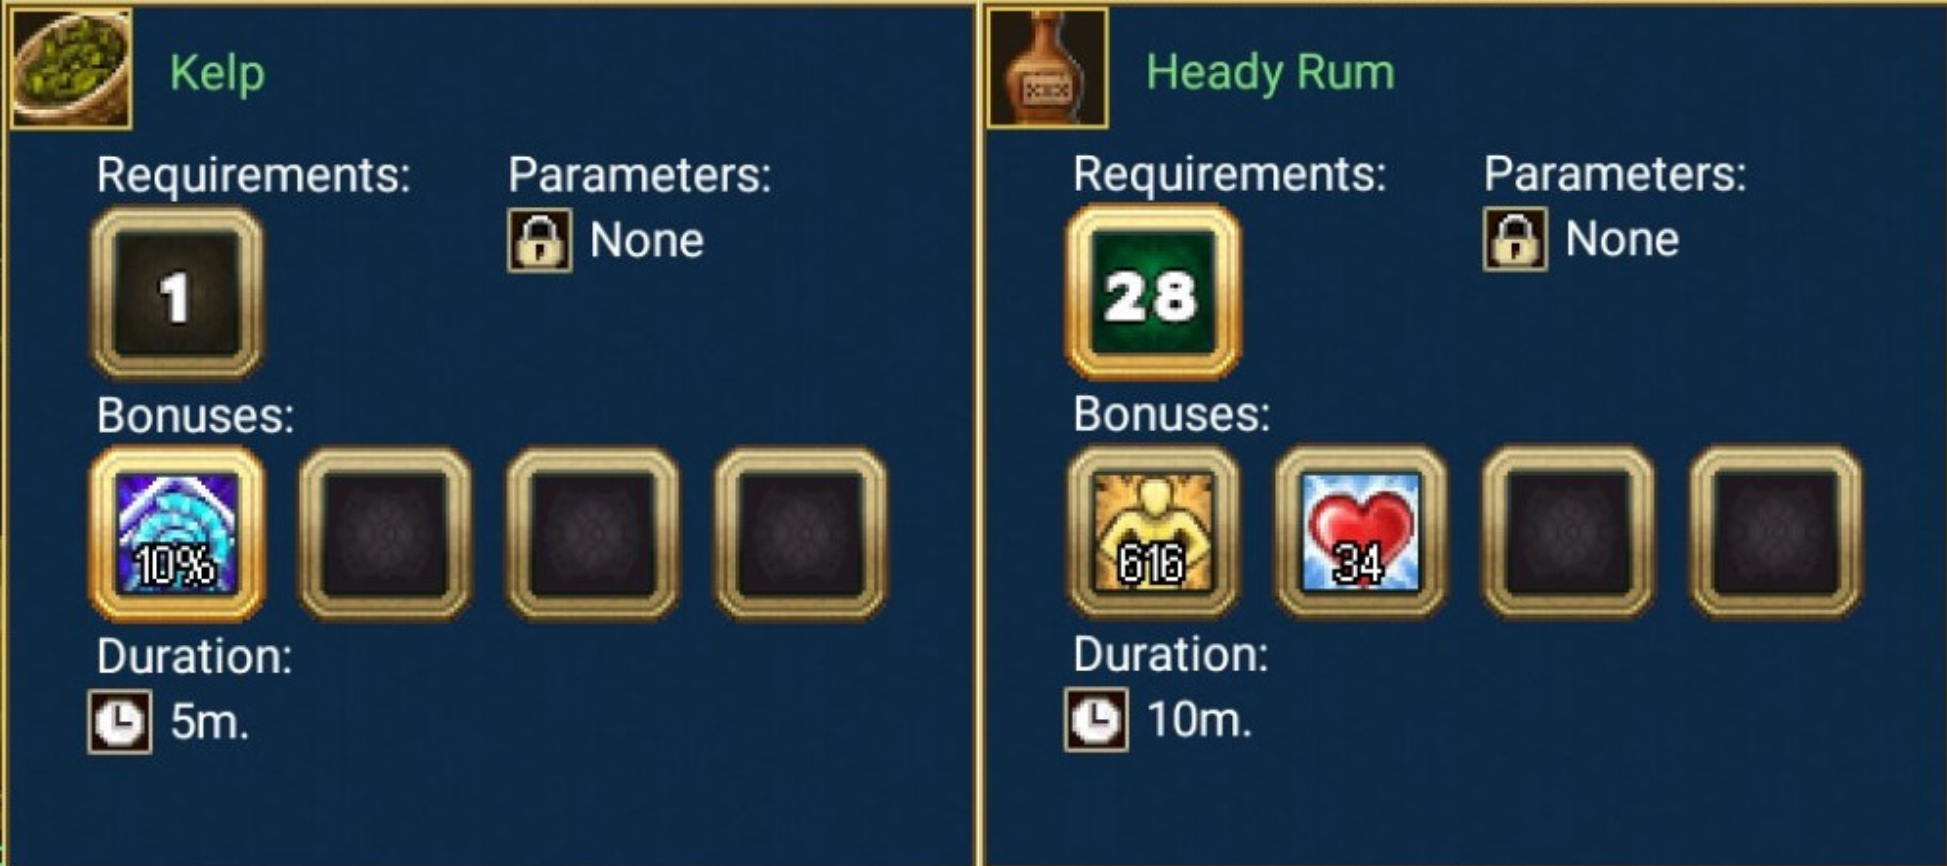
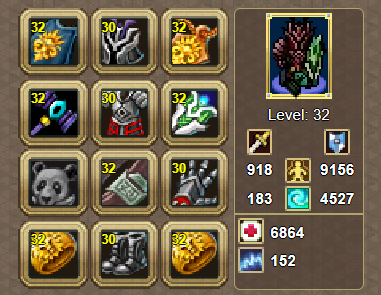
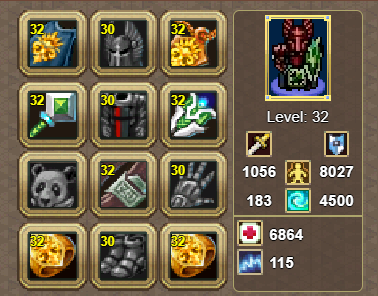
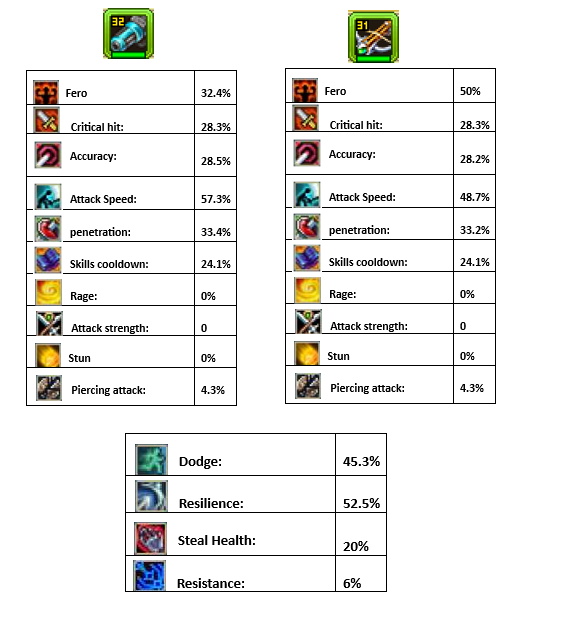
Hunter Hunter is a Legion Mountain Clan ranged class that specialize in Damage Dealing and Area Control Attack Defense Control Difficulty Pros and Cons Pros: One of the best DPS class in Legion and in game. Has the ability to control enemy’s movement and limit their fighting capability. A great class for mass fights and events “Guild vs Guild”. Cons: Lack of survivability and defensive or escape abilities. Lack of burst “high damage in a short amount of time”. Difficult to control in terms of positioning and play-style. Skill information Here you can find all the information about hunter’s skills as well as demonstration. PvE and PvP Builds PvE As mentioned before Hunter is one of the best DPS classes in legion and they play the part of the party/guild damage dealer. In terms of build there are two main builds that we will discuss, Single target and mass. Single target mainly played for dungeons and Raid bosses that require a lot of single target damage "Mythical sea" and "Mythical nadir" dungeons are great example to use this build for. Basic: Expert: Mass or group damage build is mainly played for dungeons or events that requires a lot of group damage Castle dungeons are a great example for this build. Basic: Expert: PvP: Hunters are a great class when it comes to PvP, they deal a good amount of damage while also having a helpful crowd control abilities. In terms of build there are two categories that we can divide hunter builds into, Arena and GvG/War. Arena build can split into three options based on the situation or your play-style The standard Offers a lot of damage while also gain a lot of stuns/control This build works really well against opponents that rely too much on their skills whether for: Healing Dealing Damage Control Keep in mind that some classes have abilities that grant them Resistance which can ignore all control skills for few seconds making this build weak against: Mage Blade Dancer Barbarian Chieftain Basic: Expert: The Dodge Similar to the standard build in terms of stuns/control however it shifts more into surviving or withstanding damage by filling up your Dodge stat while also having a bit of Damage reduction. The idea of this build is to avoid as much damage as possible even against characters who has Accuracy boost as it forces them to spend extra skill points into their accuracy skill making them lose points in other important skills thus lowering their damage or their fighting capability. Even though this build focuses more onto leveling Dodge and Damage reduction skills rather than damage it can still deal a decent amount of damage. This build works really well against opponents that deals a lot of burst or DPS such as: Blade Dancer Seeker Warden Mage Rogue Chieftain Barbarian Warlock Reaper On the other hand there are some classes that have the ability to increase their Accuracy which lower the chance of attacks being Dodge making this build a bit weaker against: Mage Ranger Barbarian Chieftain keep in mind that you cannot Dodge Skills effect you can only Dodge the damage for example you can Dodge Barbarian Shield strike Damage or Mage Shattered Stone damage however you cannot Dodge the Stun duration and it will still Stun you even if you Dodge it. Basic: Expert: The damage focused This build focuses on dealing an insane amount of damage and being a threat to almost anyone against you. This build is generally good against all classes however it works best against opponents that are hard to kill or lack defensive skills like: Warden Ranger Death knight Hunter Keep in mind, due to the fact it lack any sort of stuns or defensive stats this build leaves you extremely vulnerable against opponents who has mobility skills such as: Mage Seeker Blade dancer Barbarian Rogue Chieftain As you've noticed this build has a lot of counters and is hard to play so if you're planning on playing it I recommend having a support class as your partner to make sure you don't die too fast like: Necromancer Shaman Charmer Building a lot of Steal Health also works well with this build. Building Resistance could also help by avoiding stuns or control skills. Basic: Expert: GvG/war This category consist of a one major build that is very effective and can be shifted between damage and control Hunters work really well with other control classes allowing them to setup their group damage skills easily. Hunters also work well together due to hunters being able to stack "Hunter's Mark" for each other but keep in mind the increased received damage is based on your Mark's level not the character who applied it. Basic: Expert: Keep in mind that these builds are merely favored and can be changed or modified based on your preference or play-style. Itemization Having the correct Gears is very important, the combination of the stats items grant could amplify your hunter potential whether when it come to dealing damage, surviving or straight up enabling whatever build or play-style you have in mind. When it comes to Itemization we have two categories, PvE and PvP. PvE For PvE it's important to have the right gears that will grant you the best/highest amount of necessary stats to output the most damage possible while also still having some defensive capability to not get one-shotted. In terms of itemization we can split it into two categories Early game and Late game. Early game The idea of early game gears is to have cheap available gears to use until you finish your late game build while still allowing you to finish dungeons and quests at your level. The following stats are the ones you want to focus on, try getting them as high as possible. Critical hit Attack speed Penetration Stacking some Defensive Stats as well as some armor amplification can help you survive a bit more so its recommend to get: Life Steal Solidity In early game there are many options and combinations of gears that works well but I would recommend the following build as it offers the best stats in terms gears availability and cost. I would recommend going for the crafted Crossbow or the spring Bow for they offer the best stats. crafted Crossbow offers more damage and penetration. spring Bow Grants more Critical as well as Attack Strength. Here you can find the stats and calculations of the build Late game In the late game hunters tend to shine the most with the help of their skills and combined with merman gears they can show their maximum potential as damage dealers. The following stats are the core stats these should be maxed out. Critical hit Attack speed Accuracy Penetration In the late game after having your Core stats maxed you should start filling your other offensive stats that could add up to your damage like: Critical hit Strength Skill Cooldown Attack strength Piercing Stacking some Defensive Stats as well as some armor amplification can help you survive a bit more so its recommend to get: Life Steal Solidity I would recommend going for the crafted Crossbow or the spring Crossbow for they offer the best stats. Crafted Crossbow offers more Speed. Spring Crossbow offers Attack Strength. Here you can find the stats and calculations of the build PvP When it comes to PvP you want to have as much impact as possible when it comes to dealing damage or control while also withstanding damage and not be a weak target thus having the correct items will aid you in doing your job to deal damage. The following stats are the core stats these should be maxed out. Ferocity Resilience Attack speed Accuracy Penetration after having your Core stats maxed you should start filling your other offensive stats that could add up to your damage like: Skill Cooldown Attack strength Piercing Stun Stacking some Defensive Stats as well as some armor amplification can help you survive a bit more so its recommend to get: Life Steal Resistance Keep in mind that incase you decide to use a different Crossbow than the Arena one it is not necessary to have your Ferocity maxed out, however you should at least have 30% Ferocity From enchantment else your damage will drop significantly the advantage of using different kind of Crossbow could be to boost your other offensive stats which could be more useful in different situations. I would recommend to either use the standard arena Crossbow or the Crafted Crossbow Arena Crossbow offers more Ferocity. Crafted Crossbow offers more Speed. Here you can find the stats and calculations of the build: Buffs and minion Buffs and Minions are generally used to aid you in your battles from amplifying your damage or stats to supporting you with extra damage or control. We will split them into two categories PvE and PvP PvE PvP It is also advised to always carry some essentials as they can be useful in almost all situations. Greater Life Potion: Restores 60% of the character's maximum health. Life Scroll: Allows you to resurrect your Hero in case of death. Courage Scroll. Allows you to resurrect your Hero in case of death during a castle attack and guild battles. Tips and advice For newbies When you’ve just created your hunter and you’re level is still low it’s not a good idea to level Combat stance first as you don’t have enough mana regeneration early to maintain it so I would recommend leveling your other skills first and leaving it for last for when you gain more mana regeneration. Getting the group damage expert skills first once you're level 18 can help you finish quest faster as they provide more value in terms of damage compared to stats skills As I mentioned before hunters don’t have the ability to tank damage without dying and they can easily be overwhelmed by mobs or getting caught by an enemy assassin, so it’s always a good idea to have a healer with you in your party whether a minion for dungeons or a friend who plays a support class for arena or both. Necromancer are great partner when it comes to dungeons as they provide a lot of damage boost and healing. Shaman on the other hand are a great partner for arena and battles as they provide consistent healing and damage reduction. Charmer can also be a great support partner if they adapt the staff build they can provide some consistent healing and also a lot of stuns/control. Hunter’s can sometimes steal the aggro from the party tank which can put you in a tough spot so always watch your damage and your party tank aggression skill to not get yourself killed, it’s also a good idea to get Tranquil Potions which can reduce your damage aggro Hunters can be really difficult to control and play as they rely too much on positioning but once you get the hang of it hunters can become a really fun class to play. This is the end of the guide I hope it can be of use to others and shine more light into hunters, if you have any question or if you've spotted any error or inaccurate information feel free to let me know Abi Eu-Emerald


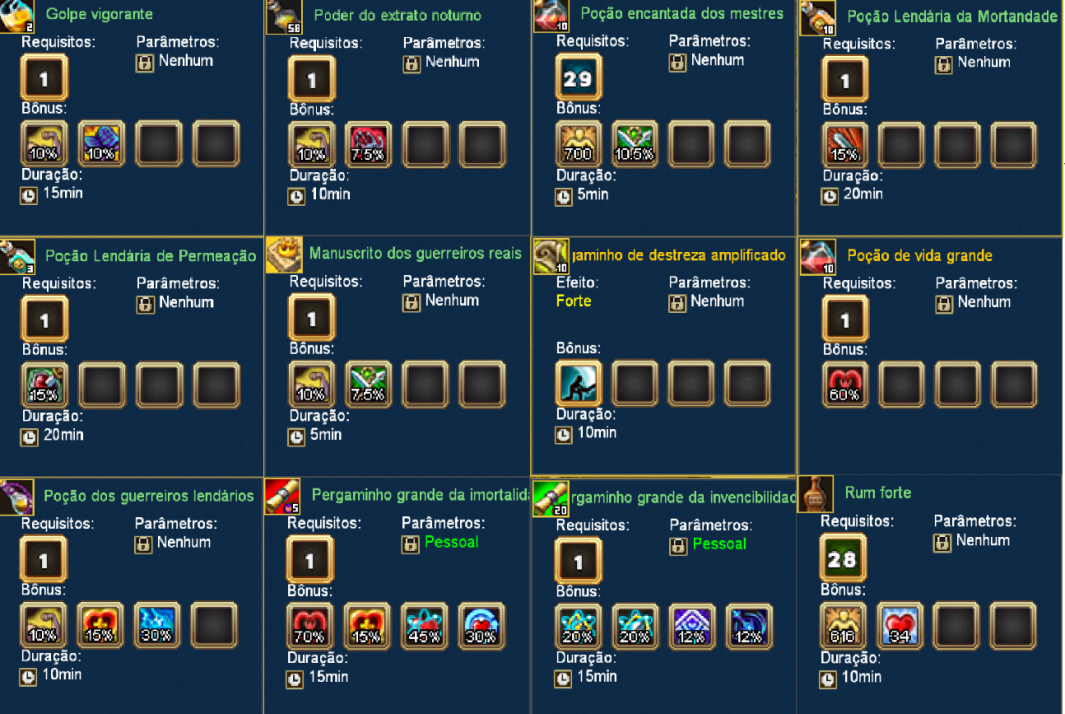
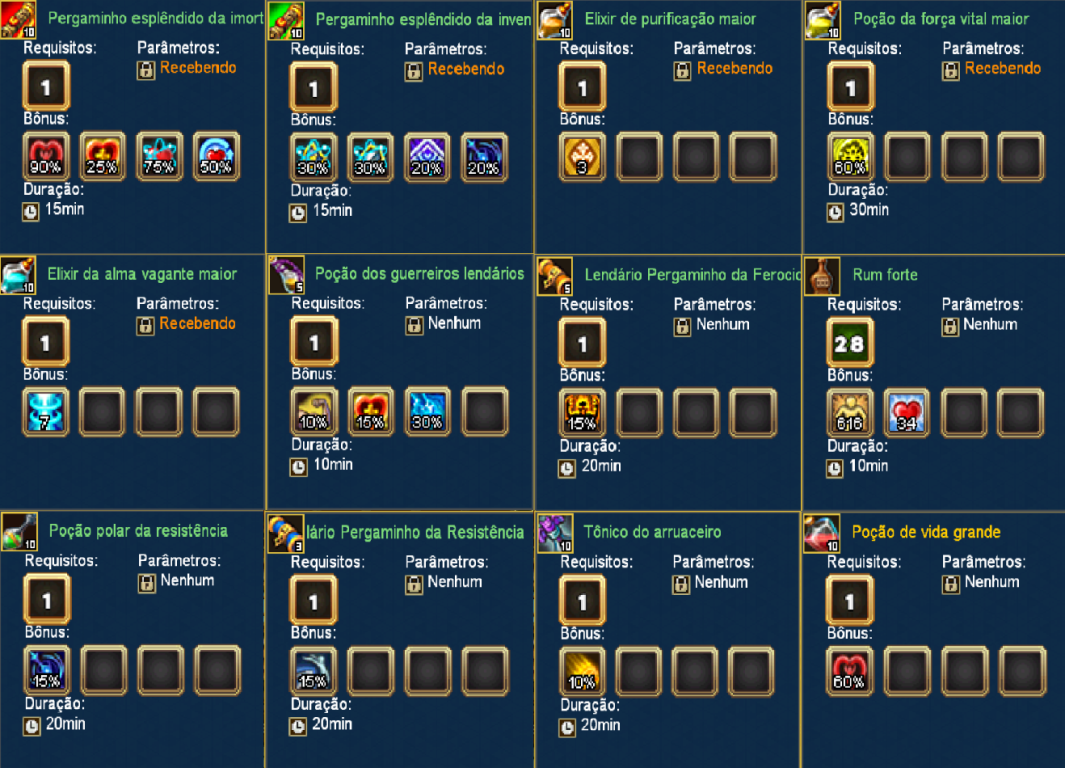
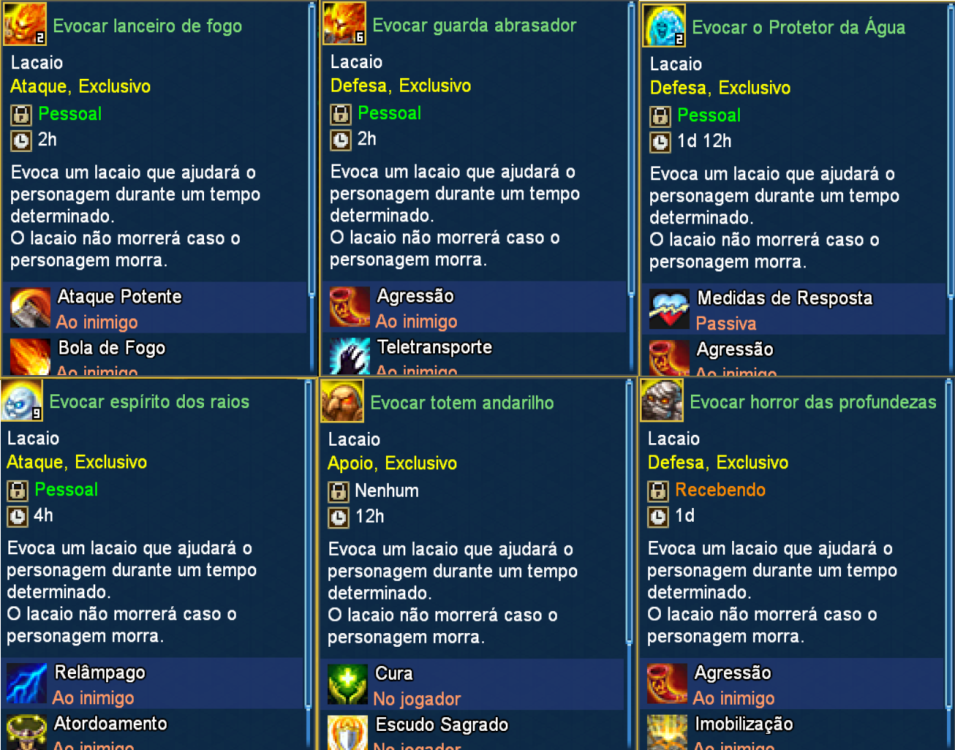
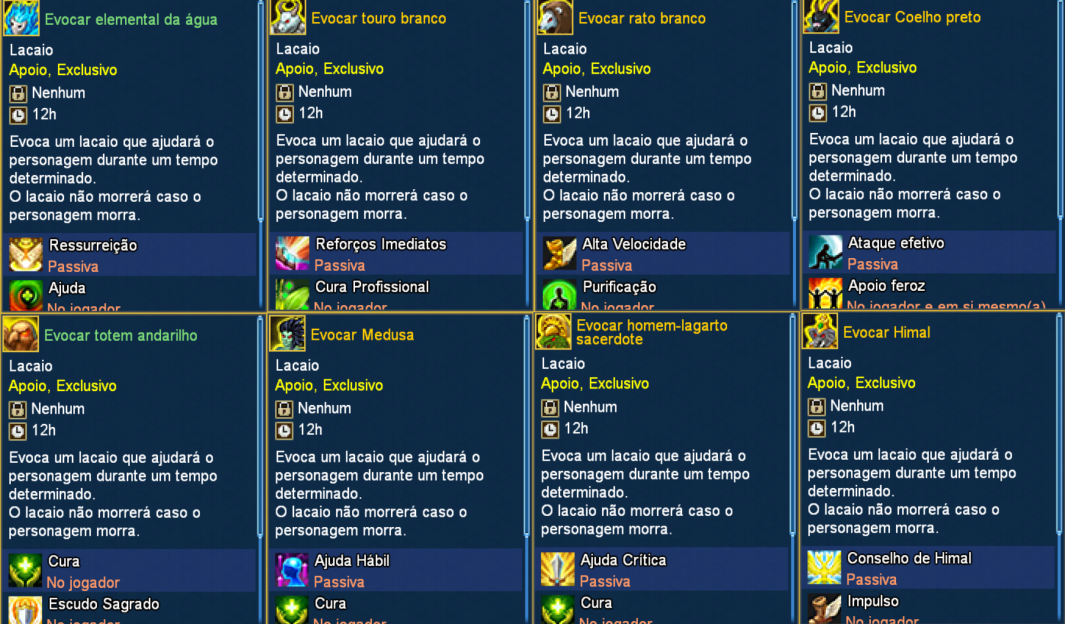
-
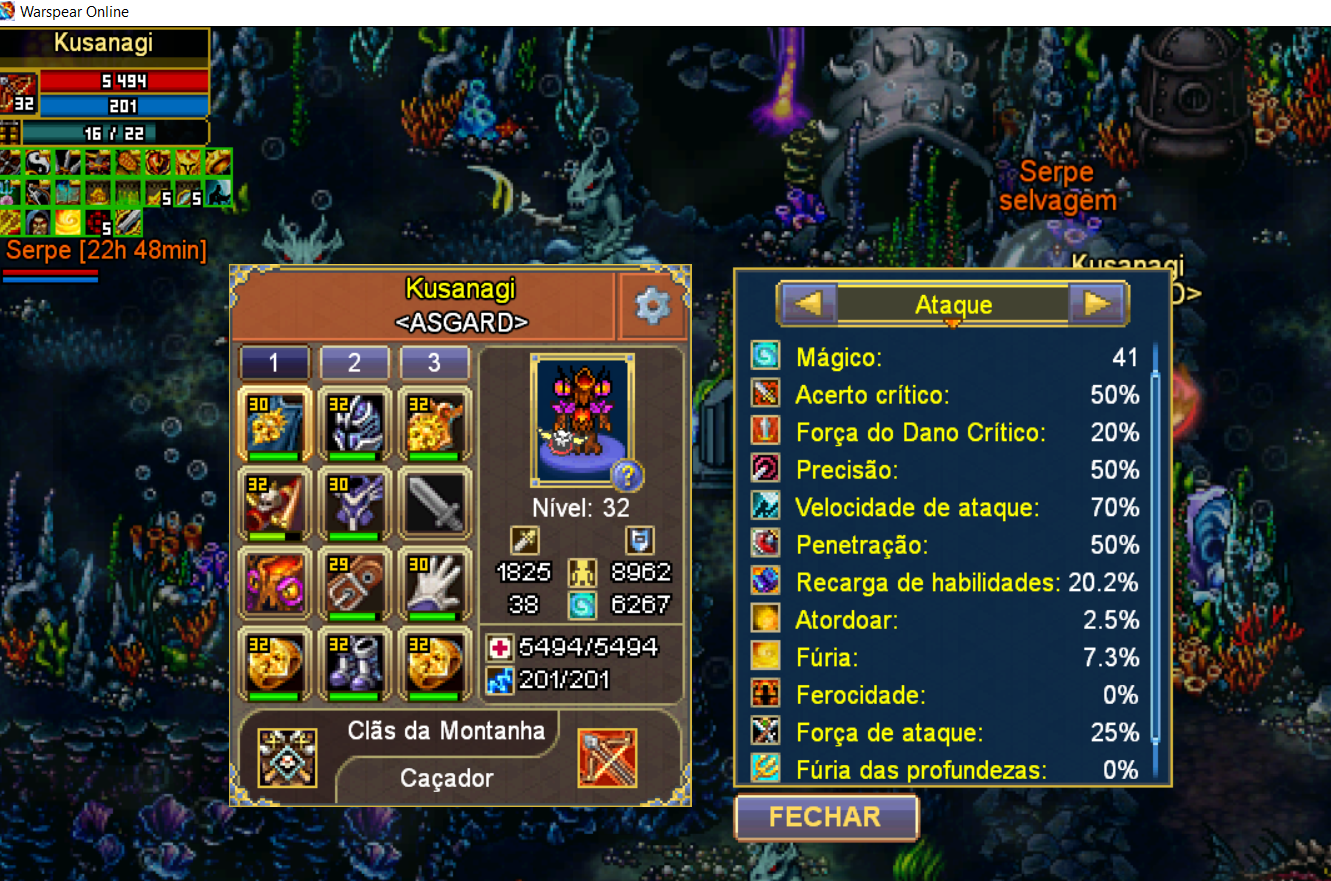
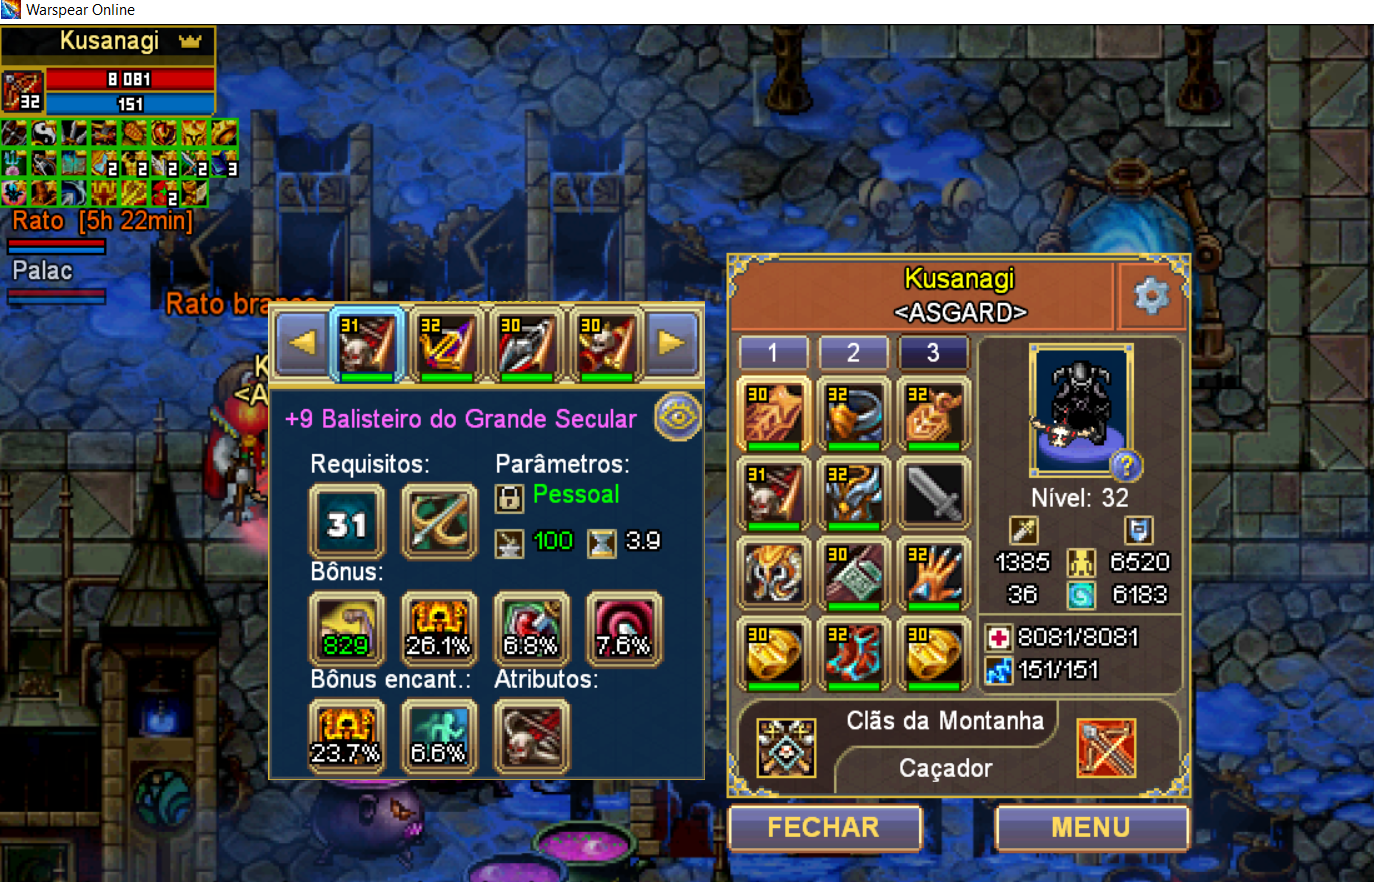
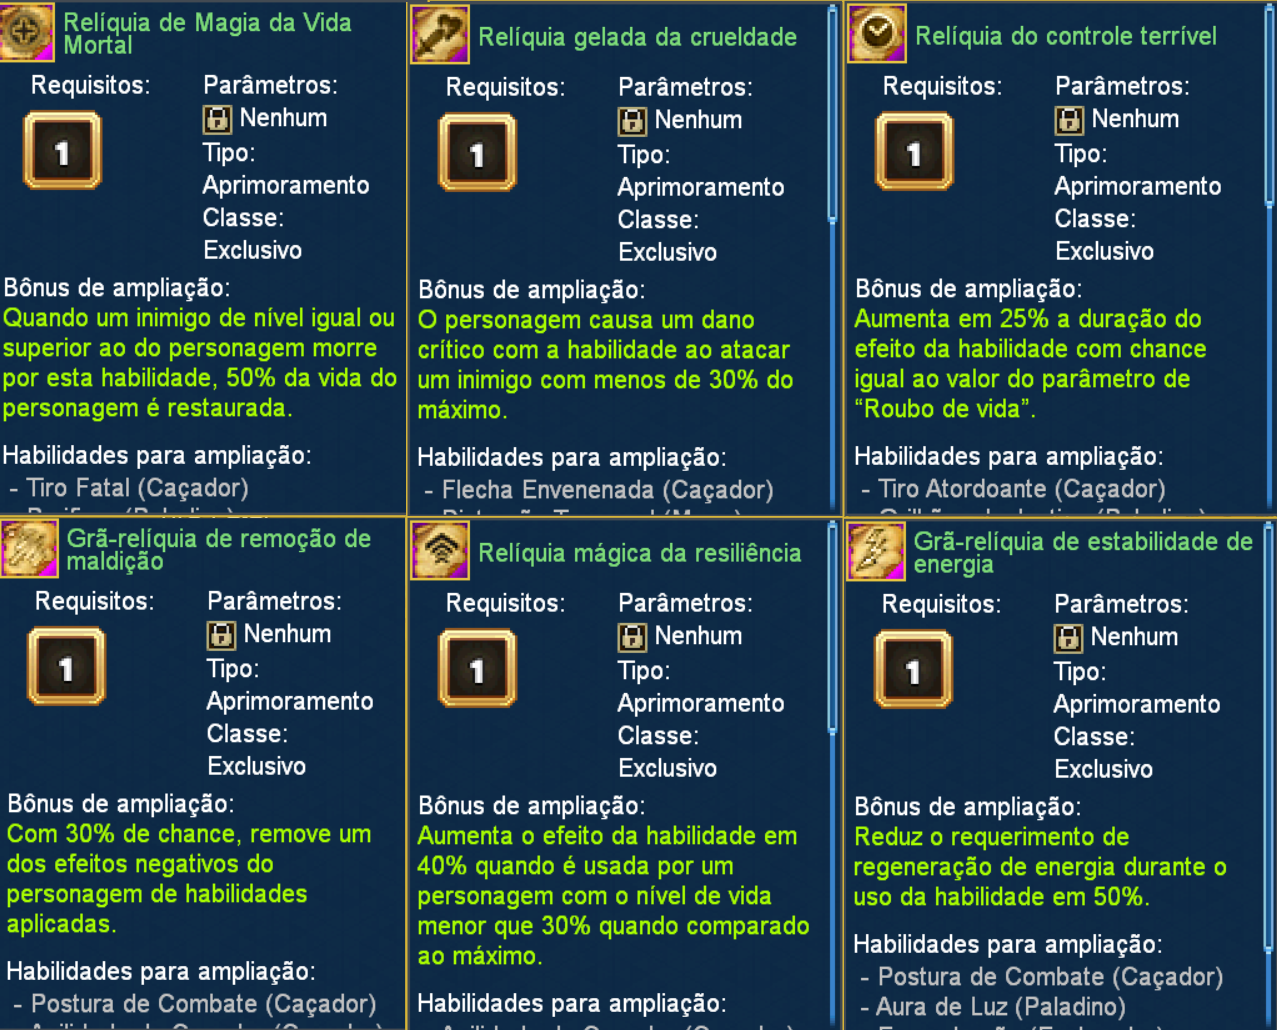
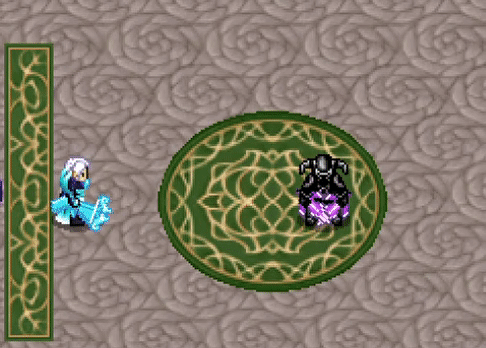
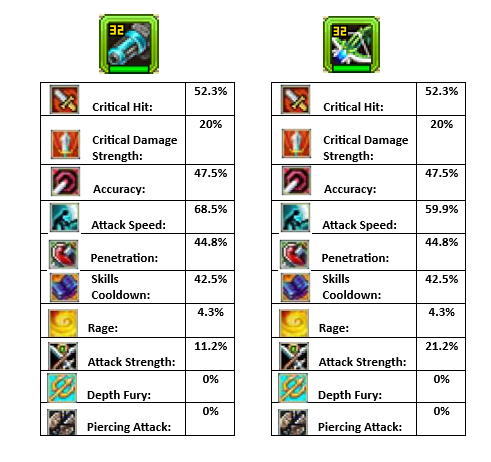
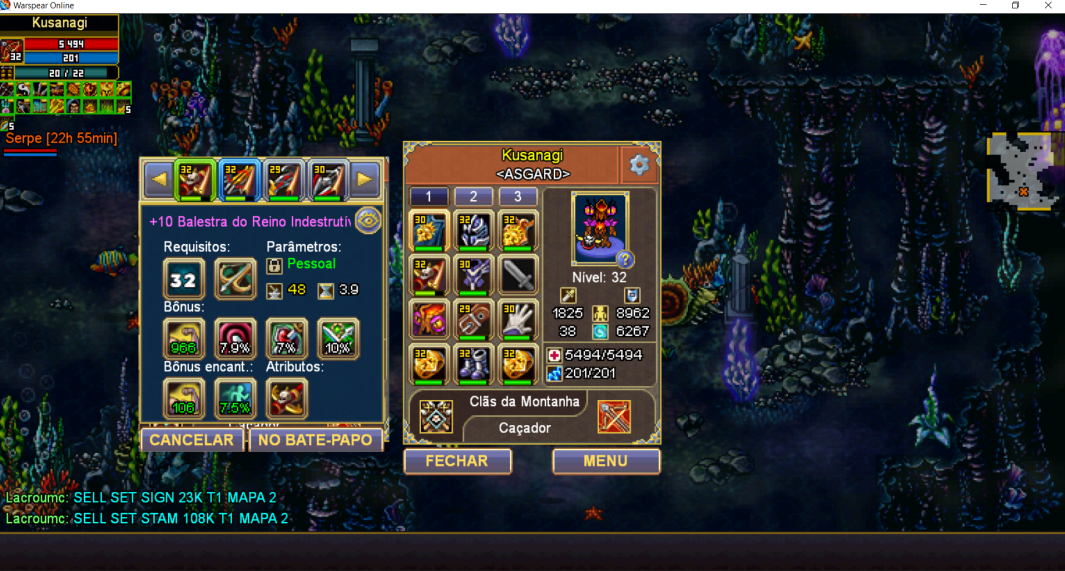
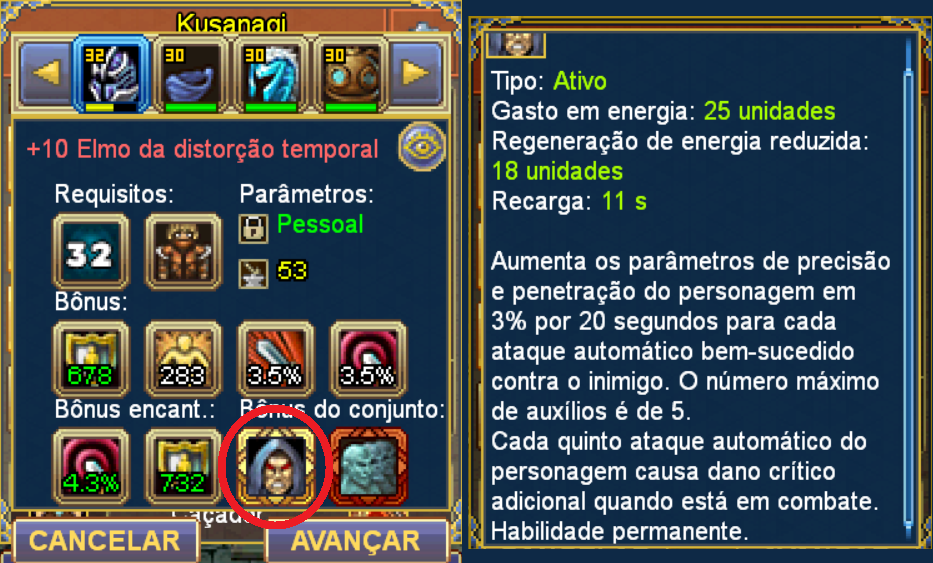
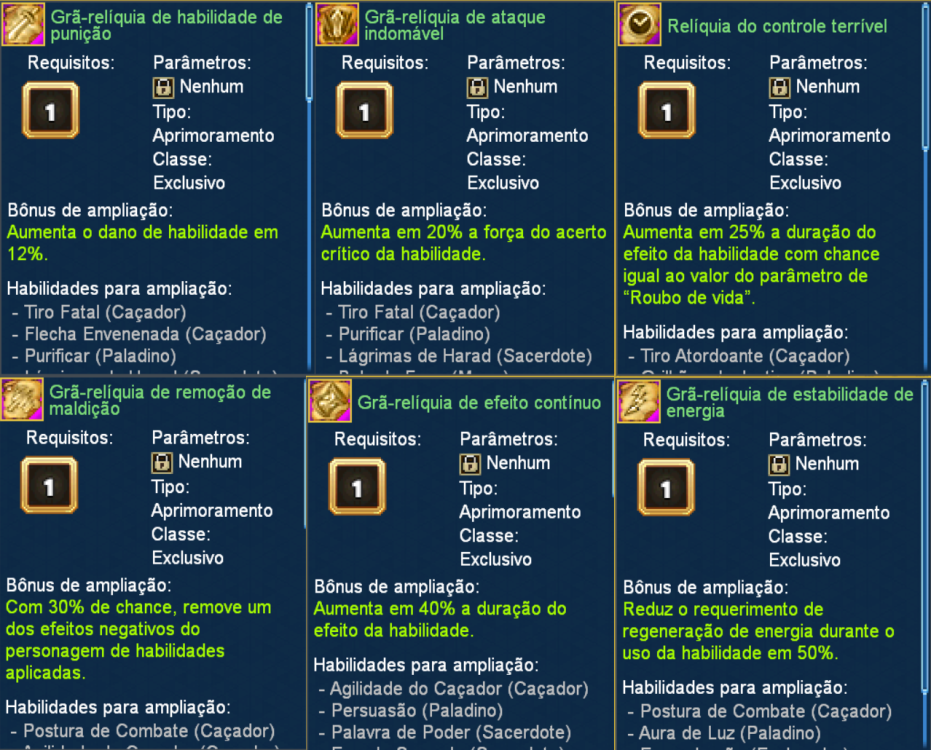
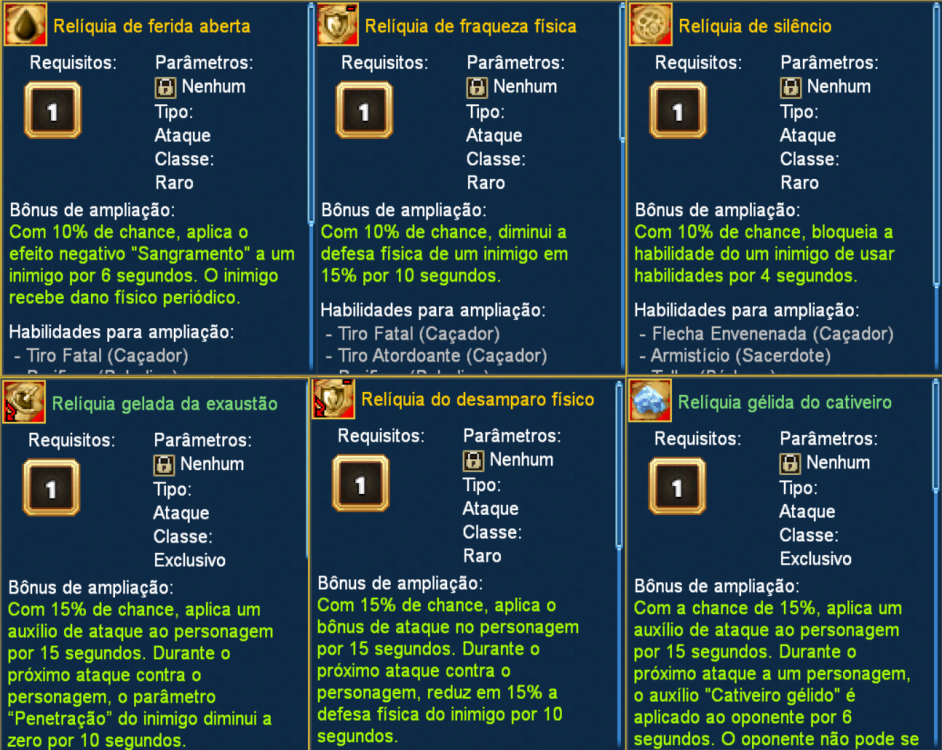
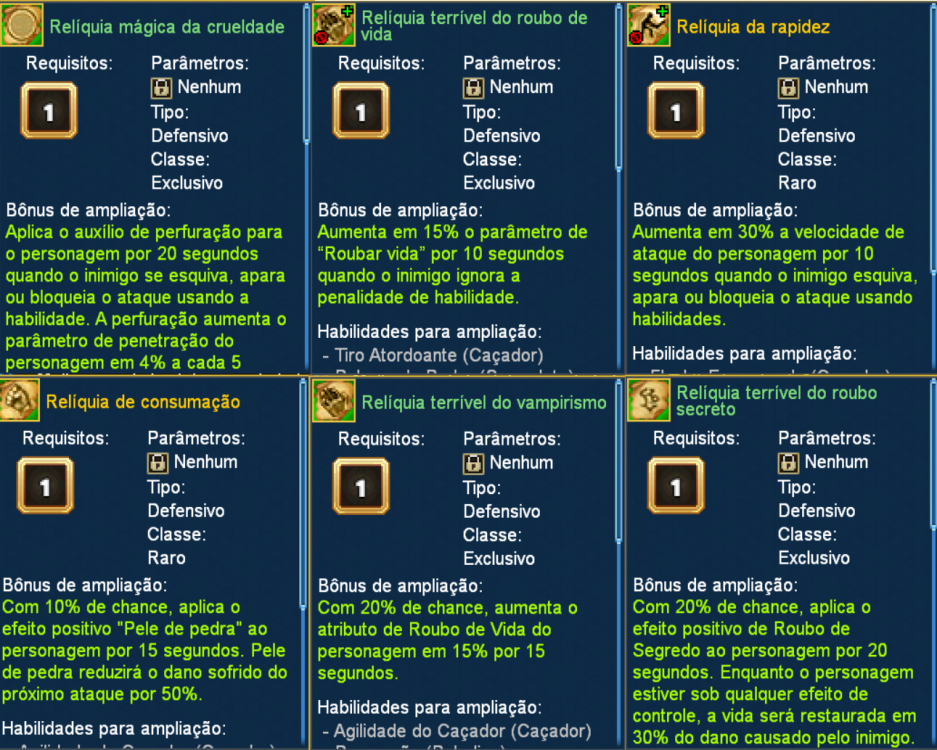
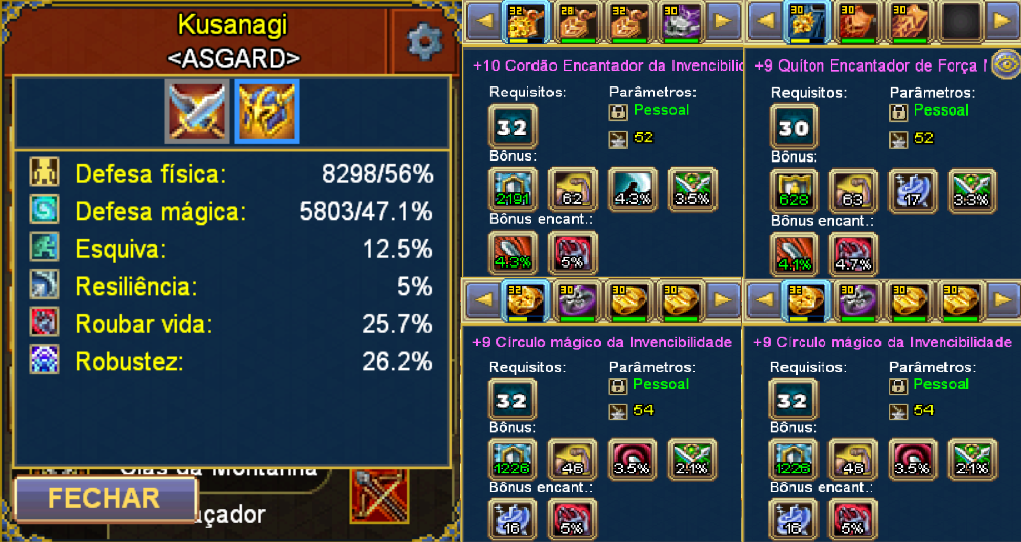
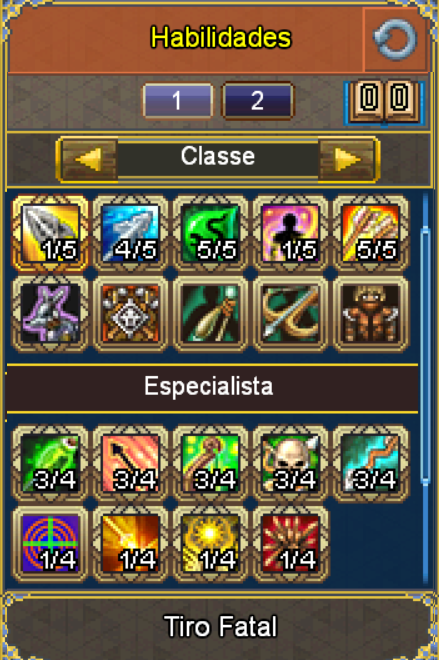
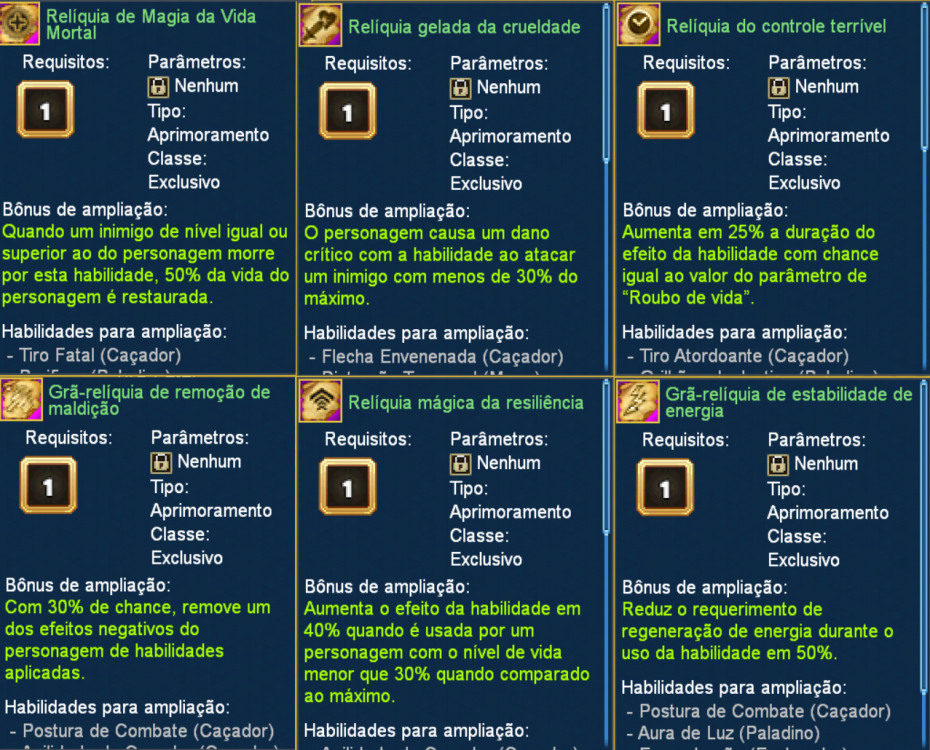
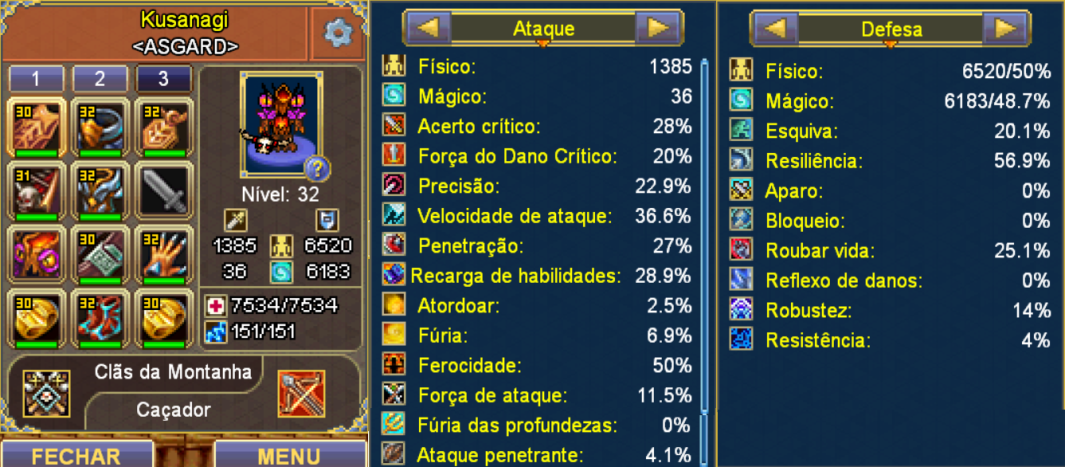
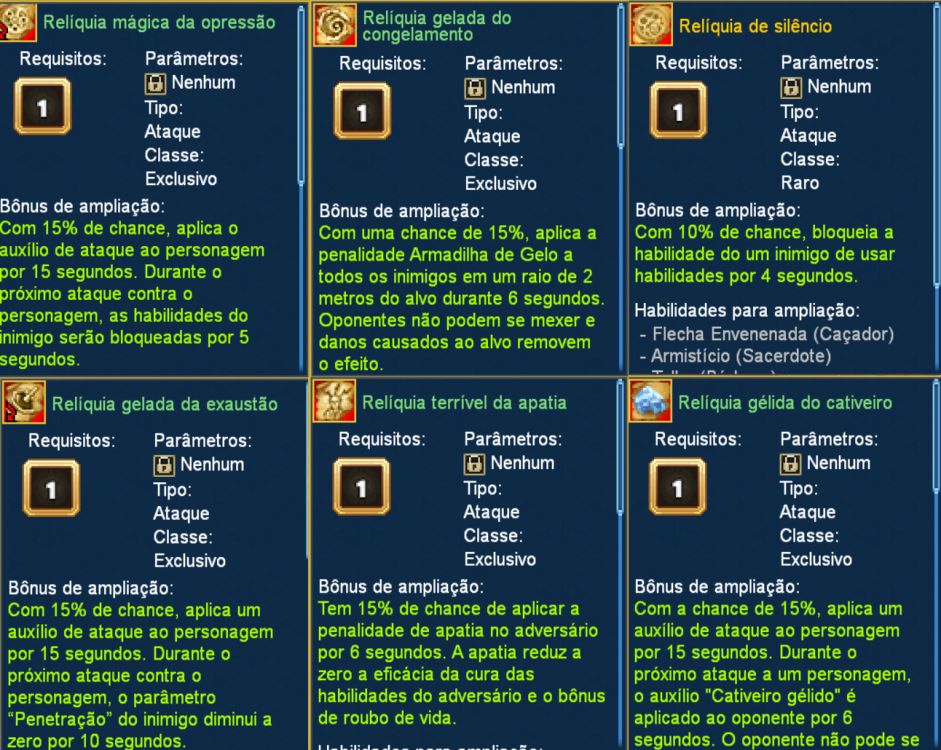
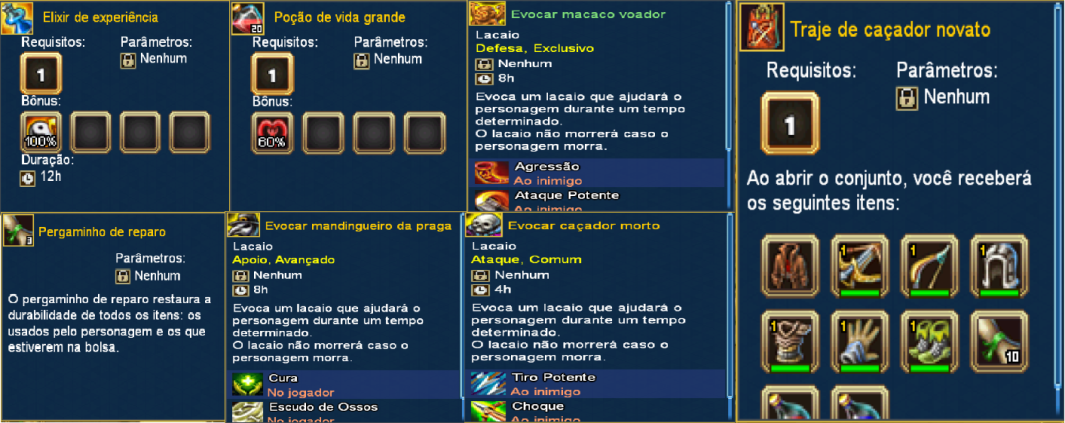
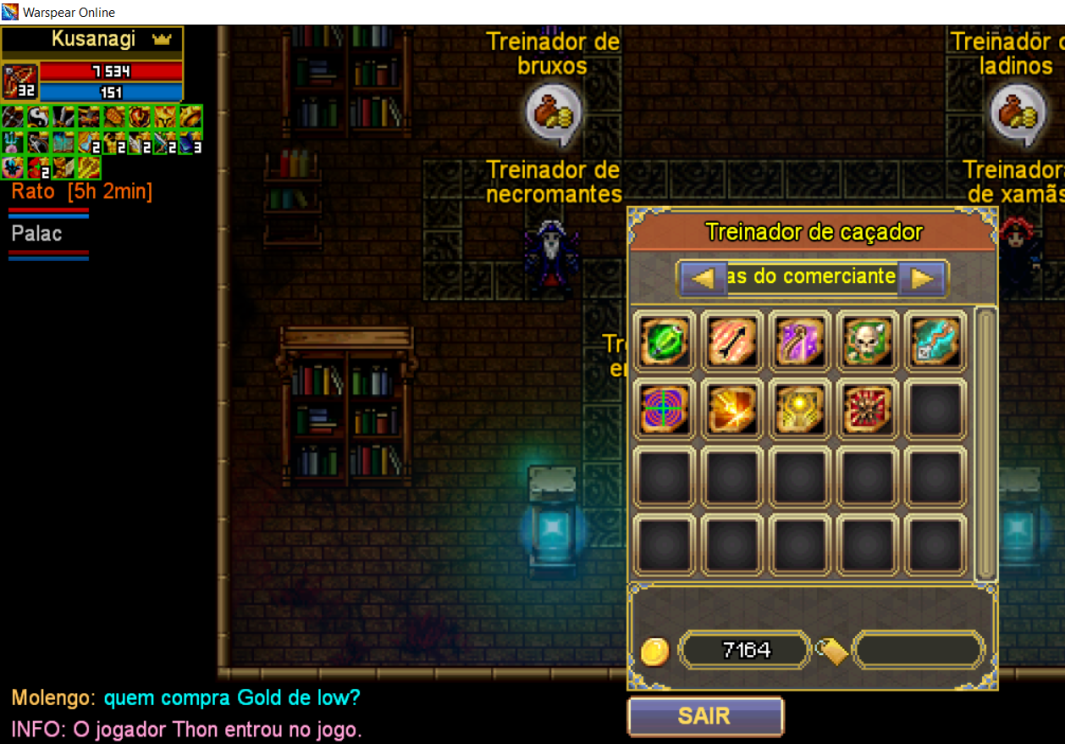
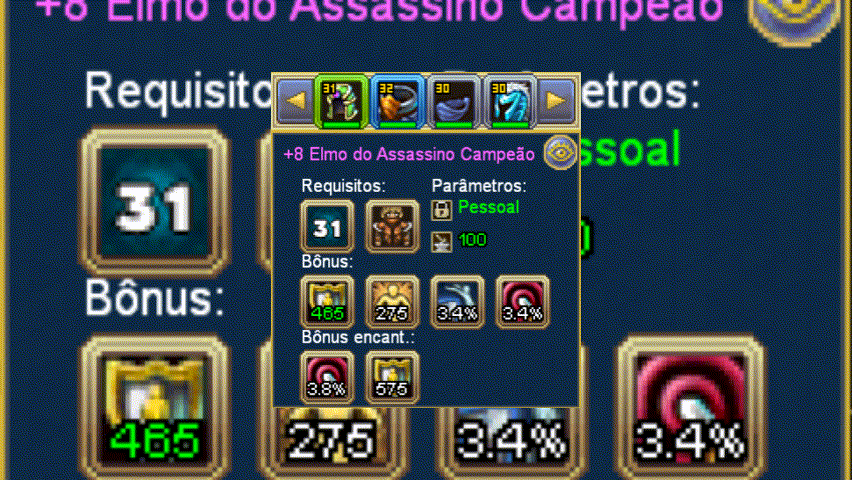
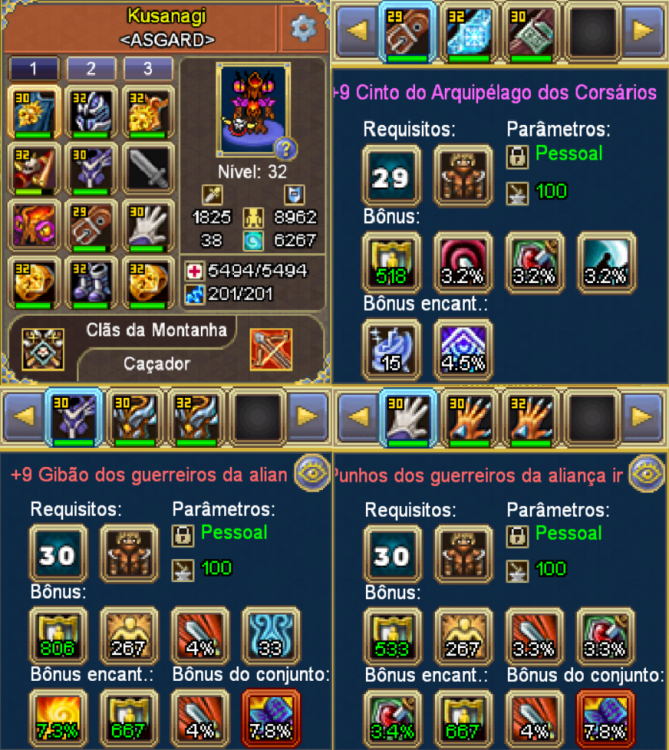
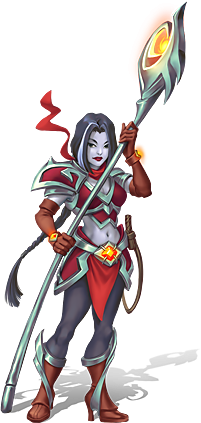
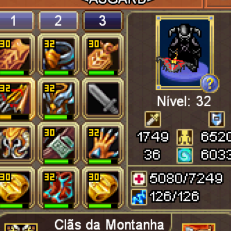 ESTE É UM GUIA PARA QUE OS NOVOS JOGADORES E OS ATUAIS JOGADORES CONHEÇAM O CAÇADOR PRODUZIDO E AUTENTICADO PELO JOGADOR KUSANAGI DO SERVIDOR BR-TOURMALINE Provenientes dos clãs das montanhas, os caçadores passam a maior parte da vida em florestas densas nas montanhas aperfeiçoando suas artes marciais, os caçadores são ágeis, explosivos e preferem manter distancia de um combate corpo a corpo, eles utilizam armaduras leves e utilizam arcos ou balestras! Caçadores tem uma enorme facilidade em ferir gravemente seus adversários, além de conseguir atordoar seus adversários com maestria. Suas Características básicas Possuem um alto índice ofensivo com danos rápidos e explosivos, além de danos periódicos Possuem um baixo índice defensivo devido ao uso de armaduras leves e a ineficiência no combate corpo a corpo Possui um médio-baixo índice de suporte/controle, que equilibram os pontos negativos da classe ORIENTAÇÃO AOS NOVOS JOGADORES Como na montagem de qualquer outra classe, recomendo que, se você não possui um considerável número de recursos disponíveis ($), não invista precocemente na classe, invista o necessário para sobrevivência do personagem dos níveis 1 até o nível 28. Nesse percurso do desenvolvimento de preferencia ao uso de consumíveis, tais como elixir do conhecimento, lacaios de suporte, equipamentos voltados para sobrevivência, aproveite dos atributos defensivos (HP, REGENERAÇÃO DE MANA, DEFESA FISICA), invista também na aquisição de skills de especialista voltadas ao aprimoramento e dano do personagem, sendo elas: Flecha guia, marca do caçador, tiro enfraquecedor, sabre toxico, instintos das montanhas. Veja abaixo uma lista de consumíveis, equipamentos e skills de especialista disponíveis! VANTAGENS DA CLASSE Atualmente é um dos principais causadores de dano da facção dos legionários, possuindo a vantagem de combate a distância combinado a mecânicas de dano, controle e atordoamento o que torna a classe muito forte e útil! No PVE (JOGADOR x MONSTRO) a classe possui uma mecânica de dano combinada, sendo essa mecânica citada como: Dano por segundo rápido, Dano periódico alto, Dano explosivo rápido. No PVP (JOGADOR x JOGADOR) a classes é uma das mais fortes devido suas mecânicas de danos rápidos, controle e atordoamento, além da vantagem de combate a longo alcance! Nota-se que é uma das classes com maior potencial e facilidade em adaptabilidade em situações de combate devido as habilidades disponíveis no seu arsenal. Sendo no PVE (JOGADOR x MONSTRO) uma das classes mais requisitadas na facção, além de ser requisitada em massa por guildas competitivas! DESVANTAGENS DA CLASSE Desvantagens no PVE (JOGADOR x MONSTRO) Devido a obrigatoriedade de diversos parâmetros ofensivos tais como acerto critico, dano critico, precisão, penetração, velocidade de ataque, recarga de habilidades, força de ataque, fúria, e a necessidade do parâmetro defensivo vampirismo para um bom desempenho da classe, o caçador apresenta deficiência em alguns atributos básicos que são a saúde máxima (HP), o alto consumo de energia (MANA), e o parâmetro defensivo robustez. Observa-se que no PVE (JOGADOR x MONSTRO) a saúde máxima dos caçadores é baixa, e na maioria das vezes eles correm o risco de levar danos altos ou ate HITKILL (MORTE) em masmorras dedicadas ou em Bosses Raid devido a deficiência dos atributos defensivos citados acima. Devido a necessidade do uso de acessórios e equipamentos com parâmetros ofensivos o caçador se torna uma classe de alto custo de investimento ($), dita na opinião de quem faz uso da classe a 4 anos como uma das mais caras do jogo! Desvantagens no PVP (JOGADOR x JOGADOR) Por ser uma classe de equipamentos leves, sua defesa torna-se razoavelmente baixa, levando em consideração as demais classes, ao entrar em combates corpo a corpo a classe se torna muito vulnerável devido o baixo valor de defesa do personagem e deficiência de saúde máxima que a classe apresenta! (OBS) NOTA-SE QUE POR SER UMA CLASSE DE LONGO ALCANCE A CHANCE DE BUGS VISUAIS É LIGEIRAMENTE ALTA, ATENTEM-SE A ESTA DICA! COMO PREPARAR SEU PERSONAGEM AO CONTEUDO PVE (JOGADOR x MONSTRO) DO JOGO! Como um personagem focado em dano físico bruto, é necessário investir em atributos ofensivos. Os atributos necessários são: * ACERTO CRITICO * PRECISÃO * PENETRAÇÃO * VELOCIDADE DE ATAQUE * FORÇA DE ATAQUE * FURIA Veja exemplos dos melhores equipamentos PVE (JOGADOR x MONSTRO), relíquias e uma boa build após as últimas atualizações na minha opinião! EQUIPAMENTOS SKILL SET 32 MERMEM OBS: ALGUNS JOGADORES OPTAM PELO USO DE EQUIPAMENTOS COM CONJUNTO DE BONUS FÚRIA, MAS NAO SE ENGANE, SE VOCE NAO POSSUI O LIVRO DE ESPECIALISTA (SEM CLASSE) ''FÚRIA VELOZ'' ESSE É O MELHOR SET! RELIQUIAS PVE (JOGADOR x MONSTRO) MINHA BUILD PVE COMO PREPARAR SEU PERSONAGEM AO CONTEUDO PVP (JOGADOR x JOGADOR) DO JOGO O conteúdo PVP (JOGADOR x JOGADOR) requer uma boa noção e conhecimento da classe, como dito anteriormente evite combates corpo a corpo, opte por danos rápidos, controle e atordoamento e sempre busque a sobrevivência! No conteúdo PVP (JOGADOR x JOGADOR) também é necessário o investimento em atributos ofensivos, porém é necessário o investimento em atributos defensivos. Os atributos necessários são: OFENSIVOS * PRECISÃO * PENETRAÇÃO * VELOCIDADE DE ATAQUE * RECARGA DE HABILIDADES * FEROCIDADE NOTA-SE QUE ALGUNS ATRIBUTOS OFENSIVOS TAMBEM AUMENTAM O REPERTORIO E DANO DO PERSONAGEM, SENDO ELES: * FORÇA DE ATAQUE * FÚRIA DEFENSIVOS * RESILIENCIA * ESQUIVA * HP * RESISTENCIA * VAMPIRISMO Veja exemplos dos melhores equipamentos, relíquias e uma boa build após as últimas atualizações na minha opinião! Atente-se aos 2 equipamentos de raridade diferentes introduzidos: · Equipamentos PVP (JOGADOR x JOGADOR) adquiridos com pontos de arena · Equipamentos grandeza adquiridos com imperiais da grandeza · Além de acessórios únicos e exclusivos EQUIPAMENTOS PVP (JOGADOR x JOGADOR) PARAMETROS OFENSIVOS E DEFENSIVOS RELIQUIAS PVP (JOGADOR x JOGADOR) MINHA BUILD PVP CONSUMIVEIS PVE (JOGADOR x MONSTRO) CONSUMIVEIS PVP (JOGADOR x JOGADOR) LACAIOS PVE (JOGADOR x MONSTRO) LACAIOS PVP (JOGADOR x JOGADOR) FINALIZANDO O CONTEUDO GOSTARIA DE DEIXAR ALGUNS LIVROS DE ESPECIALISTA (SEM CLASSE) QUE POSSUO E AGREGA MUITO NA MONTAGEM E RESULTADO FINAL DA CLASSE! Não irei citar a mecânica de cada um dos livros de especialista “sem classe” presentes no meu personagem devido a brevidade necessária do guia! Em outra aba do fórum já existe um guia disponível sobre livros raros “sem classe”! Conteúdo produzido a partir da minha experiencia em game e conivência com jogadores experientes. Ressalvo que não é necessário a montagem da classe de acordo com este guia, recomenda-se jogar de acordo com sua criatividade, interesse e divertimento para com a classe e o game. Aqui descrevi como é a minha experiencia e como tenho orientado os novos e atuais jogadores desde então! Guia produzido pelo jogador KUSANAGI do servidor BR-TOURMALINE! Aos leitores que chegaram até aqui o meu sincero agradecimento!


- 1 reply
-
- 3
-

-

-

-
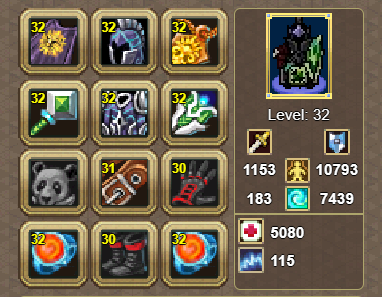
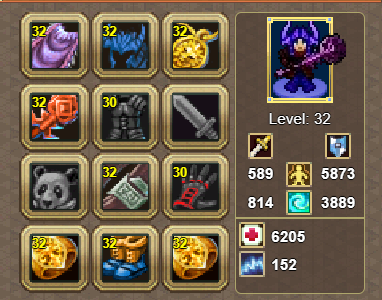
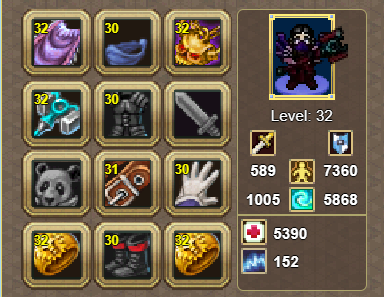
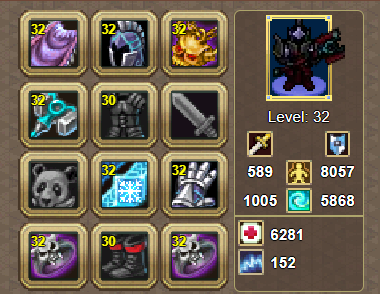
- hunter
- hunter guide
- (and 6 more)
-
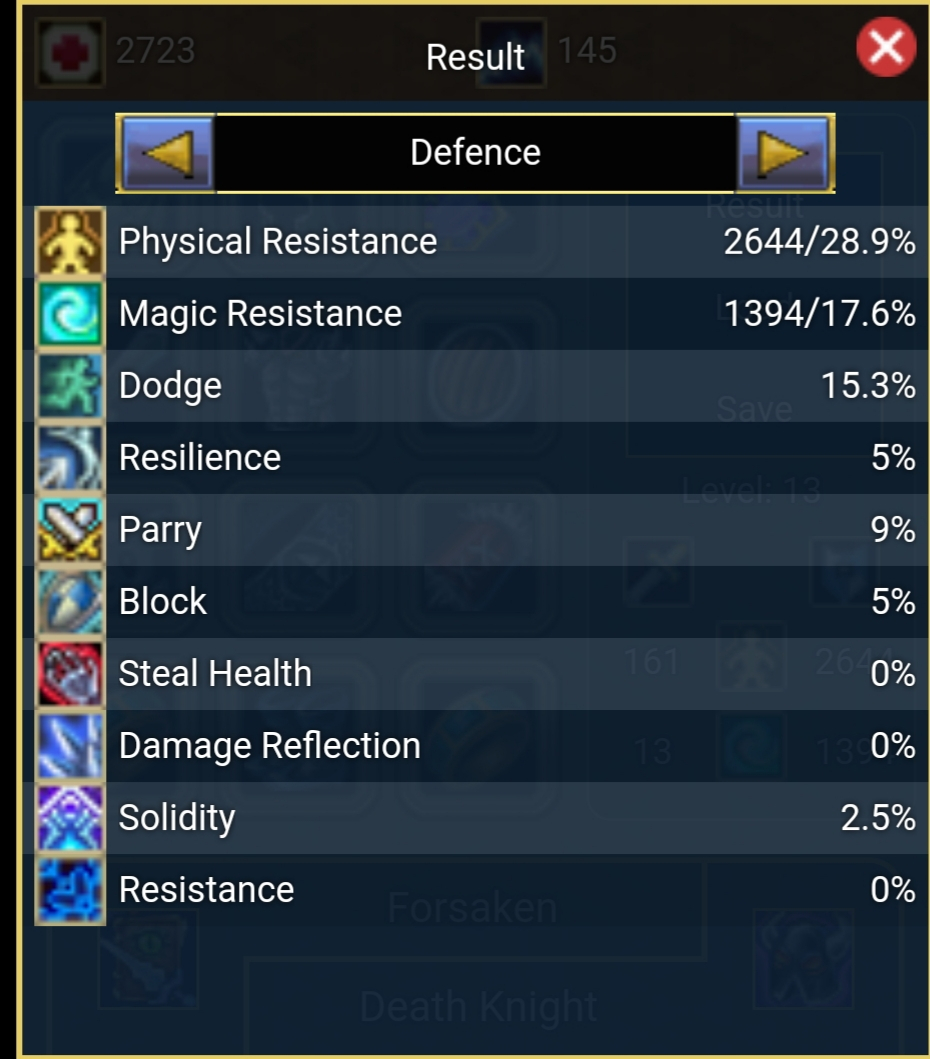
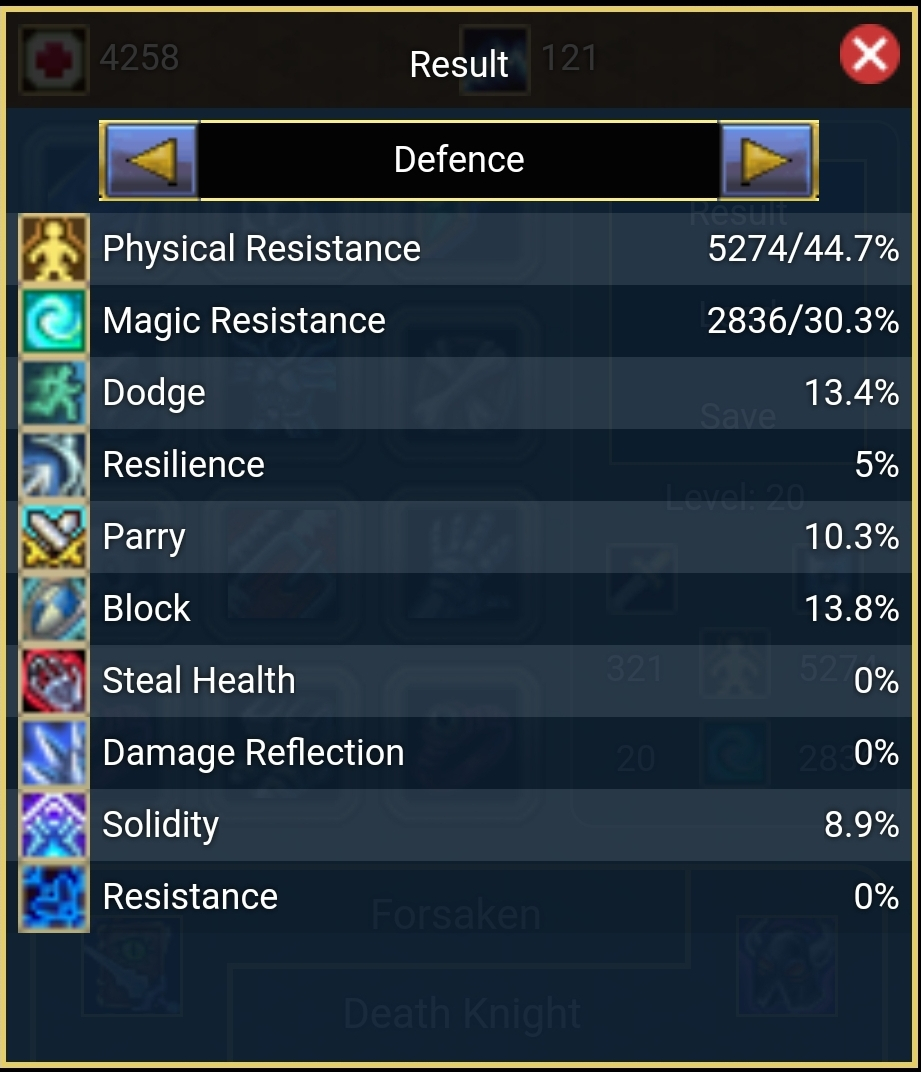
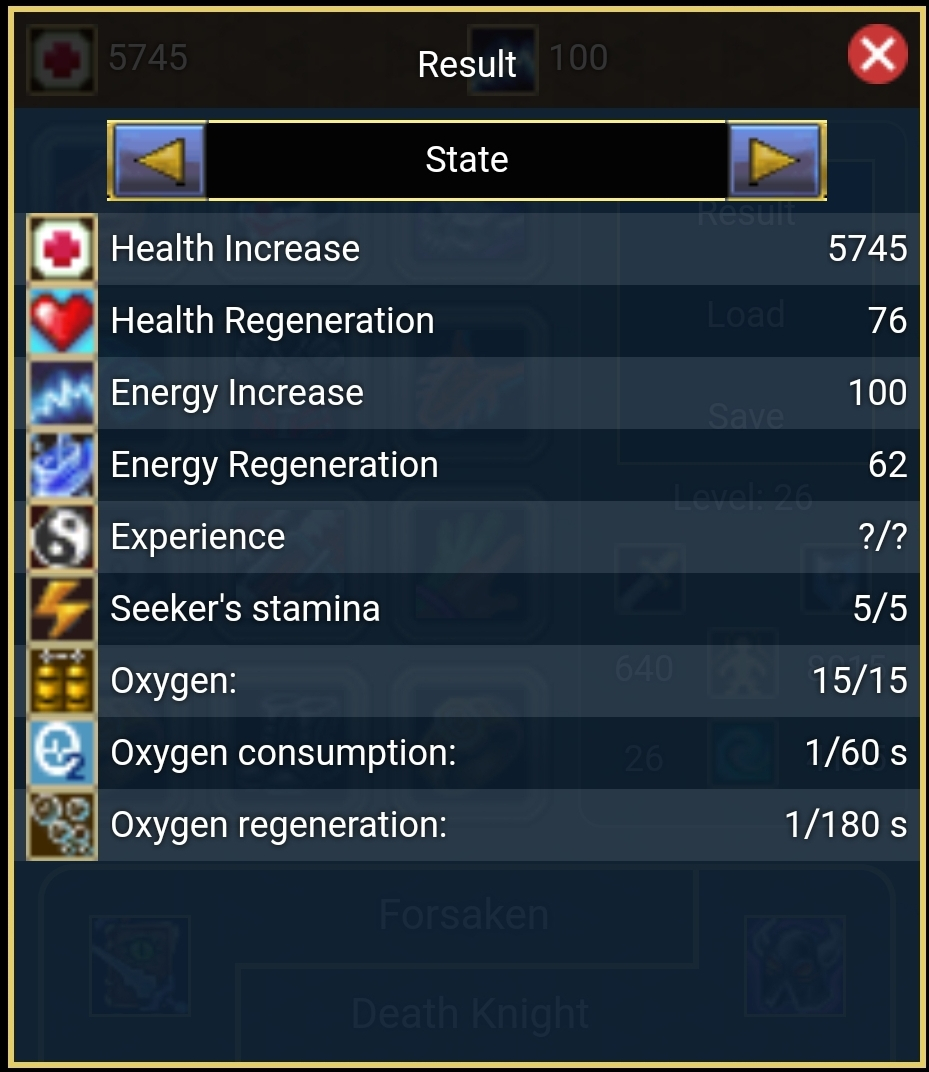
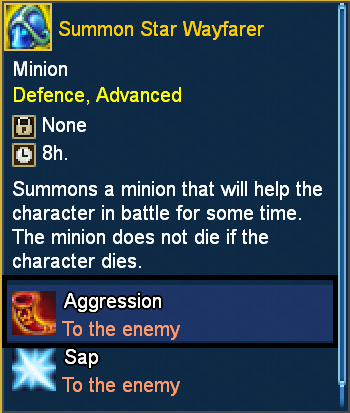
Class Description Faction: Forsaken Charmers are select fighters of the Forsakens. They combine the best features of fighting sorcerers and heavy infantry, and they are equally well skilled when using staves and heavy maces. The enemy never knows what to expect from Charmers: these warriors are able to get close to their opponent, hiding behind their shields and then bind the will of the enemy using spells. Charmers can reverse the outcome of a battle by asking a monster for help or healing wounds of their allies using spells. Features: Group support, range and melee attacks, mixed damage, control and weaken enemies. Attack: Defense: Support: Passive Skills Devotion. Increases the maximum health by 2%, and the physical and magical strength by 4% for the character. Staves. Grants use of magical staves. One-handed Mace. Grants use of one-handed maces. Shield. Grants use of shields. Physical and magic defence increased by 15% while you having a shield put on. Cloth Armor. Grants use of cloth armor. Heavy Armor. Grants use of heavy armor. Basic Skills Dark Prism Magical attack that causes increased damage to the enemy. Type: Active Usage range: 5 yards Energy expense: 12 units Cooldown: 9 seconds Damage deal (units and %): 30 / 55 / 80 / 105 / 130 points of character's magical strength and 110% / 115% / 120% / 125% / 130% of the character's magical strength Combat Healing Instantly restores a certain amount of health of character or an ally and deals them a positive “Healing” effect that periodically restores health for some time. Type: Active Usage range: 5 yards Energy expense: 12 units Cooldown: 12 seconds Instant healing (%): 30% / 40% / 50% / 65% / 75% of the character's magical strength Periodically healing (units and %): 8 / 14 / 20 / 26 / 32 points of the character's magical strength and 15% / 20% / 25% / 30% / 35% of the character's magical strength every 3 seconds Weakness Reduces physical and magical defense of the enemy for some time. Type: Active Usage range: 5 yards Energy expense: 14 units Cooldown: 20 seconds Time effect (seconds): 8 / 10 / 12 / 14 / 16 Effect (%): 15% / 25% / 35% / 45% / 55% Call Summons a monster to a specified region for some time. The monster deals physical damage to an opponent. Type: Active Usage range: 4 yards Energy expense: 18 units Cooldown: 22 seconds Maximum number of summons: 3 Time of summon (seconds): 12 / 15 / 18 / 22 / 26 Time per autoattacks of the summon (seconds): 2.5 Damage deal by the summon (%): 48% / 54% / 66% / 78% / 90% of the character's physical strength Oppression A magical attack that deals damage and negative effect “Stun” to an enemy for some time. The opponent cannot move or apply skills, damaging the target does not obviate the effect. Type: Active Usage range: 3 yards Energy expense: 20 units Cooldown: 18 seconds Time stun (seconds): 1.5 / 2 / 2.5 / 3 / 3.5 Damage deal (units and %): 30 / 55 / 80 / 105 / 130 points of the character's magical strength and 50% / 55% / 60% / 65% / 70% of the character's magical strength Expert Skills Stone Curse Magical attack that deals the negative effect “Petrification” to the enemy for some time. The opponent cannot move or apply skills, the target cannot be attacked. Type: Active Usage range: 4 yards Energy expense: 18 units Cooldown: 20 seconds Time stun (seconds): 3 / 4 / 5 / 6 Otherworldly Blessing Increases the maximum health of the character or group member, maximum amount of energy, as well as the "Block" parameter if equipped with a shield, and the "Critical damage power" parameter and critical healing power if equipped with a staff for some time. When used on an ally, the character and the ally receive a portion of the effect. Type: Active Usage range: 4 yards Energy expense: 22 units Cooldown: 35 seconds HP increased (%): 5% / 10% / 15% / 20% MP increased (%): 10% / 15% / 20% / 25% If a shield is equipped Parameter block increased (%): 2% / 4% / 6% / 9% If a staff is equipped Buff critical healing power (%): 13% / 16% / 20% / 25% Buff "Critical hit power" (%): 13% / 16% / 20% / 25% Ally effect gived (%): 50% / 60% / 70% / 80% Time effect (seconds): 15 / 20 / 25 / 30 Knowledge of the Dead Man Every time any skill is used, the character gets a buff, when five buffs are received, the positive effect “Dark aura” is applied to the character. Dark aura deals the "Stun" effect to the enemy for a while, as well as additional physical or magical damage during the next attack. The type of damage depends on the prevailing physical or magical power of the character. The "Stun" effect prevents you from moving, attacking, and using skills. Type: Passive Time of buff acumulative (seconds): 15 / 20 / 25 / 30 Time of buff stun (seconds): 20 / 25 / 30 / 35 Time stun (seconds): 2 / 3 / 4 / 5 Physical damage deal (%): 50% / 65% / 85% / 110% Magical damage deal (%): 60% / 80% / 100% / 125% Otherworldly Fire A magical attack that deals damage in the specified area, as well as the "Stun" debuff with a specified chance, to all enemies for some time. The effect prevents from moving, attacking, and using skills. The attack is repeated several times. Type: Active Usage range: 4 yards Energy expense: 26 units Cooldown: 24 seconds Number of repetitions: 2 / 2 / 3 / 3 Time between repetitions (seconds): 3 / 3 / 3 / 3 Chance for stun (%): 20% / 25% / 30% / 35% Time of stun (seconds): 1.5 / 2 / 2.5 / 3 Number of maximum pve targets: 8 / 10 / 12 / 14 Number of maximum pvp targets: 3 / 4 / 5 / 6 Magical damage deal (%): 50% / 55% / 65% / 80% Eye of the Darkness Applies the "Eye of darkness" buff to the character or and ally for some time. The effect increases physical and magical protection, the "Accuracy" parameter , and the chance of detecting masked enemies within a certain radius. Type: Active Usage range: 4 yards Energy expense: 22 units Cooldown: 25 seconds Increment of defense (%): 20% / 25% / 30% / 35% Time effect (seconds): 24 / 26 / 28 / 30 Help of Chaos Summons a monster to the character or an ally for a limited period of time. The monster restores the certain amount of character's or ally's health every 5 seconds. And deals magic damage to the enemy. Type: Active Usage range: 4 yards Energy expense: 22 units Cooldown: 20 seconds Time of summon (seconds): 14 / 16 / 18 / 20 Healing from summon (%): 55% / 65% / 75% / 90% Demonic Pact Increases the life time of monsters summoned by the Call and Help of Chaos skills, and reduces the damage they receive for the duration of the skill. The effect power increases as the skill develops. Permanent skill. Type: Active Energy expense: 20 units Energy regen reduction (units): 5 / 7 / 9 / 10 Cooldown: 8 seconds Increment lifetime of summons "Call" and "Help of Chaos" (%): 40% / 50% / 60% / 70% Reduction of damage received of summons "Call" and "Help of Chaos" (%): 12% / 16% / 22% / 28% Goading Deals the “Aggression” and "Deceleration" debuffs to all opponents within a certain radius around the character for some time. The aggresion effect causes monsters to attack the character, and only knocks down the target of the attack for players. The "Deceleration" effect reduces the speed of movement. Type: Active Energy expense: 14 units Cooldown: 14 seconds Aggression (units): 15000 / 35000 / 70000 / 150000. Aggression (yards): 2 / 2 / 2 / 2 Reduction in speed movement (%): 20% / 24% / 28% / 32% Time of debuff (seconds): 4 / 5 / 7 / 9 Maximum pvp targets: 3 / 4 / 5 / 6 Summoner Skill Forces all the monsters in the location summoned by the Call skill to attack the selected target, as well as increases the damage from their next auto attack and allows them to deal damage to all enemies within a certain radius. Type: Active Usage range: 4 yards Energy expense: 9 units Cooldown: 9 seconds Damage from auto attacks of "Call" increased (%): 25% / 35% / 45% / 55% Number of area damage given by auto attacks: 2 / 2 / 3 / 3 Yards of area damage given by auto attacks: 1 / 1 / 2 / 2 Maximum pve targets: 8 / 10 / 12 / 14


-
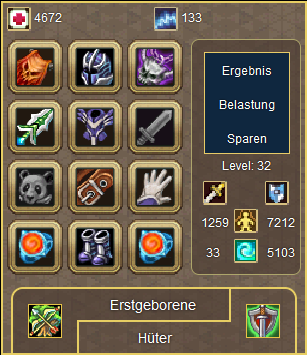
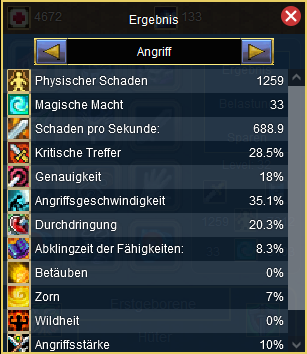
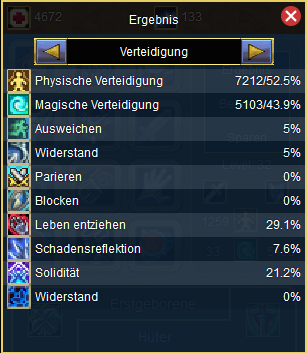
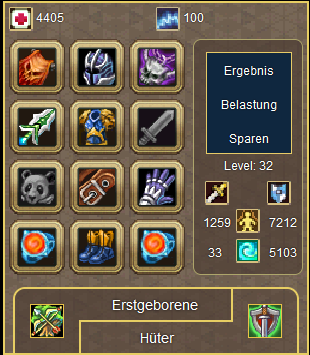
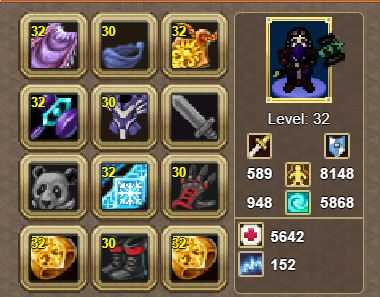
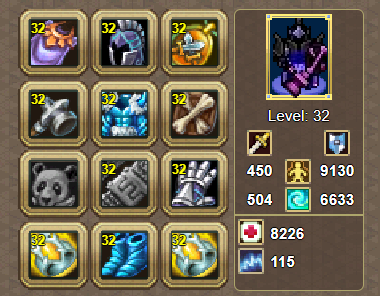
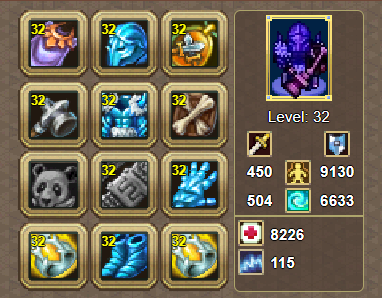
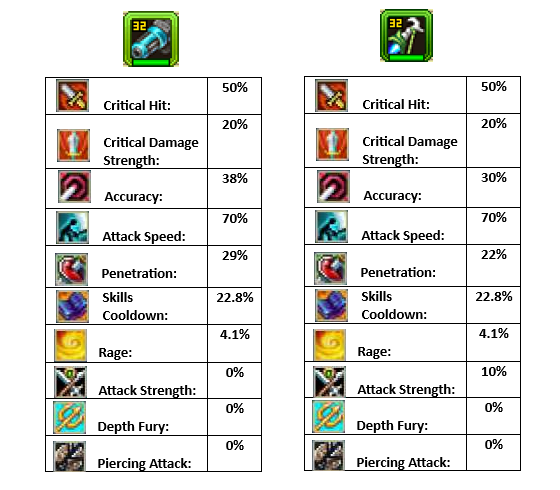
Learn how to do mermen dg and get ur mm gears in my guide video(commentary) Bow gives penetration, not pierce
-
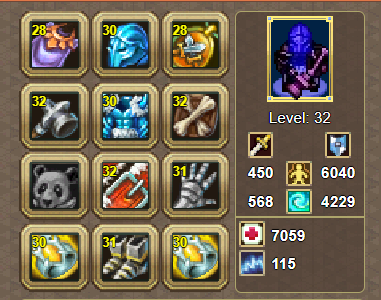
Learn how to fight the boss, stop dying and wasting my stam ty
-
I bid you welcome, my dear guests, in this topic. Today I'm going to write something that many of our new members may have wondered about, which can be resumed in these few questions: 1. Is deathknight a good class to start with? 2. Can deathknight solo bosses/baits/raid bosses? 3. How can I build my deathknight in order to be able to solo stuff? 4. Is it cheap to build a deathknight? 5. which skills should I buy first? Well, my dear fellows, in this guide I will try to answer step by step to any of these questions, explaining also pros, cons, builds, why of these builds, statistics which deathknight may love/dislike, skills he should buy asap and so on. It's definitely a full schedule, isn't it? so let's start with a quick analysis of this class. 1. Analysis of the DeathKnight The DeathKnight is an extremely versatile tank. It can reach enormous ammounts of damage and defence, it is able to ignore a large ammount of damage dealt and, most importanlty, it becomes stronger if he's surrounded by enemies. In order to realize about this last part, though, you'll need to play for a decent ammount of time and get used to its play style. As a tank, it benefits a lot from statistics like HPs and HP regen, but it requires a lot of Mana Reserve, since its skills litterally burn out your mana reserves (high cost in general and balanced in both attack and defence - that means you'll use a lot of such skills and as a conseguence you'll see your mana drop quite quickly). Once disliked enough not to let him even join parties for Normal Berengar's Tower, as time went on this class has gained a lot of respect, becoming (according to some experienced players) the best tank existing on MC side and the 2nd in game, after the Warden. More and more players have now got in touch with this class, creating everyday wonderful builds and making it suitable for basically any scenario. I'll proceed now with further infos, but let's start to talk about a delicate topic that I'd love to talk about, and this is the equipment [2] 2. Equipment and Suggestions Before starting with this section, I'd like to clarify few points. The following equipments I'm going to disclose have a mere demonstrative purpose and were thought for players who cannot afford to buy miracle coins or they are at a point to decide whether to invest or not on the character. From a personal point of view, unless you're a low level arena player, I see little to zero reasons to invest on your character (to buy equipments at least) if you're not at least at lv18. If I had coins available, my humble conseil is to make gold with them instead of buying pieces of equipment that you'll eventually drop cause they're too outdated. But even here, don't worry! I have thought about our beloved coin-users as well! 😉 This guide will start from the Lv13, because, due to the improvement the game has made on equipments on the first islands, it is enough to select every tank item you have the opportunity to choose, when completing the quest. A. Selection for lv13-19 So [ this ] is what I believe it is something good to start with. In order to achieve something like this, I hereby invite you to keep every single gold coin you receive through your journey on the first island. As you can see, the thing I focused on mostly in this equip is the HP Regeneration. I decided to choose this because on native islands and/or Irselnort (or even swamp) you might start to get in touch with strong enemies. It is important for you not to spend gold in order to get consumable items, independently if you're in battle mode or you're just resting from a fight. This build will allow you to try to be as tanky as possible. You may want to update it from time to time, but my advice is not to spend too much gold for something that will add you few points only on your build. You may also notice that I haven't (nor I will) put magic damage items on the build - the main reason is because this class has got yes some magic-based skills, but none of them are actually worth good enough to create an apposite magic build for this purpose. B. Selection for lv20-25 Now that you've finally reached this point, I believe we may start with something like [ this ]. Main improvements made with this build is the introduction of particularly new statistics. The point of all of this is to start getting in touch with them, as well as to start to look for event items, which, as you'll see soon enough, will result as a very good selection for this class. These items, especially the event ones, might be yes rare, but they are usually cheap enough and good to start with. Your defence is improved as well and defensive statistics are balanced enough to start letting you being tough enough, at least for the first part of Ayvondil. You may also want to start to join even low level guilds, in order to get used with guild mechanisms. Lately, more than amps, people seek for people who are active enough to make some gps. The best period to join a guild, in my opinion, is from the beginning of Events (Halloween - World Creation - Spring, most importantly). Guilds can give you a lot of opportunities to become rich and to improve quickly. C. Selection for lv26+ [ This ] is where things start to get serious. Even here it is hereby advised to keep some gold in order to improve. If you followed the previous advices, getting these items won't be too hard, especially for the event items: low level ones are usually cheap and very useful. Here I focused a lot also on offensive statistics and even more on a new statistic that this class loves: Life Steal. If you decided that it is time to invest on your character, these are just few of the many builds you may create in order to improve your character: [ 1 ] [ 2 ] 3. Skill Build and Suggestions Here we start with another very discussed point. As you may understand, a skill buid is very, very personal, but I will try to show you the ones which, in my opinion, deserve to be levelled and those who should not. Thorn of Death: Our beloved primary damage skill. No more and no less! Useful everywhere because, who doesn't like having a bit more damage? The higher the level, the higher the damage. The nice power from this skill comes from the relics you can put on it. We will discuss about this later. Having it at 5/5 would make of that work at its maximum power, and I honestly don't dislike it Exhalation of Darkness: This is a mix of a Magic Attack combined with a Stun which lasts 1.5 s. The stunning ability is even more appreciated than the damage itself which, thanks to the latest class' update, lasts up to 4 seconds if maxed. If you love the stunning capabilities of this class, as well as magic damage, you might want to show this skill some love and level it up to 3/5 or even maxing it by removing the points from thorn and add them here (not advised unless PvP - the skill doesn't deal critical damage). The buff will not disappear if the attack gets parried/blocked/dodged; something you'd better keep in mind ^^ (UPD 9.3.0!) Provocation: It's the skill every tank class has got. It protects the healer from the rage of the enemy and the damager from the same reason. It has a low cool down - good reason to add in it some good relics, don't you think? On PvP, it makes the enemy lose the current target. Make sure, if you are PvE, to have this skill at level 3/5 at least Threads of Darkness: One of the most intriguing skills the DK posseses. It pulls the enemy close to the DK, in order to expose him to your party (or simply to an enraged DK). There are some more things this skill allows you to do: the enemy pulled in this way sees also the damage received increased and he won't be able to move for a short period of time. Increasing the level of this skill will allow you to increase the ammount of time the "Increased damage" debuff lasts and the ammount o time the enemy stands on the ground. Honestly, I believe that the very reason people use this skill for is the ability to pull a very far away enemy close to you, and not for the other two effects; due to this, I would recommend to keep this skill at 1/5 Dark Shield: The main defensive skill of this class. Very efficient skill considering that you only need to press it once in order to make it work. It is highly def-dependant, hence, in order to make it as strong as possible, you may want to keep this statistic as high as possible. A good combo with this skill is the use of Aura of Hatred and some relics which increase Dark Wing's effectiveness. Increasing its level will also increase the chances to work, the time it lasts. Having this skill at 5/5 is quite a must, if you ask me. And now about experts - this will be quite hard for me but I'll try as well. Saturation: This is one of the key skills of this class. In exchange of a (quite too high currently - 10%) percentage of HPs, your Life Steal parameter will higly increase for a short ammount of time. Perhaps it was necessary to create specific life steal builds in order to use this skill but as for now, if you don't plan to have a lot of HPs, this skill can be a nice power up in order to survive by killing you enemies. It has a good synergy with Steel Hurricane and a LOT of mobs surrounding you. That was just a little hint, where the skill Threads of Darkness might result in a good way to make the enemy very close to you. The first disadvantage, maybe, relies indeed on the high ammount of Hps required to use this skill and the way too short ammount of time it lasts, even maxed, however, under a certain percentage of your maximum HPs, the skill won't require any sacrifice, depending on the level of the skill (UPD 9.3.0!). Steel Hurricane: It is a damage skill: it deals damage to every enemy surrounding the DK up to 1 yard from it. Levelling this skill up will increase the ammount of damage the skill deals but it won't increase the radius of the skill. It works well combined with Aura of Hatred which will increase the damage dealt even more. It won't be a bad idea to combine it also with Saturation. if you see yourself crowded by mobs... and to speed things up, it won't be a bad idea to pull an enemy closer to you with Threads of Darkness either ^^. It works pretty well in PvE, so I encourage the player to take it among the first experts selected. Having this skill at 3/4 or even maxed won't be a bad decision. Totally bad idea if you plan to go for PvP - there are better skills to max. It's a good alternative also for the every day more popular Magic Damage builds, as the type of damage dealt depends on the prevailing ammount of damage the class has got (e.g. you got more physical = it deals physical dmg; you got more magical dmg = it deals magical damage!) (UPD 9.3.0!) Death Call:. The AoE aggro skill. It spreads an aura which aggros every enemy close to the DK and deals Magic Damage for 4 times. The damage depends on the skill level as well as the ammount of magic damage the DK has got. Increasing its level will see a larger ammount of aggro given, increased aggro time and the damage dealt increases a bit more. Do not understimate this skill in PvP: making a crowd of players lose their target while it's fighting against another crowd of players is not something a player should understimate, especially in a scenario where you shall think and act fast. If you plan to be a PvE player, then this skill is one of the first ones you should get. For a maximized power, make it at least 3/4, but it will work perfectly fine even at 2/4 Aura of Hatred: It's a buffing skill. Increases the DK's defensive and offensive numerical statistics for a certain period of time. Levelling it up will make the skill last longer and improves the effect of the buffs given, and it combines perfectly with Dark Shield - which will work better - and Steel Hurricane - which will deal more damage. It is a jack of all trades, but a long cool down, justified by the ammount of power this skill basically gifts. Maxing this skill out might result in a wise choice, but in that case, make sure to have got at least 15% of CoolDown parameter, so that you won't have to wait for too long in order to re-use it. Sharp Shadow: Elusive skill: it works as a ranged skill and it is able to stun the enemy dealing him High Magic Damage. It might work combined with Saturation. and that will result in a sort of Healing if Saturation is actived, but the ammount of HPs you spend for that skill will not, unfortunately, be healed back by that combo. This skill is the best friend of PvP DKs and the worst enemy for Healers, alongside Blow of the Silence: if you plan to PvP, make this skill 4/4, otherwise, don't buy it at all. Secret Reserves: Very hated skill, once, but after the several adjustments it has received now it became quite balanced. It is a Passive Skill and, in order to work decently, requires to have a lot of HP Regeneration. Although it might seem a very bad skill, combined with Blood Protection might grant the Dk a chance to survive in critical moments and it's still used a lot on PvP on tough moments. I would still recommend it on PvP though (4/4) - with the right build - especially against Damagers, which will basically need to kill you twice with that and,who knows, in the meanwhile it might be you the winner this time. From time to time, you may want to seek for a particular book that boosts decently the ammount of HP regen given as well as more HPs, which are always welcome in PvP: Power of Life Blow of the Silence: Skill that denies the enemy from using his skills. Increasing its level will see the effectiveness increased (up to 8s, which is incredibly high). Increases also the Magic damage and the Physical damage deal on the next attack. It is a skill that might seem a must to max, but in a ManyVSMany scenario, I can personally guarantee that it works perfectly even at 1/4. If you face some tough guys though, you may want to make it maxed so that he'll need way more time to recover. Blood Protection: understimated skill, due to the little ammount of time it lasts and for the very high cool down it has. However, in 1 vs many scenarios it reveals to be an extremely useful skill, especially if maxed, which will give time to your mates (or even to yourself) to heal up/use a potion. If you are on the first stage of the game and you want to learn stuff like Labyrinth, then I would recommend to at least make it 3/4 until you become confident enough to live without it. Knight's Curse: Interesting skill, incredibly useful when in party or alone if you add a bit of magic damage on your equipment. It suits perfectly in both PvP and PvE scenarios, because it can be affected by buffing parameters (Rage/Fury of Dephts/Ferocity). On underwater territories it can deal massive damage if the Deathknight uses a Spear or Mace (make sure to pick up magic damage items though ^^). The only con I'd point out is the use of magic damage: if you decided not to have such statistic in your build then this skill might not be that cool; buy this skill only if you are planning to add a bit of magic damage in your equipment. It can be perfectly combined with Blow of the Silence and through that you can mute your enemy from any distance (as long as 1 - there is fire on the ground and 2 - the enemy doesn't move from the zone; it can work anyway even if someone steps on the fire and you trigger Blow of the Silence) 4. Statistics and Improvements you may want to read about This is the point that I'd like to show my ideas about which statistics you should base your character on. First on the list of course is: -Life Steal: it is useless to point out that this statistic is quite a must for a perfect DK. However, Life Steal runes (from which you get basically 16% of Life Steal) are quite expensive, and this is a reason of why I told you not to change too many items at the first stage of your jurney with this class. Nonetheless, if you manage to get a good ammount of such statistic, you may want to combine it with two more, and they respectively are Critical Hit and Accuracy. Critical hit will allow you to double your damage and from it you will also double the ammount of HP you heal from your enemies. Don't forget to make sure to aggro as much enemies as possible - even low level ones (actually, they're the best ones) - and to use Steel Hurricane to maximize the work. Accuracy is necessary because you won't heal from your enemies if you can't hit them. In order to maximize Life Steal you may also want to use some relics: Terrible relic of Steal Health (use it on Threads of Darkness), Terrible Relic of Vampirism (Use it on Provocation and eventually on Dark Shield too; If you have to choose, definitely Provocation) and Terrible Relic of Blood-Devourer (on Thorn of Death). These relics shall be used wisely: use Threads of Darkness in case you are facing a mob which will surely resist your skill - this shall grant you free Life Steal for some time. While recovering, you may want to use Blood Protection in order to reduce even more the damage received and to get the maximum ammount of life back - this is in case you're soloing bosses, or simply if you're on a hard time but you're too lazy to click on the potion. If you arrived to the point to be rich enough to buy the server, then you may want to consider to get these 3 books for you: Enhanced Steal Health , Secret Power of Vampirism , Distorsion of Life In order to maximize Critical Hit i hereby recommend the use of the Icy relic of Rampage on Exhalation of Darkness - mind that you'll need the use of another statistic in order to trigger this relic, which is: -Rage: this statistic revealed to be handy in every situation, not only for the damage buff it gives, but also thanks to the second effect, which will increase your HPs if you kill an enemy (being under rage effect) with a level Higher or the Same as yours. This is why I strongly recommend to put this statistic somewhere on your equip - as weapon/shield or crystal on your equipment. This statistic also allows you to use one of the best relics DKs can use: Icy Relic of Intractability. Equipping it to Dark Shield. and using it while being on rage buff, this relic will increase the effectiveness of your skill by 40%, without further costs! This statistic is perfect for classes who have use of DoT skills and, thankfully, DKs have got Death Call. -CoolDown:. this statistic is quite good to have for our class. In case you realize to have something like 70/80 Energy Regen, then you may consider to replace an Energy Regen crystal with this one. I wouldn't recommend the use of Penetration; More damage means more life recovered through life steal, but remember that you'd have to replace a good crystal with this. It is not our job to deal damage: there are better classes for that ^^ -Stun: It is a statistic that can help you to earn some time during hard situations like "Descent in the Grotto" event, although not useful anymore if combined with Death Call because, due to the recent update, the stun does not trigger with the damage dealt through this skill. If you realize to have a lot of accuracy, then you may want to replace an Accuracy Crystal with a Stun Crystal on on your shield (25% of accuracy is more than enough for a tank). Relics like Relic of Stun will be fine enough for the same use. This is all. I realize that I perhaps could have written way more specific stuff, but I want this skill to cope with the comprehension of new people who decided to approach with this class for the first time or simply for the ones who would like to know something more about this class. Mind one little thing also: I tried as much as possible to avoid to put specific statistics such as the Cool Down time of every single skill or the precise time a skill lasts, because this is a kind of information a player can simply find in game. Every word given here comes from my game experience and on how i personally play this class. I hope not to have disappointed the expectations of the way more experienced players than me, praying also that from this guide may grow comments which might eventually improve the content of the topic itself. I thank you all for your kind attenction and I bid everyone a Nice Day!


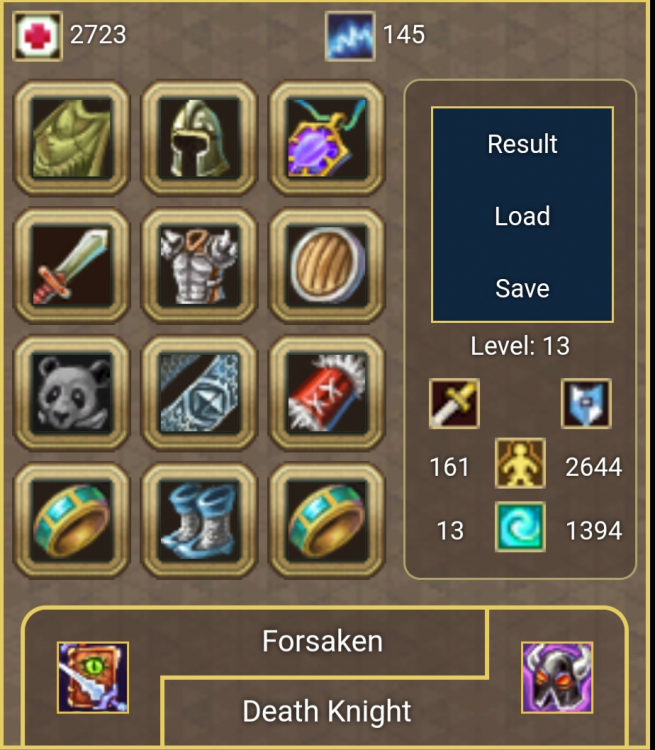
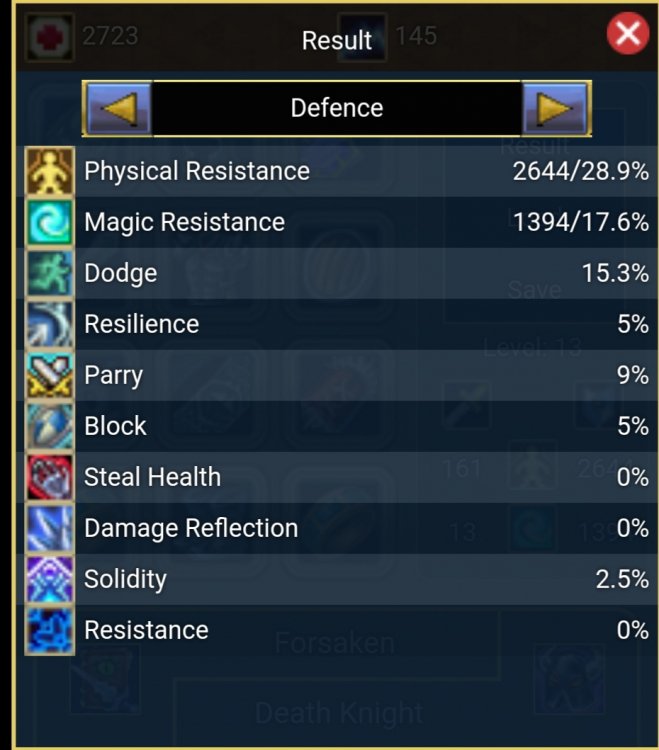
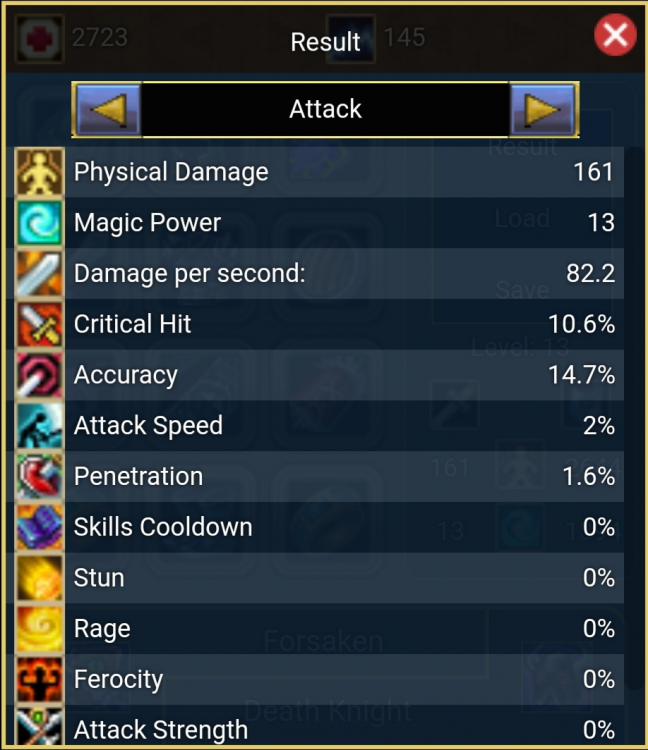
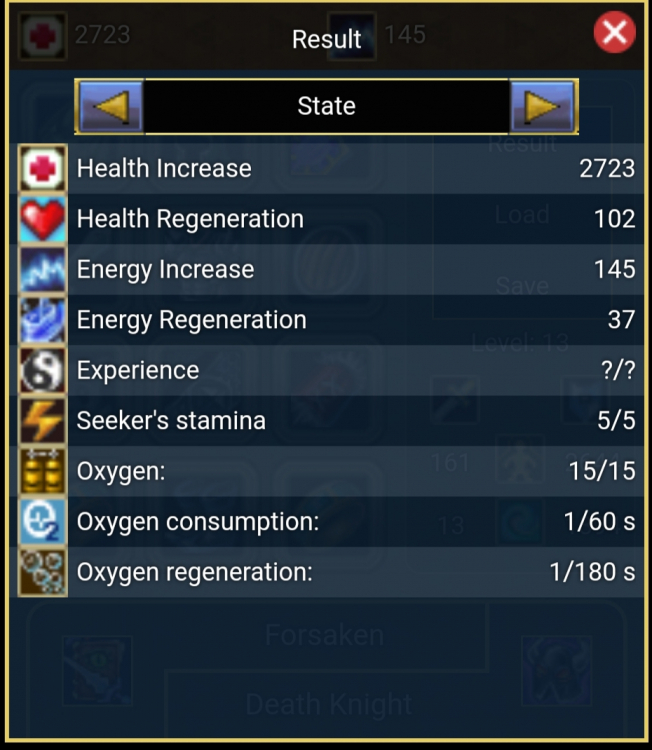
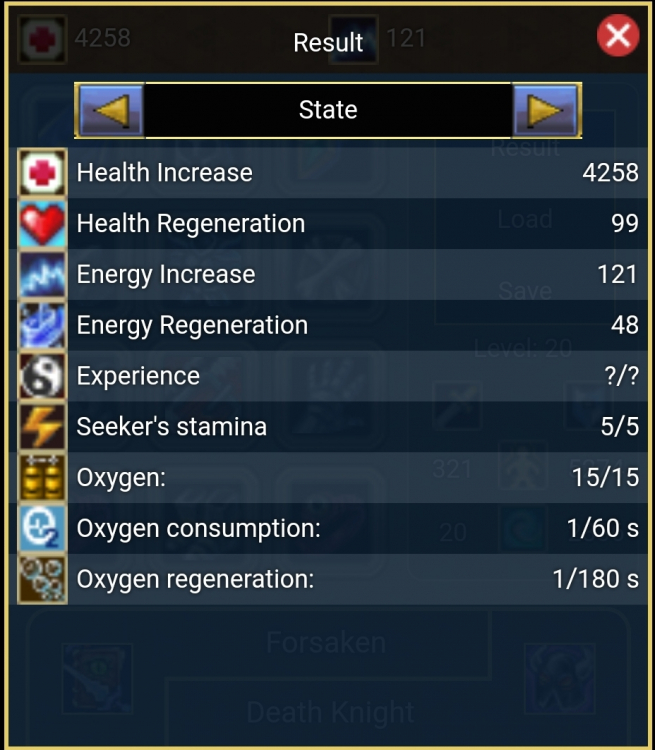


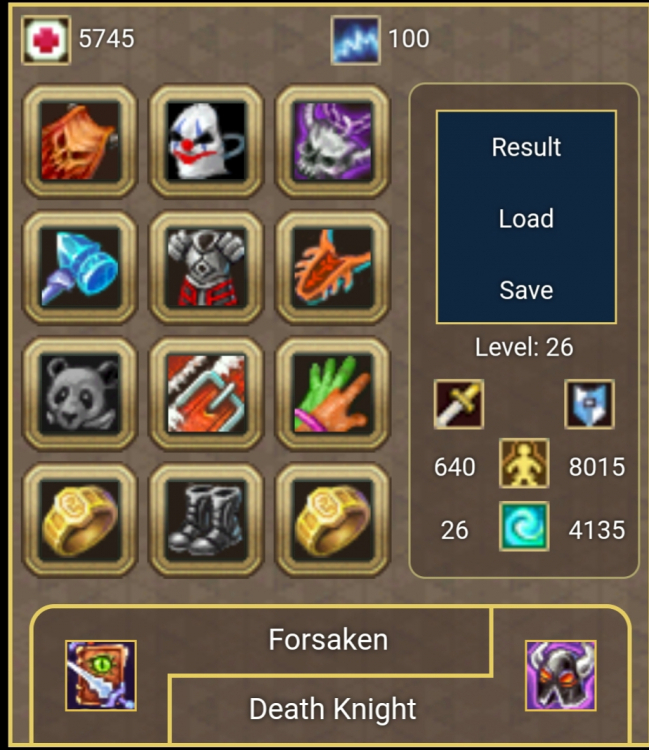
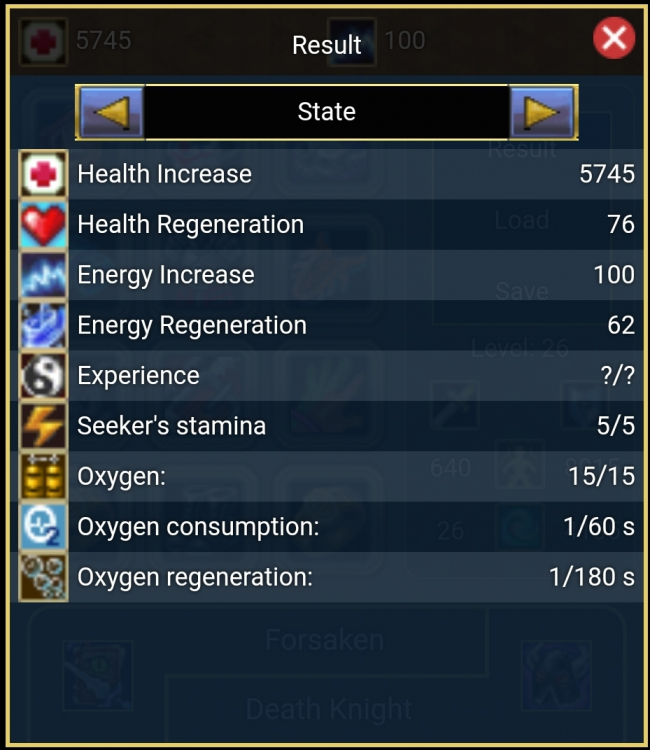

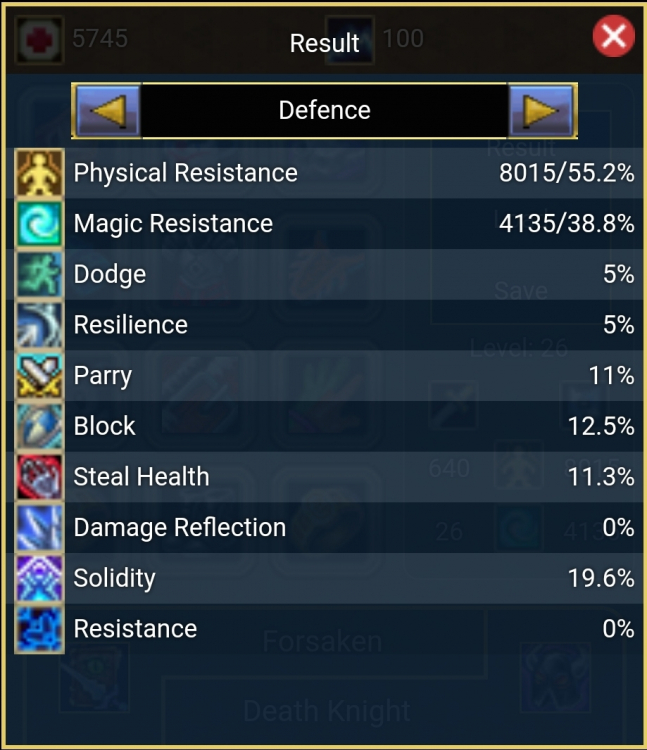

- 118 replies
-
- 12
-
-
-
-

-
Everything about Blade Dancer (BD) 1. Introduction 2. Which Gears and Weapons can BD use? 3. Blade dancer Basic Skills 4. Everything about PvE BD 4.1 Basic Skills build for PvE 4.2 Relics For PvE 4.3 Expert Skills info and build for PvE 4.4 Gears and Weapons for PvE 4.5 best Buffs and Minions 4.6 Rare Books 5. Everything about PvP BD and Arena 5.1 Basic Skills build for PvP 5.2 Relics for PvP 5.3 Expert Skills build for PvP 5.4 Gears and Weapons for PvP 5.5 best Buffs 5.6 Rare books 6. Talents for BD 6.1 Knowledge Talents 6.2 Ayvondil T5 Talents 1. Introduction Blade Dancers: BDs are agile and strong swordsmen in both PvP and PvE as well, their skills stand out for being mixed, being very skilled in defensive and offensive matters, being able to use heavy armor and two weapons, being focused on full speed or full tank the class stands out being able to do both functions. A very fun class to play, especially if you like diversity in your game. 2. Which Gears and Weapons can BD use? Heavy Armor (Better defensive stats) Light Armor (Better damage stats) Can use Two one-handed Weapons, they can be: Daggers (1.7 interval between attacks) Swords (2.0 interval between attacks) Axes (2.2 interval between attacks) Obs: The physical damage of the weapon on the left hand is reduced by 40% and the magical 30% 3. BD Basic Skills info Flash Strike: a skill that deals instantly damage to a single enemy, this skill combines your stats damage with more (40%43%46%49%-52%) per level. Agression: increase the "Agression" parameter on a enemy, usefull if you are a Tank BD (7500-15000-25000-45000-75000) per level, but I only recommend to use this skill in max 3/5. Parry: increase your "Parry" parameter, very usefull for arena and PvE Tank BD, (1%-2%-3%-4%-5%) per level, amazing skill for Full Parry BDs (the max Parry is 30%) Sap: decreases enemy "Damage" and "Speed" parameter, usefull against full speed enemys on arena and high damage bosses on PvE. Reduces enemy damage in (12%-14%-17%-22%-29%) per level. Reduces enemy Speed in (12%-16%-20%-25%-35%) per level Hamstring: this skill damage is equal to (40%-43%-46%49%52%) of your stats damage, imobilizes the enemy and aplies the "Bleeding" effect, enemy receive 3x damage. Stun time (2-3-4-5-5) per level 4. Everything about PvE BD BD PvE as mentioned before, it can do two roles, Tank or DPS (Damage), currently it is more recommended to do a DPS BD, because we have other classes that play the role of Tank, but in this topic I will show both Tank and DPS. I will show Builds for others levels too, because I saw a lot of BDs lv13 and lv20 for example, and when you reach lv20, start using your skills points only o new skills, because they are better than the basic ones. 4.1 Basic Skills build for PvE: This build for lv13 BD (has only 7 skill points) 5/5 1/5 4/5 1/5 1/5 This build for lv18-25 5/5 1/5 5/5 3/5 1/5 This build for lv26+ 5/5 1/5 5/5 1/5 3/5 This build for full Tank BD 1/5 3/5 5/5 1/5 5/5 Obs: I used another build for lv26+, because most of mobs and bosses actually have high parameter of resistance, it mean that there are better skills than hamstring to use. And 3/5 agro on Full tank build is enough, especially if you are using agro pots. 4.2 Relics for PvE Relics are ways to improve basic skills, here I'll show you the best ones for your PvE, but as you can see, there are 8 slots available, so you can use different relics and switch them whenever you want to other means. There are 4 types of relics, they can be: Offensive: increases the attacking potential of the skill by adding especial effects when triggered. Defensive: enhance the defensive effect of the skill and allow the character to better cops with attacks. Empowering: especial relics of instant reaction, increase the effectiveness of the skill when attacking and defending. Group or Castle: the effect may vary depending on the number of nearby players from the group, they are like empowering, but you need group to see the full potential, and increase the chance of some relics to trigger in 5%. Flash Strike Relics: full dmg Relics, up to 24% dmg increased and gain a lot of penetration when the relic of cruelty is triggered Agression Relics: this skill is more usefull for tank BDs, thats why I chose to put the agro and the physical blocking, but even if you are a DMG BD, and use this skill, you can chose this relic if you like more vampirism, chose this Relic instead of the physical blocking Sap Relics: thats the best basic skill in my opinion, the Relic os Awkwardness enhance the skill potential, when triggered, reduces the enemy speed by 55% if 5/5 Sap, and on bosses, if they resist, the Relic of steal health helps you with more vampirism. Hamstring Relics: this is more for a PvP skill, but you can use for PvE to trigger Relics like the Relic of Swiftness, and increase your speed by 30% or reduce the enemy def. Parry Relics: another skill like agression, better to use if you are a Tank BD, has usefull defensive relics, that can decreases enemy "Penetration" parameter to 0%, and the Curse Removal stops effects like Poison and bleeding. and again you can use the Vamp relic if you prefer over the physical blocking one. 4.3 Expert Skills info for PvE Blades' Power: increase your "Attack strenght" parameter for (8%-15%-24%-30%) per level, and reduces your mana reg in (5-7-9-10) per level. Best BD skill for DMG BDs. Rush: the BD runs into the place you select ignoring every stuns and debuffs, a expert agression skill (15000-35000-80000-140000) agression points per level, and stun the enemys in the area for (2-3-4-5) seconds per level, usefull if you are a tank BD. Strike Hurricane: increases your "Speed" parameter in (5%-7%-10%-15%) and "Agility" (12%-16%-20%-25%) per level, essential skill for a DPS BD. Sonic Boom: a skill that deals damage in a 3x3 area, the damage on prox enemys is (33%39%-52%-72%). If you reached lv18 and dont have any new Skills, I recommend this one first. Magic Transformation: a skill that protects the blade dancer from attacks, the amount of damage hits the shield can absorbs depends on your defense too (can tank like 1000-1500-2000-2500 damage) very usefull for tank BDs. Mark of the blade: Increases your "Penetration" parameter in (5%-7%-9%-12%) per level and decreases enemy "Dodge" in (-4%-7%10%-15%) and "Parry" in (-3%-5%-7%-10%) per level. Usefull if you are a Damage BD and enemys are dodging your attacks. Enlightment: Increases your "Accuracy" parameter in (7%-10%-13%-17%) and your "Dodge" parameter in (5%-7%-10%-15%) per level Spirit of Resistance: The BD receives a Resistance buff that can ignores a negative effect (1-2-2-3) Resistance buffs for (10-12-14-16) seconds per level. Every debuff you receive removes a Resistance buff. Counterattack: the one who attacks the BD, receive damage equal to (25%-32%-36%-40%) of your damage per level, the skill duration is (8-10-12-14) seconds per level Best builds Reaching lv18 first skill I recommed (as a damage, at a low level is more important to have a Damage skill) 1/4 Reaching lv20, next skill to buy and where to use your 2 skill points (having this skill at lv20 3/4 is an big advantage) 1/4 3/4 Reaching lv22, next skill to buy and where to use your skill point 1/4 4/4 1/4 Reaching lv24, next skill to buy and where to use your skill point (now start focusing on your speed) 1/4 4/4 1/4 2/4 Reaching lv26, next skill to buy and where to use your skill point 1/4 4/4 1/4 3/4 1/4 Reaching lv28, next skill to buy and where to use your skill point 1/4 4/4 1/4 4/4 1/4. 1/4 Reaching lv30, next skill to buy and where to use your 2 skill points (Mark of the blade is a better skill in my opinion, now start focusing on your Penetration) 1/4 4/4 1/4 4/4 1/4 1/4 3/4 (or if you preffer) 3/4 Reaching lv32, next skill to buy and where to use your skill point (now you have 3 skills at 4/4) 1/4 4/4 1/4 4/4 1/4 1/4 4/4 1/4 1/4 Full tank BD build (this build is for a full tank, that don't care about damage) 4/4 4/4 1/4 4/4 1/4 1/4 1/4 1/4 1/4 Obs: if you have the class talent "Stellar Blessing" you gain one more skill point, and can explore others Skills. 4.4 Gears and Weapons for PvE there are a lot of good Gears and Weapons, but you need to keep atention on important atributes, like pene, crit, speed, Accuracy and attack strenght, because actually the DPS game in a overall is more focused especially in attack strenght, having a good weapon with it, and a good set with atributes that completes what is missing does a lot of difference. And as a tank, keep atention on things like, defenses Magical/Physical, Solidity and Parry, having a good % of Solidity is the most important nowadays, reducing the chance of receiving a hitkill. Best Weapons for Damage BD Craft Weapons: are very good weapons, having 3 essential atributes in them and the damage of a weapon with +1 level (example: a lv32 etheral craft sword has the damage of a lv33 sword). Obs: Be carefull, not all of them have the "Speed" parameter, you should avoid using Weapons without speed as a Damage. Spring Weapons: those are the most popular and the best Weapons for Melee DPS, they fit extremely well in Damage BDs, having Attack strenght is sure an advantage. Swords: are the most used Weapons, and the best one for towers especially, having "Critical" parameter, BD has no critical hit skill and lacks on it, this sword is the weapon who representats BD the most. Daggers: some BDs use them, on high HP bosses like 300k+, the dagger's speed surpasses the other weapons, but its lack of crit is something that will be noticed, you will very hardly get a good amount using them, and even if you do, you will sacrifice other attributes T5 Weapons I recommend using only daggers, because they are the only weapon with speed, even if you have the Speed and Rapid Fury book you will probably not getting 70% speed without buffs. Best Weapon for full tank BD Craft Axe: if you are a full tank BD, and dont care about speed, this is the best Weapon for you, having an defensive atribute in a weapon is an advantage for a Tank, can reach 30% Parry without hard efforts using them. Obs: there are every other levels of the weapons showed here, you can have those same Weapons in your lv10, 20, 24 BD etc. Best Armors for Damage BD I will show here some of the best armos you can use, to increase your most important damage stats like Accuracy, Speed, Crit and Penetration. Obs: Use Defense rune and Speed Crystal at Boots, Vambraces and Armor, and Solidity rune and Accuracy crystal on the helmet. Best Atributes you can find ir armors for damage BD: Ayvondil sets: you can encounter this set in map 4 Dungeons, having lv20-22-24-26-28 and 30. This sets has critical in every part, and Accuracy/Speed bonuses, use these if you think you don't have enough speed and mobs are dodging too much. Coliseum sets: you can encounter this set in map 2 Colosseum dungeon having lv20-22-24-26-28 and 30. This set is the best if you want a full Penetration BD and don't plan buying mermem gears. Mermem sets: you can encounter this set in map 4 Mermem dungeon, having only the 32 level. This is the best and most op set that a Damage can use, having 2 parts, you unlock the "Irreversible Anger" skill increasing your Accuracy and Penetration in 2% every auto atk (max of buffs is 10x, 20% each in total) and a Critical hit every 5 auto atks, and using 4 parts you unlock the "Deadly illusion" skill the skills sumons 3 copies of you for 15 seconds with 30% of your total damage, they will desapear after a specified time or after dying dealing 150% to the attacker but no more than 5000 units, but I dont recommend using 4 parts of it. The set showed here is the "Time Distortion" its better than the "Fatal Retribution" for BD Best Armors for Full tank BD I will show here some of the best Armors you can use, having a high amount of Solidity, HP, Parry, Magical and Physical defense. Solidy Obs: best atributes you can find in armors for Tank BD: Craft set: you can craft those itens or pay to someone for craft, they are the best in my opinion, because of having an Insane HP %, reaching a high amount of hp is essential. Mermem set: you can encounter this set in map 4 Mermem dungeon having only the 32 level. This is the best set for a Tank BD, having 2 parts you unlock the "Thirst for Life" skill increases the character HP by 3% and reduces the damage received by Monsters in 3% and players by 2% (max of buffs is 10x, 30% hp 30% reduction by Monsters and 20% by players) and when your Hp gets below 50% the set removes one debuff or control effect every 5 seconds. Using 4 parts you unlock the "Ancestors' Power" skill the skill transforms you into a monster for 15 seconds increasing your HP in 50%, physical and Magical defense in 80%, attack strenght in 80% and Resistance by 50%, but you cant use skills. The set showed here is the "Dooms command" set, its better than the "Power Incarnation" for a PvE BD. Best Belts for damage BD Those are the two best belts for BD, it just depends on what you needs more, if its penetration or Critical, I recommend using belts with speed. Both of them are from chests, you can encounter them having keys, the Icy Belt at Snow Christmas event and the Belt of the archipelago privateers at t5, always use Solidity runes in your belts, and if possible, Critical hit crystals. Best Belt for Tank BD This is the best belt for a Tank BD and fits well in every tank combination, having Parry and 15% HP is essential for a Tank, always use Solidity runes in your belts and mana regen. Best Acessories for Damage BD Rings: always chose ring with the "Accuracy" parameter, because bd lacks in Accuracy and even if you have lv32 mermem gears you can't reach 50% without books, use mana regen crystals in them and vampism runes. Cloaks: if you dont have enough speed, and think its necessary, use speed Cloaks, but I recommend using the ones with mana regen, because you can gain atributes in other itens like using Critical hit on Belt, Critical hit crystals in them, but if yiu already have 49%-50%, you can use piercing attack crystal and use vampirism runes or Solidity if you want. Amulet: if you dont have the "Rapid Fury" book, I'd recommend you using amulets with speed, but if you have both speeds books, chose amulets with penetration, use Critical hit crystals, but if you don't have lv32 mermem gears and lacks on Accuracy, you can use Accuracy too and vampirism rune. Spring Acessories: they have the "Attack strenght" parameter, thats why they are the most used and the best actually for DPS classes, you can reach 10%+ Attack strenght only using 4 of them (Obs: I recommend using 4 of them) Halloween Acessories: they were the most popular a few years ago, because were the onlys to have the "Speed" parameter in them with physical damage, but things changed (Obs: I recommend using the Cloak, if you think you don't have enough speed) Snow Acessories: they have the "Fury" buff on them, being very usefull if you have the "Rapid Fury" book, and there others with "Piercing attack" parameter (If you want to use them, I only recommend the rings, because you will probably lose damage using the Cloak/Amulet with %) Best Acessories for Tank BD Rings: always choose rings with HP, and if possible, with Solidity, but if you think you have enough Solidity, use the ones with vamp or Accuracy, always use mana regen crystals and vampirism rune. Cloaks: there are a lot of good Cloaks, like the ones with Parry, if you don't have enough Parry and want a better %, use them, others good options are Cloaks with HP and Solidity, use Critical Crystal and vampirism, if you want can use Parry too. Amulets: use the halloween amulet with HP, be carefull to have at least 20% vampirism, you can chose the Solidity one too, use Critical Crystal or Accuracy if you want, and vampirism rune. Adverses Acessories: First I chosed the craft cloak, because it has all necessary atributes that you need at a tank Cloak, but there is a good option if you don't want mana regen and 4% dmg I chosed the halloween amulet because of the Vamp, its essential for a Tank BD having vamp, but you can use the Solidity if you need, and the rings, i recommend using the Solidity rings because its hard to reach a good Solidity % at a BD, but if yiu do, or have a lv12 guild 3/3 yiu can use the Craft or the halloween rings with HP. 4.5 Best Buffs and Minions Buffs and Minions are a way to improve your status, use them in dungeons and bosses, they surely make a big difference, they can better your damage and some of your atributes, I will show here the best of them. Cards/Scrolls: Best cards for Damage BD: those are the best cards for a damage, as you can see, all of them increase your damage in 10% or 15%, I recommend you using the one with Attack strenght, because in most places is the one who increases your damage the most, the card with Piercing attack for high defense enemys and bosses and the card with speed if you can't reach 70%, and here another card, but only use if you have less than 60% speed Best cards for Tank BD: those are the 2 best cards, they're so much better than every other card, first the Defense card, you can reach 50% solity easy using them, you can tank anything, and the HP card, I recommend using if you have at least 40% Solidity, but the defense still better. Pots: Best pots for damage BD: there are some of the best pots, the pot with 10% damage and 10% fury is the best in most ocasions, for high defense bosses, piercing attack pots are a good option to hit all your damage with the piercing buff. Other pot I recommend, if your damage is too high and you're afraid of dying (lol) This pot reduces the agro you create by dealing a lot of damage Best pots for Tank BD: as a tank, its essential having an high amount of hp, thats why i decided to show some of them, and the vampirism pot if you think you don't have enough vampirism, can heal like 1k+ with Critical hits. And use those 2 pots to increase your agression and healers/pets cure on your BD Damage consumables: The fresh barracuda increase Depths fury by 5% and the turtle soup your mana and mana regen, and they dont remove card/pot buff. Tank consumables: The kelp and rum are 2 amazing buffs for a tank, the kelp increases your Solidity in underwater and the rum your HP, and they dont remove card/pot buff. Best Minions: Lizardman Priestess: increases your "Critical damage" parameter in 20% as long as the pet is alive and gives you a resistence buff for some time Black Tiger: the pet uses a skill that increases your "Critical damage" parameter in 30% for some time and increases your total amount of mana Walking Totem: the pet increases your "Accuracy" and "Speed" parameter for some time and protects you with Paladin's shield and healing skill Flame's recruit: the pet increases your damage in 25% for some time (the best in my opinion) 4.6 Rare Books for PvE Best books for full Damage BD: Enhanced Attack Speed (7% Speed) Enhanced Fury (6% fury) Rapid Fury (10% speed when fury is on) Enhanced Critical hit (3% Crit) Enhanced Piercing Attack (4% Piercing Attack) Excessive Attack (10% Attack strenght when against 3 or more enemies) Enhanced Attack Strenght (4% Attack Strenght) Enhanced Penetration (3% Pene) Revelation of Fury (Aplies the fury buff every Critical hit every 20s) Enhanced Accuracy (4% Accuracy) Enhanced Critical Damage (10% Critical Damage) Best books for Full Tank BD: Physical Protection (10% physical defense) Magical Protection (10% magical defense) Physical Toughening (20% physical defense and 10% dmg reduction to physical auto attacks when Hp is lower than 30%) Magical Toughening (20% magical defense and 10% dmg reduction to magical auto attacks when Hp is lower than 30%) Power of Life (Increases your health regen by 15% and Hp by 6%) Enhanced stealth Health (6% Vampirism) Secret Power of Vampirism (15% vampirism when your Hp is lower than 30%) Distortion of Life (Restores 150% of your hp when the character is under a stun with the chance equal to your vampirism) Enhanced Solidity (4% Solidity) Absolute Strenght (Absorbs a Critical hit if its bigger than your currently hp) Power of Spirit (increases your mana and mana regen by 10%) Obs: I playing as a PvE bd for years and dont see the mana book a very necessary thing for PvE as a damage, and about tank, I would recommed using only one, the Solidity book or the Absolute Strenght. The best set for both in my opinion (+8 and +9) 5. Everything about PvP BD and Arena BD has been one of the strongest PvP classes in all warspear, in my opinion BD is always at the top 3 most op classes in 1x1 pvp or some arenas, having the capacity of using Heavy Armor and 2 Weapons with some stun skills and debuffs, they can lower enemy atributes like speed, damage, parry and dodge, and op buffs like speed, Attack strenght, here I will show all tips for PvP. 5.1 Basic Skills build for PvP: This build for lv13 BD (has only 7 skill points) 1/5 1/5 4/5 5/5 1/5 This build for lv18+ 3/5 1/5 5/5 5/5 1/5 This build for full Parry BD 1/5 1/5 4/5 4/5 5/5 5.2 Relics for PvP Flash Strike Relics: the stun relics does an important role in arena, with your enemy being under 3s stun a lot of things can happen. Agression Relics: the inacessability relic is usefull to trigger other relic, like the Icy captivity, an amazing relic for those who know how to use their stuns, and deceptive control will turn the enemy afraid of using any stuns on you, because if they do, they receive the "Sleep Magic" effect. Sap Relics: the Relic of apathy are extremely usefull against healing classes, blocking their cure for some time, and the Magic Relic of reaction, you can use the sap in enemys with resist only to trigger this relic, receiving one more resist buff Hamstring Relics: the relic of sickness fits well with the Hamstring because the Hamstring stops enemys movements and this what the relic needs to work perfectly. Parry Relics: another chance for you to trigger the deceptive control relic is here, and the Opression relic blocks enemys capacity of using skills for some time. 5.3 Expert Skills build for PvP: If you like speed in your pvp, this build if for you: 4/4 4/4 4/4 If you're more a full Tank in PvP: 4/4 4/4 4/4 If you want more stuns: 4/4 4/4 4/4 If want more Penetration and reduces enemy dodge/parry: 4/4 4/4 4/4 Obs: always use the "Spirit of Resistance" for pvp in 4/4, its BD best skill in pvp, and you can create new Builds and use one more extra point if you have the"Stellar Blessing" talent 5.4 Gears and Weapons for PvP: In PvP, its important having "Ferocity" because this atribute increase your damage against players, try getting the closer you can to 50% (the max), and another important atribute is the "Resilience", reduces damage received from players and reduces the chance of you receiving Critical hits in PvP, but be carefull, those atributes does the oposite effect on Monsters, only use them in PvP. Best Weapons for PvP BD Arena Weapons: as you can see, they have the "Ferocity" in them, always use Ferocity crystals too, try reaching 50%, but if you are a high level and have Ferocity books, there ate better combinations for you. There are the best combinations, you can reach like 49% Ferocity and gain other atributes like pene and attack strenght, if you are more a speed user, use the Daggers combination or if you like more brutal damage use the axes, you can even use the Craft axe if like more parry in your PvP and Craft Swords if want more Accuracy. Armors for PvP Basic arena armor: Always chose armors with defensive atributes, like dodge/parry over critical, because you will rarely deals a Critical hit against PvP enemies, and don't use light armor in PvP if you have Heavy Armor with the same atributes, the set showed here is the most basical that you can buy with arena points. Greatness armors: Those are the best Armors in PvP, you can buy them with the Imperial of greatness, they have bonuses, with the first being hP or physical defense bônus and the Second 4% of Resilience, who makes an big difference. Greatness + Mermem Armors combination: You can combine others parts if you want, but this combination is the best, you gain mana regen in your boots, Penetration with Accuracy in your Vambraces and CD (skill cooldown) in your helmet, you can reach like 45% Resilience if using the Acessories and gain 20% damage reduction from your Mermem set, with 30% more Hp and removing stuns and controls effect every 5 seconds when your hp is lower than 50%, no one can stop you. Belts for PvP You can use the basic arena belt, but you will lack on important atributes like pene/parry, Accuracy and the high HP %, thats why i recommend using the craft belts, you wants more damage in your BD use the ligr belt, and you're more a full Parry use the heavy belt. Greatness Acessories Those are the greatness and contender Acessories, you can buy them with the Imperial of greatness, they have Resilience in them, thats why they are very usefull and everyone wants them, I recommend using only the greatness rings and Amulet/Cloak the contender ones, because you will probably lose damage using the greatness, they are itens with %. 5.4 Best buffs Best cards in arena Those are the best card in arena, getting an high amount of defense with resistence is the best maybe, but if you lacks on things like Resilience, you better use the 15% resil Scroll, and the 15% speed cards are extremely usefull if you are a full Speed BD in PvP and have nice Resilience parameters, and theres another card, if you dont have PvP Weapons Best pots in arena Those are the best pots, you have here pots to see invisible enemies, very usefull against rogue/seeker and other using invisible buffs, a pot that remove 3 negative effects from you, these ones you need to have them always, and the 15% resist pots fits well if used with the Scroll castle with 20% resist, using resist on helmet and amulet you can reach more than 40% easy. Consumable The best consumable in arena, having an high amount of hp is essential. 4.6 Rare books for PvP and arena: Gladiator's Resilience (5% Resilience) Gladiator's Ferocity (5% Ferocity Restrained Rage (aplies fury everytime 2 or more members of your party is under a stun) Enhanced steal Health (6% more vampirism) Distortion of Life (Restores 150% of your hp when the character is under a stun with the chance equal to your vampirism) Physical Toughening (20% physical defense and 10% dmg reduction to physical auto attacks when Hp is lower than 30%) Magical Toughening (20% magical defense and 10% dmg reduction to magical auto attacks when Hp is lower than 30%) Enhanced Attack Speed (7% speed) Rapid Fury (10% speed when fury is on) Enhanced Attack Strenght (4% attack strenght) Enhanced Penetration (3% Penetration) Power of Spirit (increases your mana and mana regen by 10%) Power of Life (increases your total Hp in 6% and health regen by 15%) Improved stunning (2,5% stun chance) The best set for both full parry and speed (+8 and +9) 6. Talents for BD Talents are improvements on your char, for a BD as a damage or tank, there are a lot of usefull Talents, I will just show you the ones to level up first, because you can and need to study them all. 6.1 Knowledge Talents Damage BD Talents to level up: You have important talents for damage here, like Accuracy, Penetration, Speed. As a damage focus on this part first, every % of Damage atributes are importants. Tank BD Talents to level up: You have important talents for tank here, like Solidity, HP and the ones who reduce the damage you receive from enemies, having all of them 3/3 and have 3% damage reduction is sure a lot. BD especial Talents: Parry +: increases the Parry of your skill in 0.5%-1%-1.5% per level (works nice with the masterful Parry) Hamstring +: increases the damage of your skill in 5% Masterful Parry: decreases the damage you receive by 10% with the chance equal to your Parry parameter (usefull for Tank BD and in PvP, having more 10% damage reduction combined with mermem sets or Resilience is Very op) Stellar Blessing: the character receives one more skill point (use this one to explore new builds, having one more skill point is always usefull) 6.2 Ayvondil T5 Talents Defensive Talents Those are the defensive Talents in t5, the ones i recommend you leveling first if you are a tank BD or a more defensive players in the underwater area. The First row are Talents that reduce the damage of Critical hits you receive. The Second row are Talents that remove negative effects you receive, like poison, bleeding, hydrophobia and stun. The third row are Talents that reduces the damage you receive when you're under poison, bleeding, hydrophobia and stun. The last are adverses talents that reduces critical chances and increases your def. Attack Talents Those are the damage Talents, they will increase your damage and some atributes like pene and crit, you can see that there aee way more defensive Talents, because in t5 the defense is more essential. Thanks for Reading all my guide, I hope you liked, Its everything that I know playing for like 6 yeras as a free player BD, you can explore new Builds and itens if you want, because there a lot of good skills and gears. Ultrablade - br Tourmaline


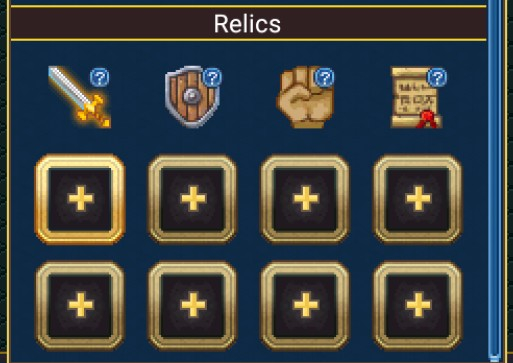


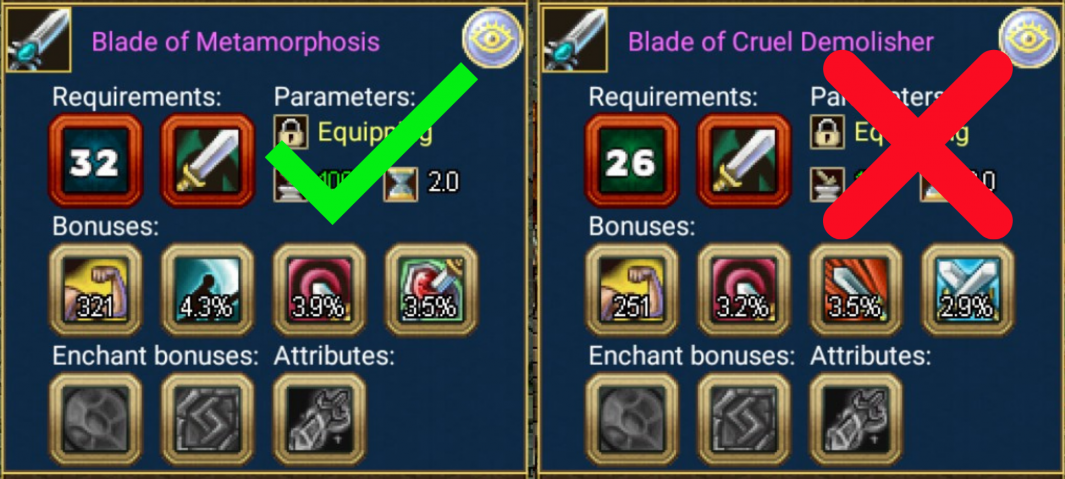
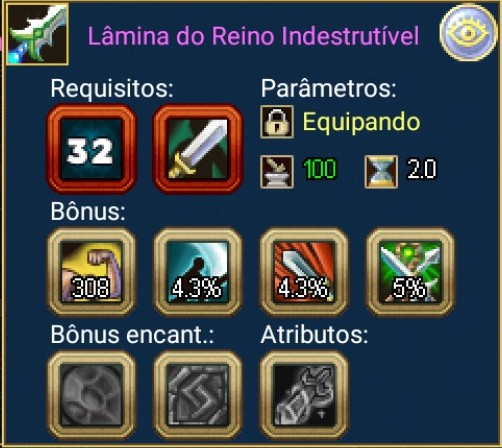
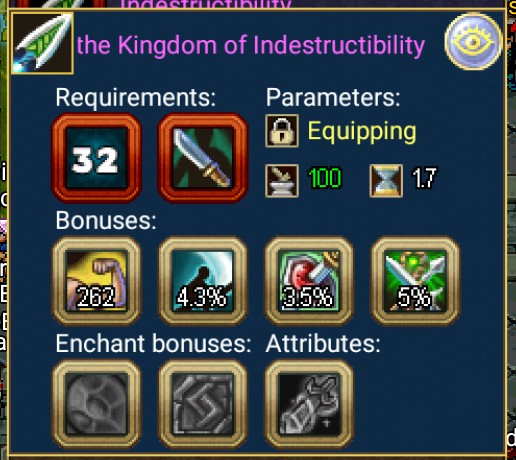

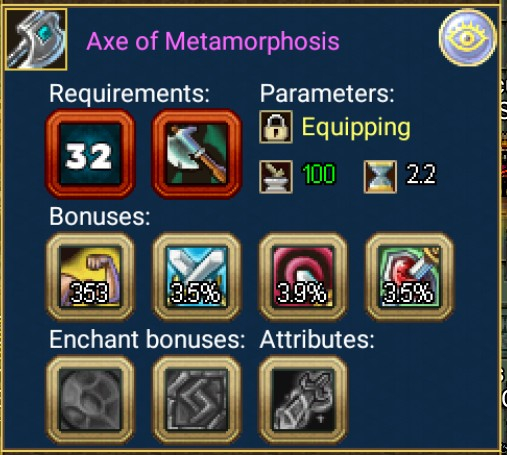


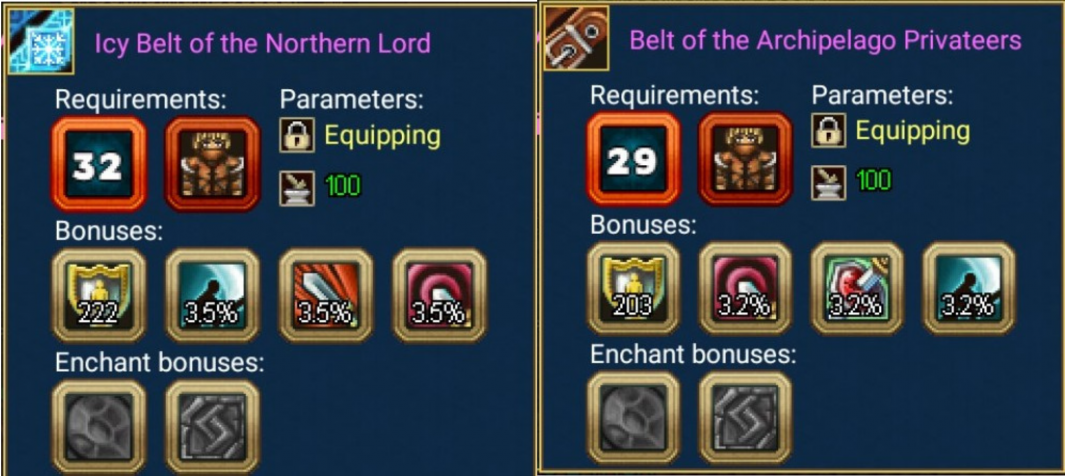

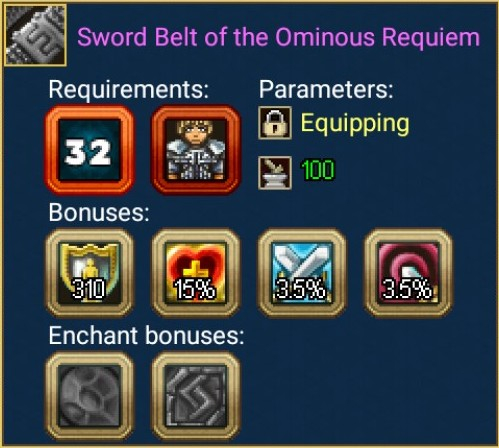


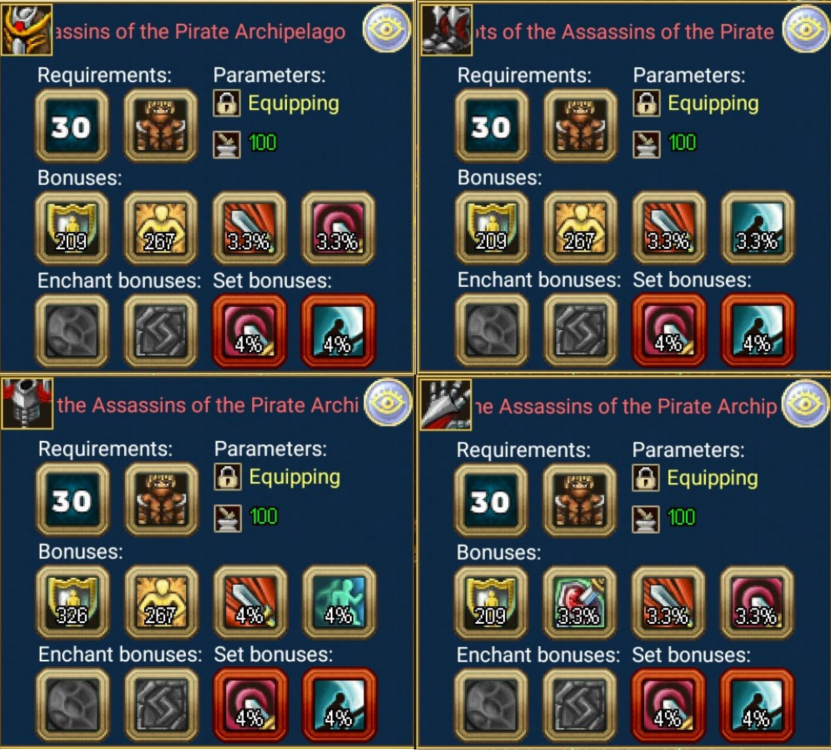
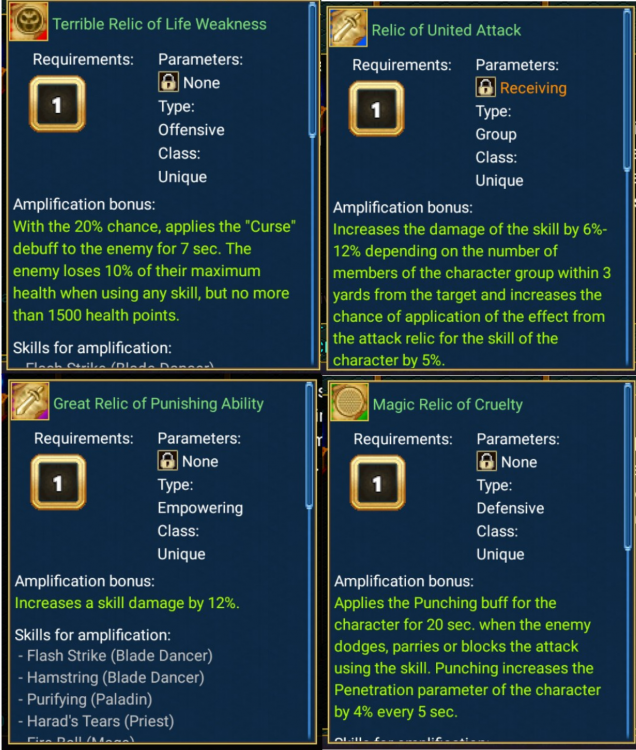
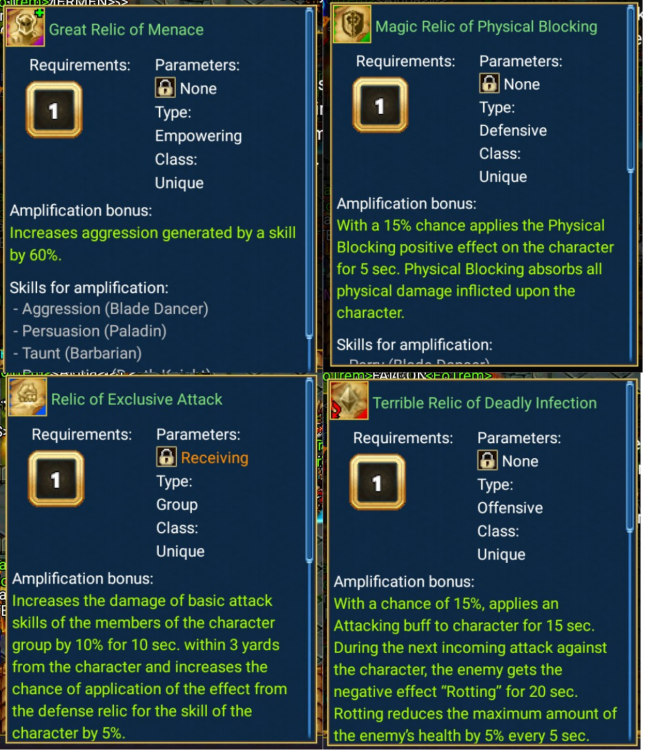

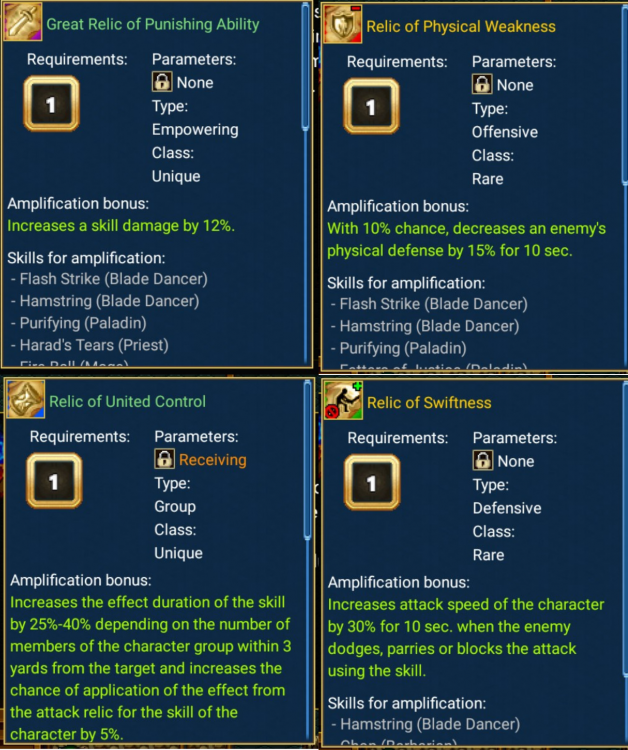

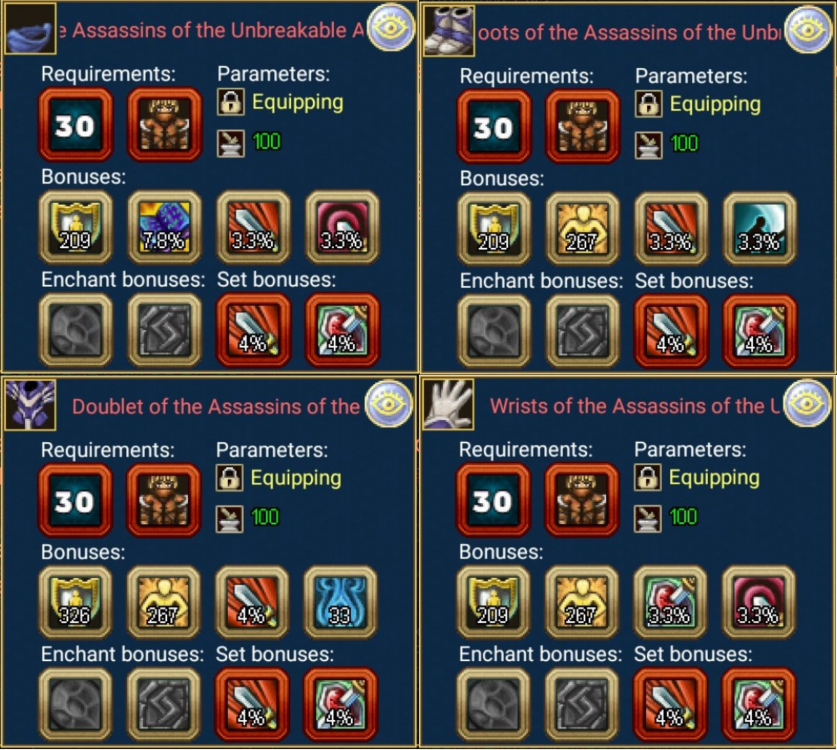
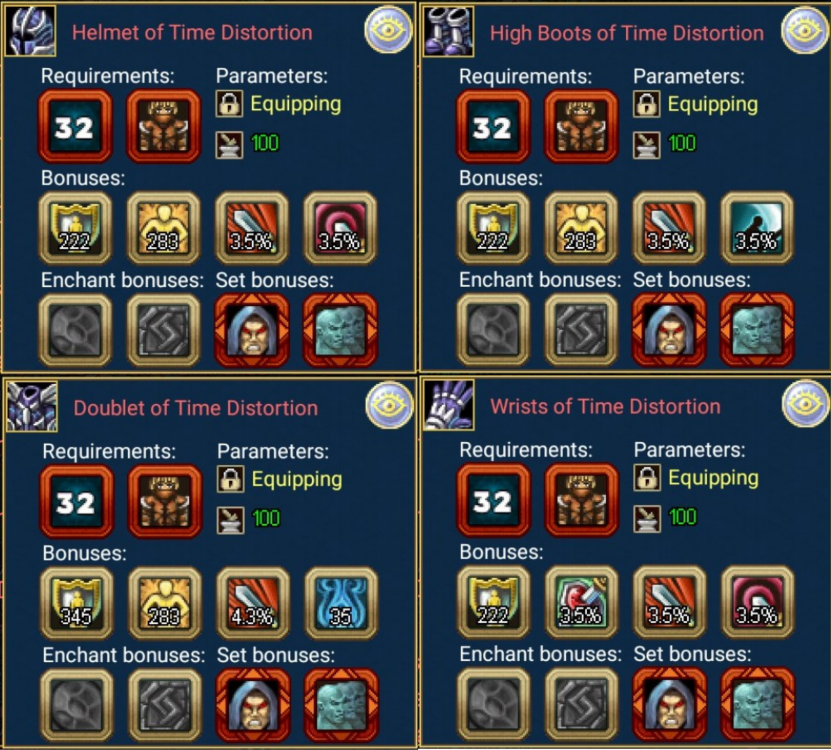
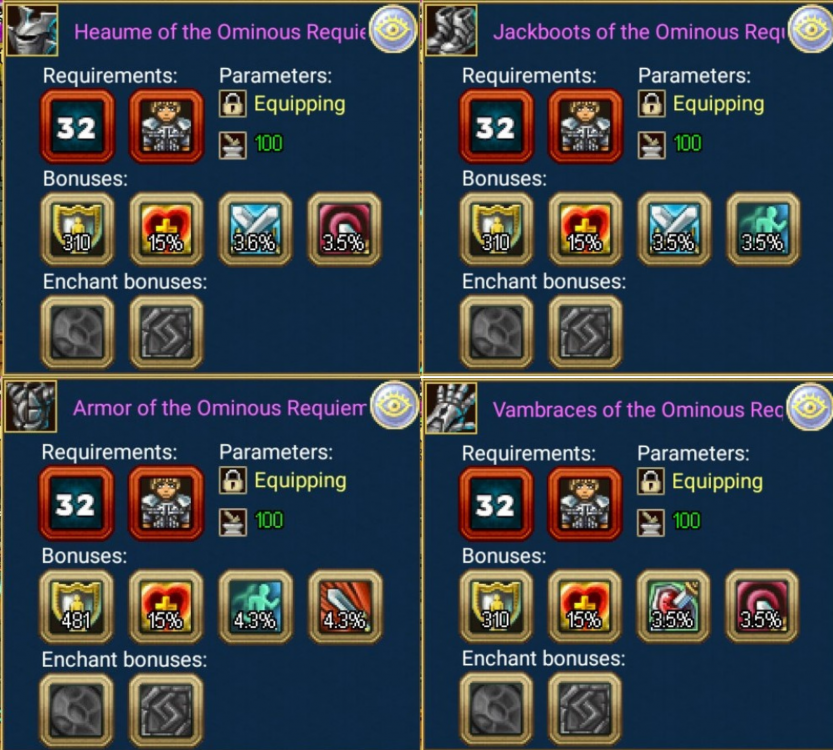
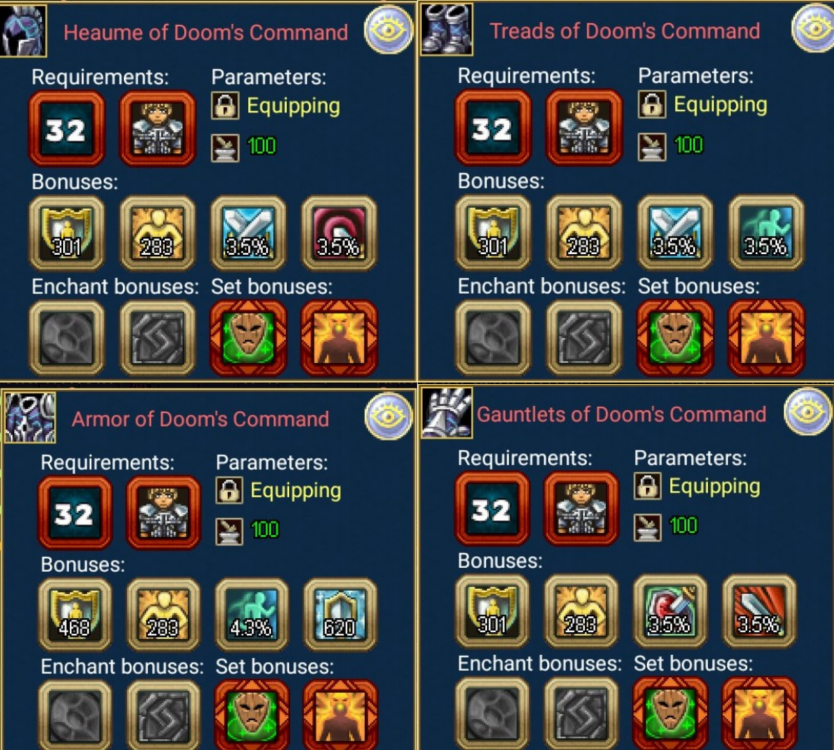
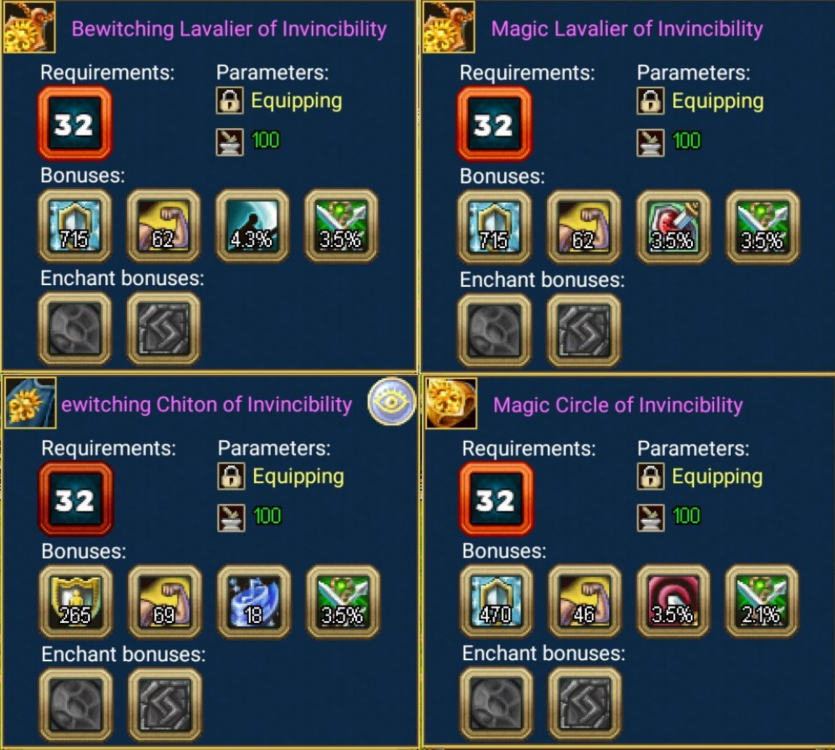
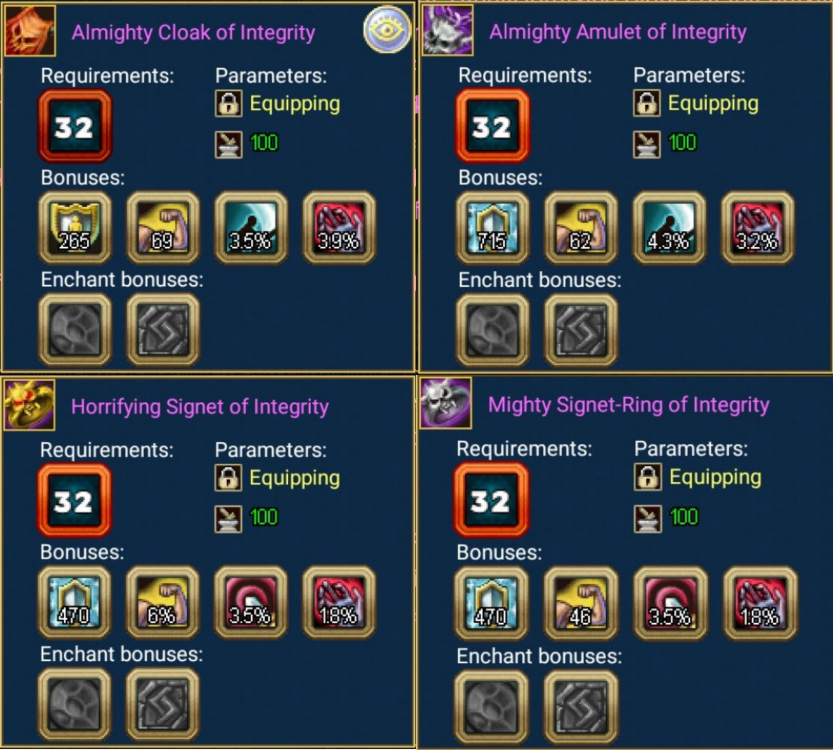

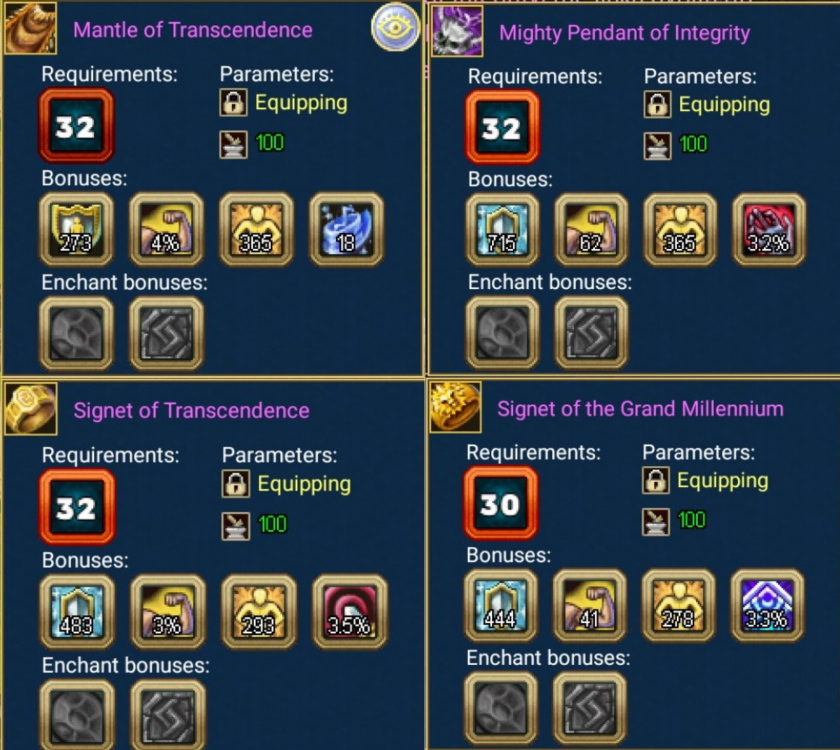
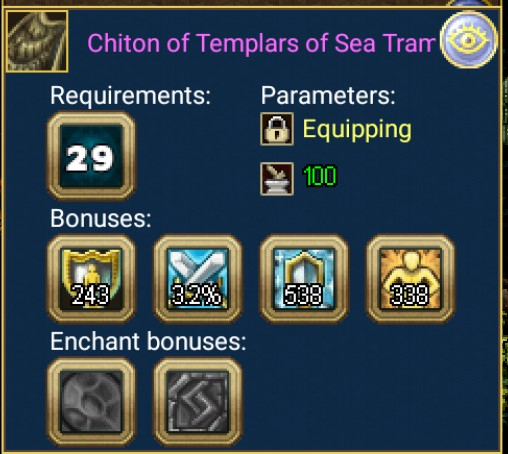


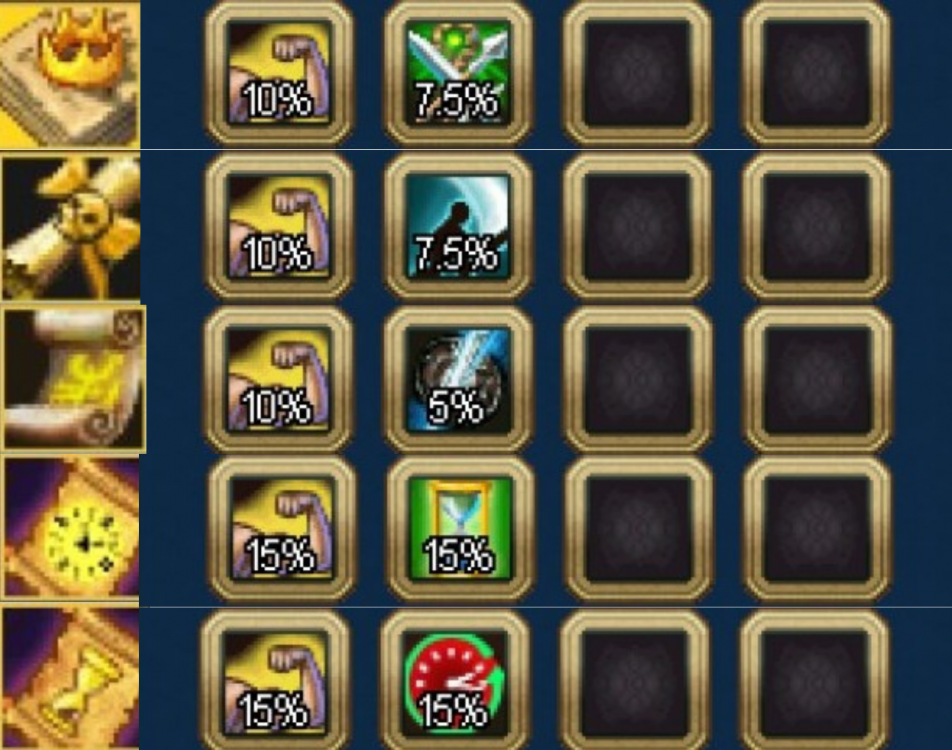
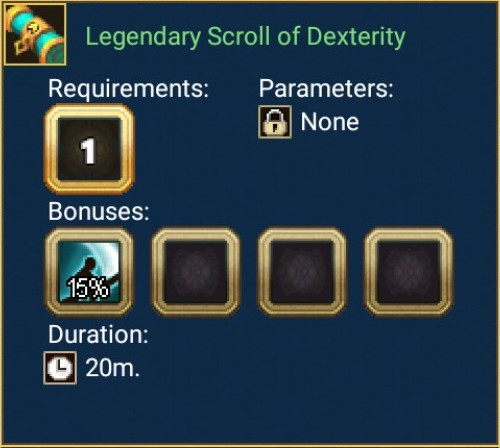

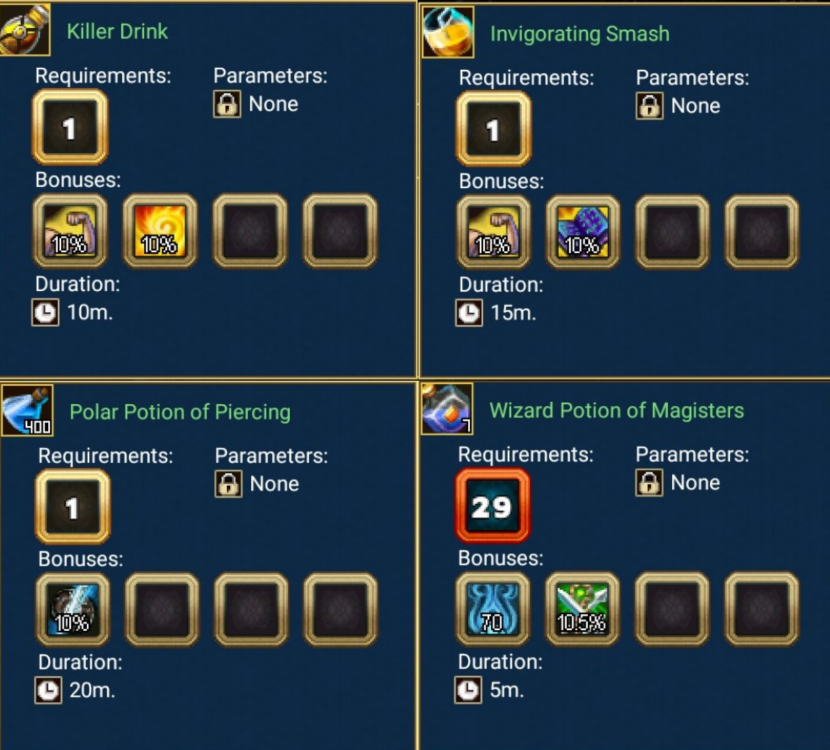
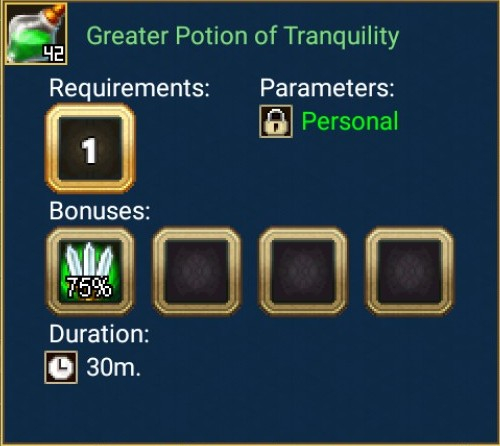
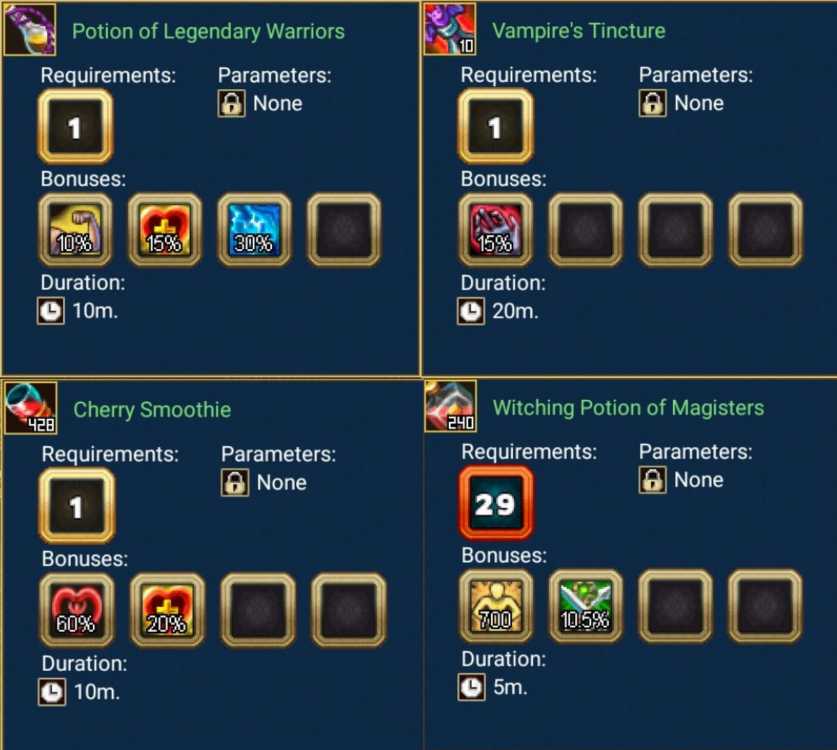


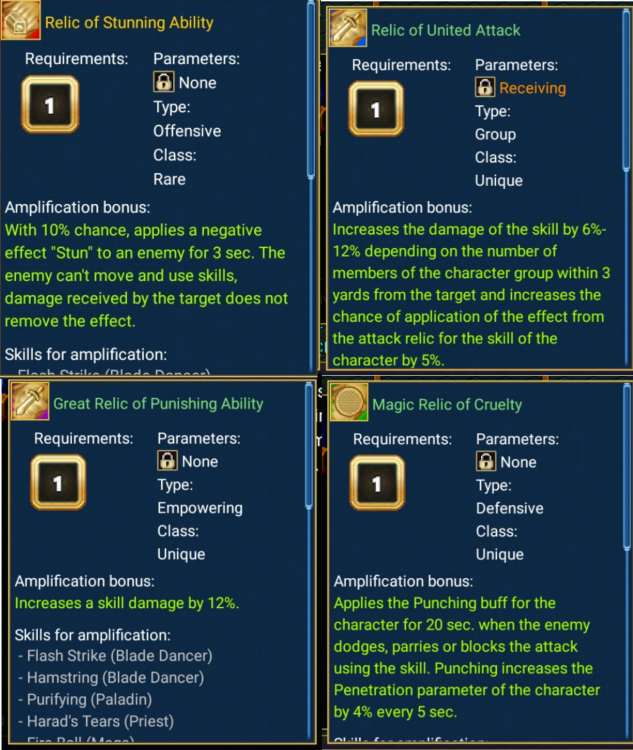
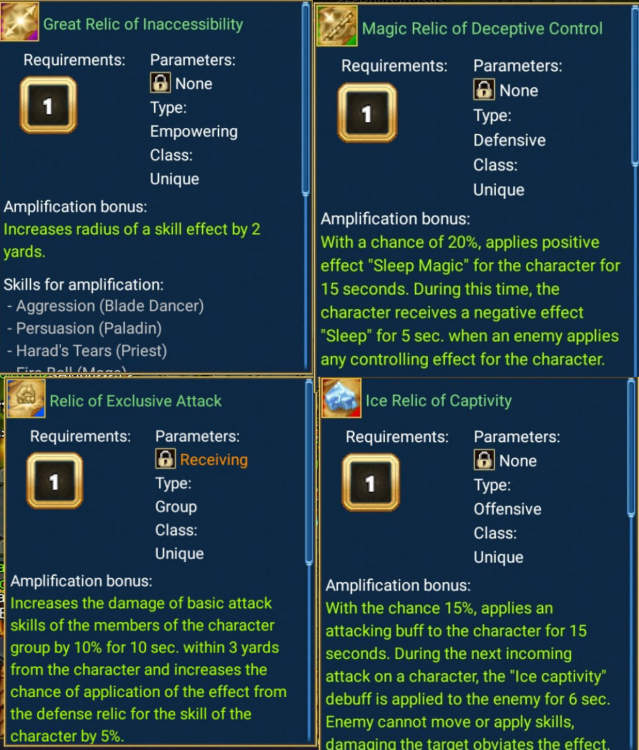
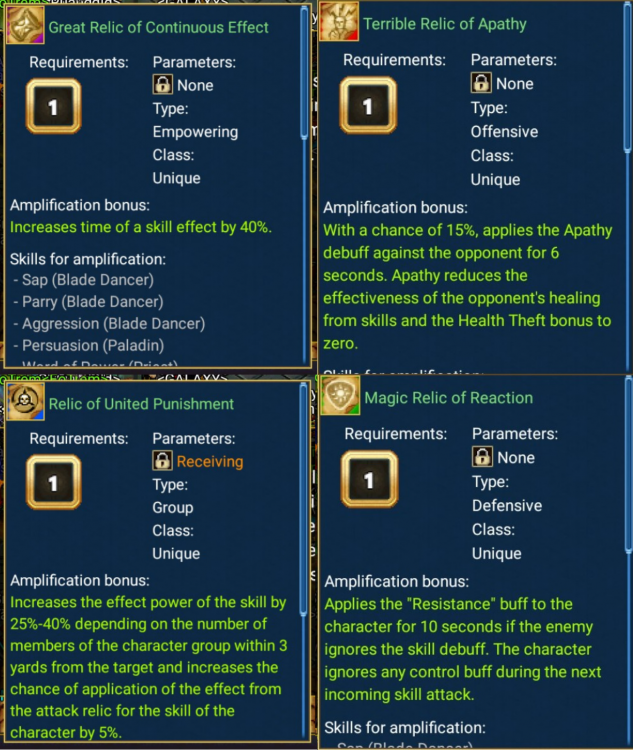
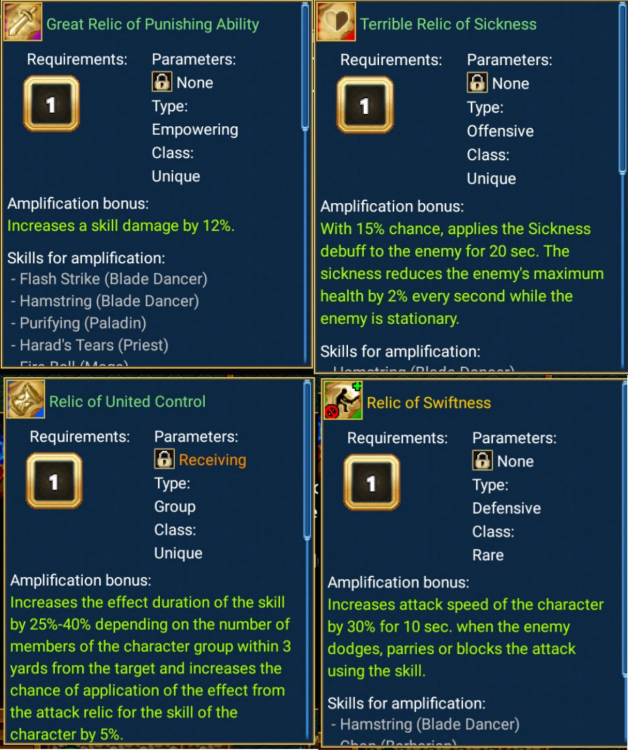


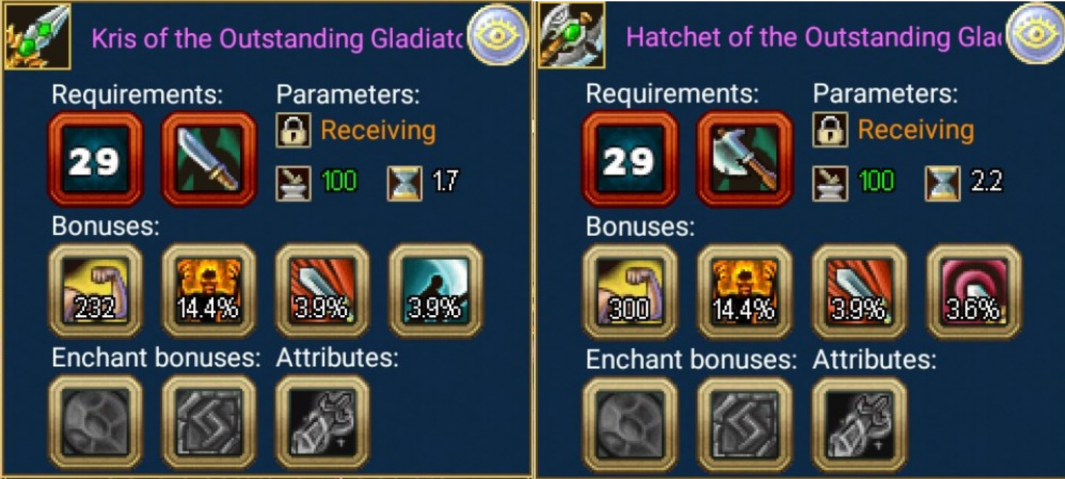
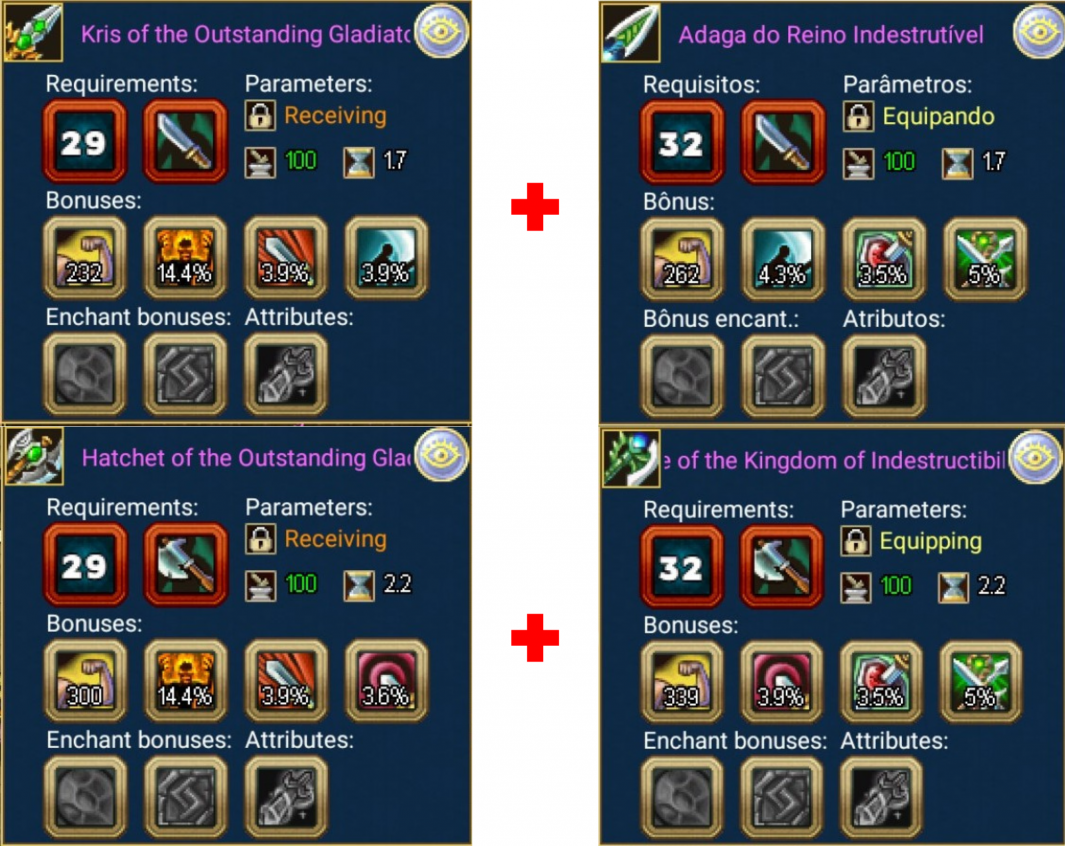
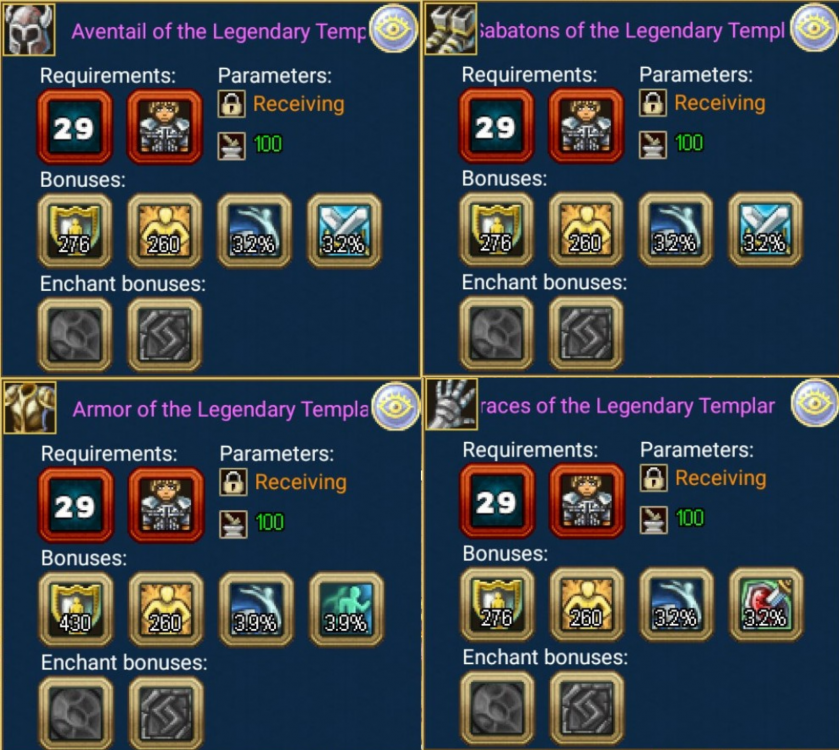
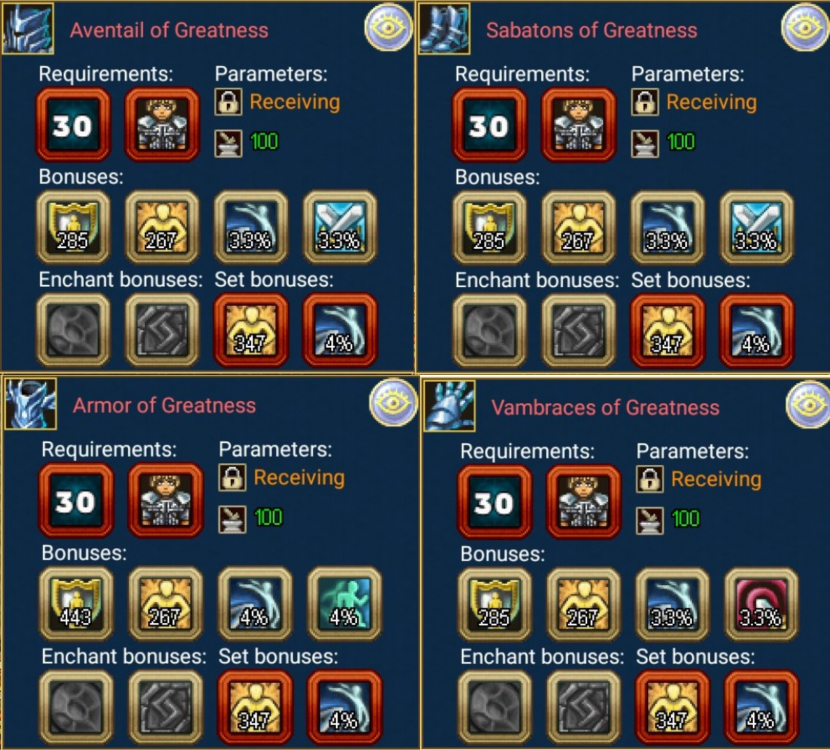
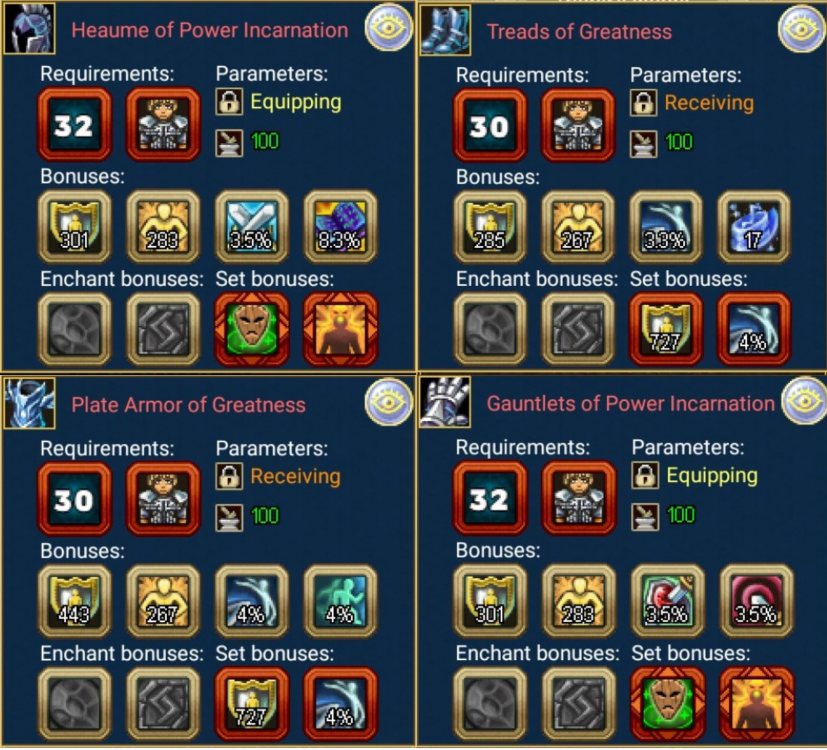
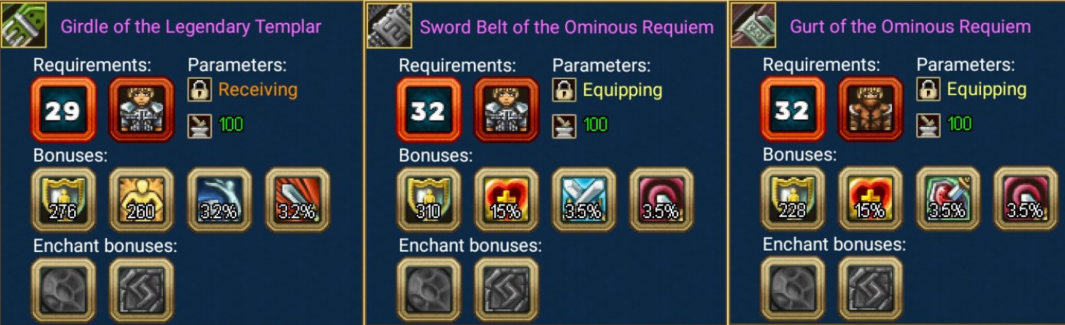

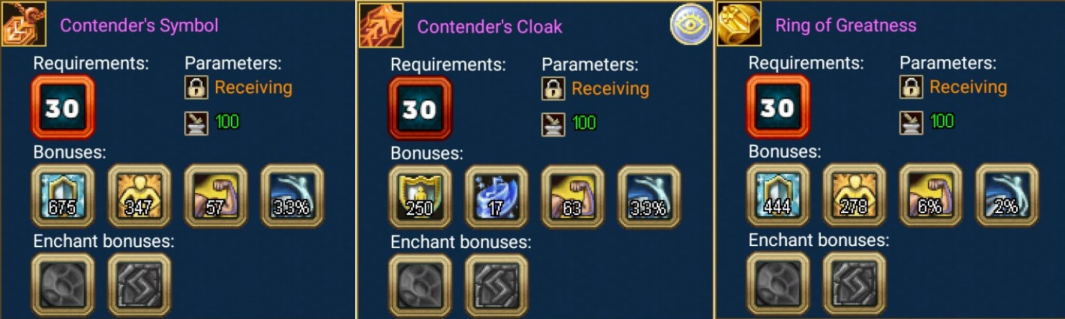
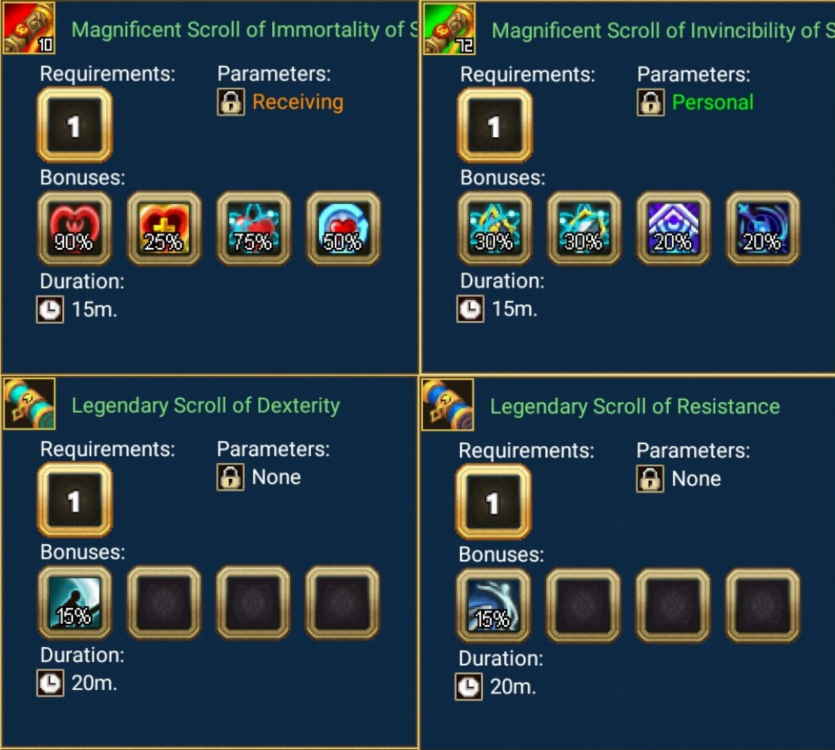
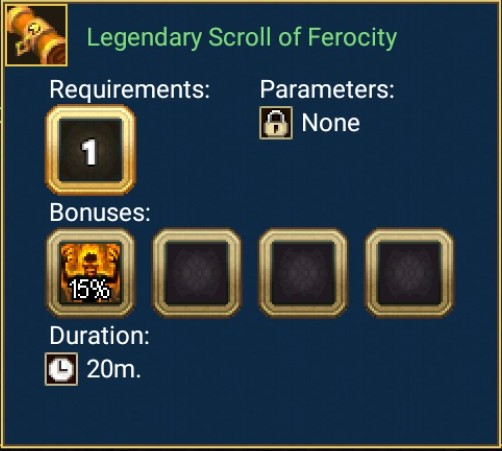
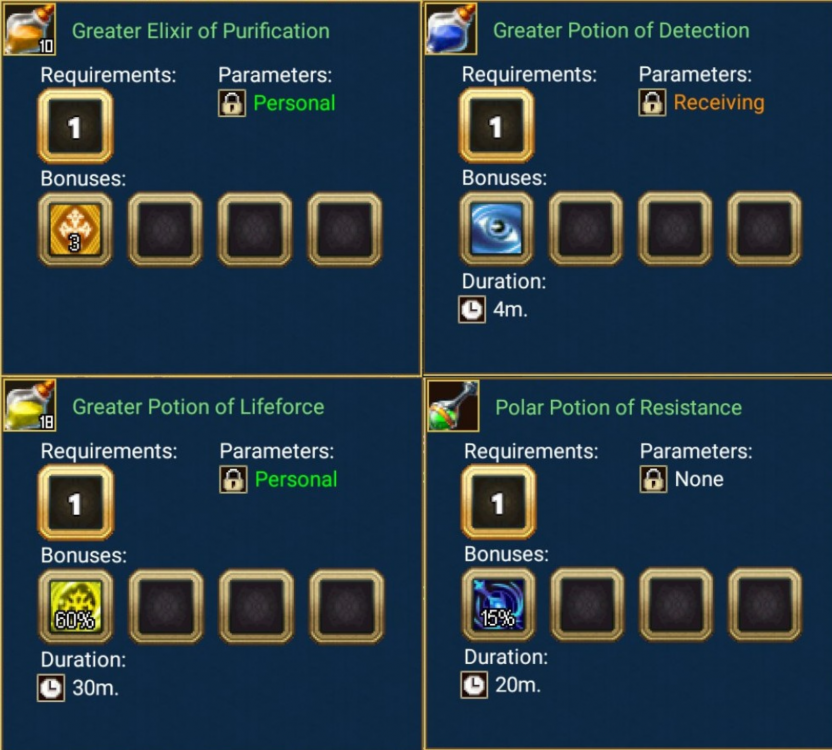
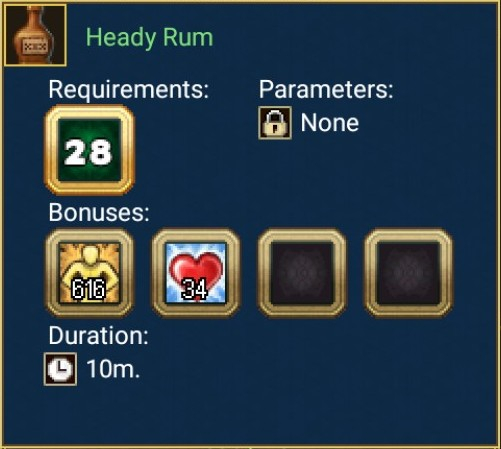


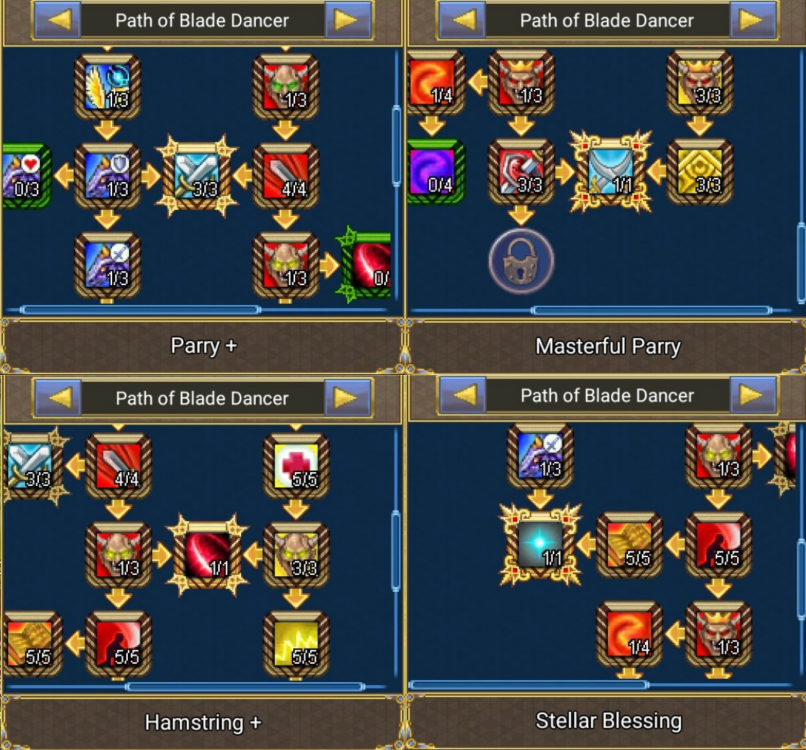
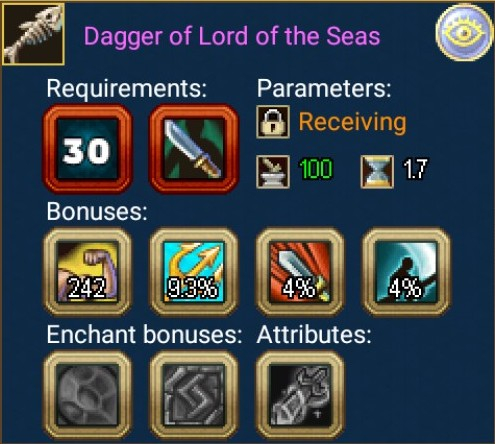
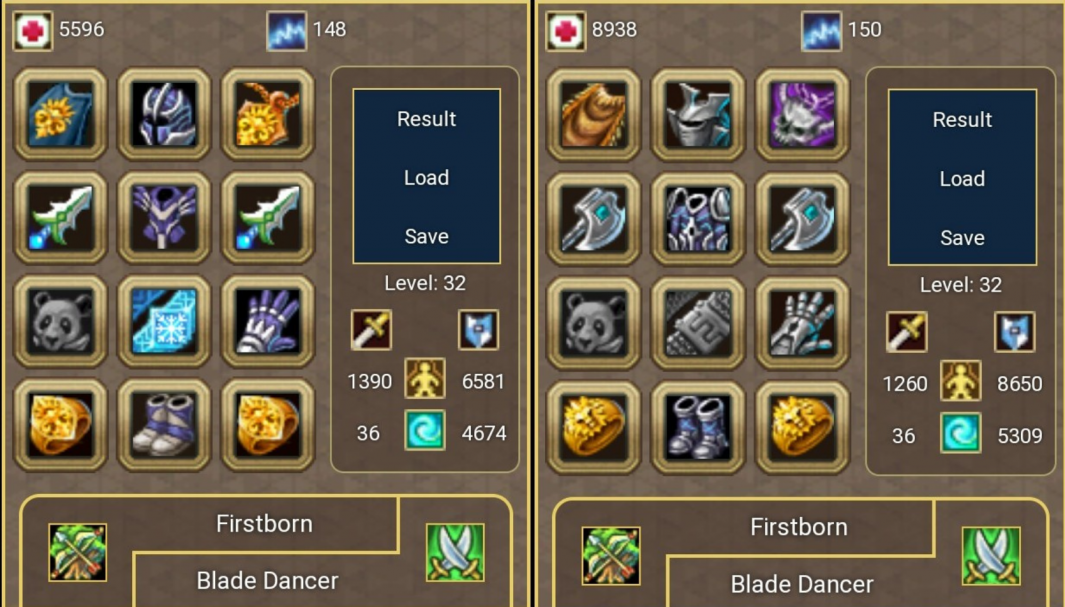

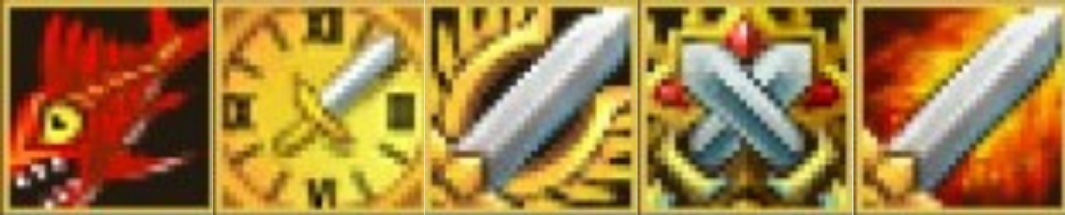
-
SELAMUN ALEYKÜM KARDEŞLERİM İnşallah iyisinizdir, yeni başlayan, bir süredir oynayan veya uzun soluklu oynayan kişiler Türkçe foruma hoş geldiniz. Ben 5-6 yıldır bu oyunu oynuyorum bazen ara verdim bazen hiç durmadım. Toplanmak, yardımlaşmak, sorular sormak, veya şu forumu da birazcık canlandırmak için buraya toplanın :) Yakın bir zaman sonra oyuna döneceğim, hali hazırda bir loncamız da mevcut. Birkaç arkadaş elf tarafında oynuyoruz. Yabancılarla oynamak bazen sorun oluşturduğu için, gece vakitleri saat 1'de oyunun günlük görevleri yenileniyor. Hiç beklemeden Ayvondil haritasında ki 85k/95k/200k adlı bossları kesiyoruz. Yeni başlayanlar için biraz yabancı gelebilir belki ama bu konu altında siz de yorum yazarak Oyun nickinizi yazarak bize katılabilirsiniz. Oyunda para kasmak açısından sorun yaşayan kişilere de 5 yıllık tecrübem ile nerelerde ve hangi şekilde level atlayacağını anlatıp hızlıca Ayvondil haritasına çıkartabilirim. Bahsettiğim 85/95/200k boss görevlerini yaptığınızda en azından 20k-25k gibi bir miktarı yarım ya da 1 saat (Grubun oratalama gücüne bağlı) içerisinde bitirebiliyorsunuz. Şu şekilde anlatmaya başlıyorum. Eğer oyuna yeni başlıyorsanız ve bu tür "2d Mmorpg, Retro" tarzı oyunlara da önceden aşina değilseniz "Chosen" yani insan ırkından başlamanız sizi azda olsa sıkabilir. Görevleri birbirini takip ediyor ve uzun sürebiliyor bazen de karıştırabiliyorsunuz :) Elf ırkından başlarsanız görevleri çoğunluklar bitki toplama, bazı yaratıkları kesmek gibi kısa, basit ve açık görevleri vardır. Oyun içerisinde yaratık keserek Exp yani level kasabilmeniz mümkün değildir Hızlıca level atlamak istiyorsanız 2. haritada haftalarca mavi görevlerle oyalanmak yerine hızlı bir şekilde ana görevleri yaparak Ayvondil dediğimiz büyük adaya geçmeye çalışın. Orada istemezseniz de günlük görevlerden hem para kasabilir hem de level atlayabilirsiniz. 2. map yani "İrselnot - Ash Coast" adında ki haritada ilk köy "Gasphel" kıyısında ki limandan kalkan gemiyle "Norlant" adaları haritasına geçebilirsiniz. Burada ana görevlerle beraber, tamamladığınız bazı görevler günlük görevlere dönüşür. Zor düşündüğünüz görevleri yaparken itemlerinizi çıkarabilirsiniz. Mobların grup olmasından dolayı iyi ve tecrübesi olmayan oyuncular için ölüm kaçınılmaz oluyor. :) Bu da itemlerinizi tamir ettirmenize yol açıyor. Gerekli görevleri yaparak şanslıysanız "Norlant Aqueducts" adlı görevden Hpli amulet düşürebilirsiniz 13 ya da 18 levellik. Ben ikisinden de düşürdüm. Hiçbir item alamasanız bile ölmeden bitirebilirseniz, bu haritanın bir günde verebileceği ortalama Gold miktarı 3-4k civarıdır. İtem kasana kadar oyalanabilirsiniz :) Ben tamamen ezberlediğim için, şanslıysam yarım saat gibi bir sürede kısa görevleri bitiriyordum. Oyunda ölmekten kaçının, öleceğinizi düşündüğünüz savaşlardan kaçının. Eğer ölüm kaçınılmaz ise ve o alanda düşman bir oyuncu varsa ona ölmeniz daha iyidir :) Çünkü oyuncular tarafından öldürülürseniz itemlerinizin dayanıklılığında bir azalma olmuyor :) Ve köyünüze gitmek istiyorsanız, bulunduğunuz alanda dünman oyuncu görürseniz bırakın öldürsin, hızlıca kayıtlı olduğunuz köyde başlarsınız :) Dediğim gibi Eu-Emerald serverinde oynuyorum, Bahsettiğim loncanın ve kendi ismimi vermeyeceğim, forumun canlanması ve 1 yorum da olsa atılabilmesi için sizlerin Eu-Emerald serverine gelmesini, mümkünse elf tarafında oynamasını ve grubumuza katılmak için de bu konu altına değerli yorumlarınızı atmanızı rica ediyorum. 2 dakikalık bir kayıt işlemi ve birkaç dakikalık profil düzenlenmesinin ardından türkçe konuşabilen bütün kardeşlerimizi yabancılık çekmemesi için bekliyorum. Irkçılık, hakaret, ego gibi fitnelerden uzak olup, serbest görüşün, düşünceye ve fikre açık, dini, mezhebi, dili, hiç fark etmeksizin tüm "Kürt,türk,laz,arnavut,arap,ateist,deist,müslüman,hristiyan,yahudi,budist,şaman,anarşist,devrimci,aktivist,şeriatçı,laikçi,dirilişçi :D tüm oyuncuları bekliyorum, tek kural düşünceye, görüşe, inanca, kültüre, dile, ırka saygıdır. Hepimiz aynıyız, hiçbiriimzin bir diğerine üstünlüğü de yoktur. Ben bu kadar yazdım, beni kırmayın bir yorum da siz atın hadi bekliyorum.. İyi oyunlar dilerim :)
-
1. INTRODUCTION 2 .CLASS INFORMATION 3. SPECIALIZATIONS 4. BASIC SKILLS ( + RELICS) 5. EXPERT SKILLS 6. TREE TALENTS: PATH OF ROGUE 7. SKILL BUILD IMPROVEMENT ( + PARAMETERS) 8. COMBOS 9. SOME THINGS ABOUT THE CLASS 1. The rogue is a hard class to use, but haves skills comfortables and versatile, is fast and is a skill damager, you can perform combos with the class. You can also flee from the enemies and take a breath to think about another attack strategy, it also works to perform surprise attacks, most of all to get the best potential of the class is to attack first, never let the enemy start because it is a lost game or you must think of something fast to obtain the victory. How to start play Rogue Class Choose a free slot Select Side-Faction Mountain Clans Select character Rogue Choose gender and apariency Choose a nickname for your character Choose Game Realm (Server) 2. 3. 4. The skills are character powers that will help us a lot during our adventure in the game, each character has a maximum of 5 basic skills when you start the game. As the player levels up, the character can obtain skill points to improve them. Now let's know what the Rogue's skills are. 4.1 l Characteristics 4.2 l Relics / Merciless Strike / / / / / / Category: Attack Skill Type: Active Usage range: Melee Cooldown: 6 Seconds Energy expense: 12 / 13 / 14 / 15 / 16 Units A furious attack with a weapon, dealing heightened physical damage. The strength of damage increases with skill level. Skill Damage: Depends with skill development Relics available: / Kick in the Back / / / / / / Category: Negative Effect Skill Type: Active / Temporal Usage range: Melee Cooldown: 15 Seconds Energy expense: 13 / 14 / 15 / 16 / 17 Units Blow that reduces the enemy's Accuracy parameter for a while. As the skill develops, the number of attacks and effect duration time increase. SE Parameter Enemy's Accuracy Reduction: -5 / -15 / -25 / -35 / -45 % SE Duration: 3 / 7 / 9 / 12 / 15 Seconds Negative Effect: Accuracy Relics available: / Dodging / / / / / / Category: Defense Skill Type: Active / Temporal Cooldown: 30 Seconds Energy expense: 15 / 16 / 17 / 18 / 19 Units Increases the character's Dodge parameter for a while. As the skill develops, the power of the effect also increases. SE Parameter Dodge: 10 / 14 / 18 / 22 / 26 % SE Duration: 15 Seconds for all levels Positive Effect: Dodge Relics available: / Gouge / / / / / / Category: Control Effect Skill Type: Active / Temporal Usage range: Melee with bonus Area on Effect Cooldown: 20 Seconds Energy expense: 13 / 15 / 17 / 19 / 21 Units Deals the Paralysis debuff to the enemy, as well as to all targets within a radius of 1 yard from the character, for a while. Oppenents cannot move or use skills, any impact on paralyzed opponents removes the effect. If all opponents who are in battle with the character are paralyzed, then the character can use the Stealth skill. SE Duration: 3 / 3.5 / 4 / 4.5 / 5 Seconds PvP: 3 / 4 / 4 / 5 / 6 Targets PvE: Unlimited Targets Negative Effect: Paralysis Relics available: / Stealth / / / / / / Category: Defense Skill Type: Active / Temporal Cooldown: 8 Seconds Energy expense: 15 / 16 / 17 / 18 / 19 Units Allows the character's to move in stealth mode if not already in battle. Any attack made when stealth is in effect deals increased damage. Skill Bonus Damage: Depends of skill development. Only for 1 increased hit. SE Duration: 7 / 9 / 11 / 13 / 15 Seconds Positive Effect: Stealth Relics available: 5. Those are new skills that have been put during the development of the game. These are unlocked at level 18 and to access them you need to have spent 10 skill points on the basic ones. 6. 6.1 l ROLE TALENTS (DAMAGE DEALING CLASS) 7. Well those are all the exististing skills of the Rogue, now let's see how we can develop the skills and evaluate them for PvE and PvP. Currently there are many ways to build it, some builds are not as effective as the others, but each one depends on how the Rogue is equipped. It also depends on the strategy and gameplay of the player, it is a character that uses combos so to speak, and as a player of this class you must take advantage of it. 7.1 l PARAMETERS The parameters are benefits that the characters have, in the case of the rogue we must amplify the parameters that benefit us in damage, survival defense and use of skills · l DEFENSIVE PARAMETERS · l OFFENSIVE PARAMETERS 7.2 l SKILL BUILDS 8. This section is very important, as every player who wants to be a master of the class should know these tactics and plays of the Rogue, that can be used within the combats in the game. Note: Most combos play much better on PC than on mobile devices. This is not to say that it does not work for phones, but that they are complicated to do. On the PC they are also complicated to do, but it all depends on the use of the keyboard and mouse. I present 2 ways to do it, the traditional way, and the double click action way that can be enabled by going to Menu > Settings and Logout > Settings > · Joker / / / / It is a move to start first, it serves to deal auto-attack damage and make yourself invisible so as not to be targeted by the enemy. It is quite complicated to do, but when you do it it is satisfying. · Deception / / / / It is almost the same as the joker, but this time with a gouge, it can be used in most fights because of how basic it is. It also gives us time to think about what strategy we will use while our enemy cannot use skills and during this time we give the enemy an auto-attack damage and disappear. If you do it in PvP matches you will know why I call it deception · Short Time / / / / This attack for the enemy's eyes is like breaking the laws of space-time, but it is a slightly simple trick, Elusive Jump is a very instantaneous and fast skill, so there should not be many problems in its realization. The trick is quite useful to massively boost the damage of Elusive Jump, if you have it at 4/4 you could see a lot of difference. I called it "Short time" because the poison is a negative effect of periodic damage that we cannot control, so we must be fast enough to use the Jump before the poison makes us discover the enemy, and if they discover our damage it would be like using the Same basic poison-jump combo. · Dirty Trick / / / / Well, in elusive jump we increased the attack a lot, but is it possible with the Trickiest Technique skill? The answer is: yes, we can use the ability to do even more damage, and even better, apply a stun. · Fatalities / / / / After training quite hard, you can perform the fatalities. They are personalized attacks with the mixture of the previous combos. Fatalities are performed with the Rogue's skill build stun. They are good for dealing a lot of damage while the enemy is stunned, or with some chance that your enemy will respond quickly with a counterattack. Some Demostrations: It is also good to have some useful relics for PvE / PvP, I do not recommend using relics of periodic damage because they damage the attacks. · TIPS / / / / 9. SOME THINGS ABOUT THE CLASS It is a class that undergoes quite a few changes during the development of the game. It is a character that is better played on PC than on mobile devices. It has a high spam of skills, but not all of them are used completely. He is the character with the highest attack speed. Damage is only temporarily increased during combos. The class is not immortal, it possesses many weaknesses against ranged enemies. His previous counterpart was the Blade dancer, now is the Seeker. Many new players select the class solely for stealth, as does the Seeker. In Warspear Client installation the image character is a Rogue. "For me the rogue is a character that I have a lot of affection, with the little development he has, he is still useful for many things. It has little attack strength to sustain close combat, but great things come from the little things."


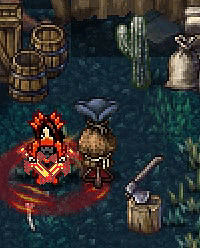


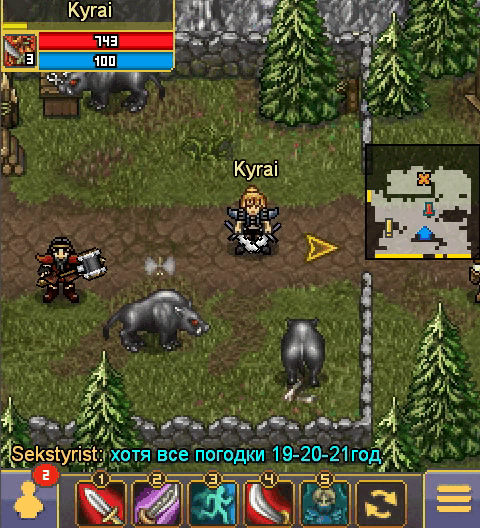


-
ROGUE CLASS GUIDE [Guide in development] The rogue is a hard class to use, but haves skills comfortables and versatile, is fast and is a skill damager, you can perform combos with the class. You can also flee from the enemies and take a breath to think about another attack strategy, it also works to perform surprise attacks, most of all to get the best potential of the class is to attack first, never let the enemy start because it is a lost game or you must think of something fast to obtain the victory. Faction: Mountain Clans Alliance: Legion Dealing damage, melee attack, physical damage, stealthiness. Rogues are fast, tricky fighters. They prefer light weapons and leather armor that does not restrict their movements. They won't hesitate to use dirty tricks to reach their goals, and they may even become fully invisible. Rogues are able to deal a huge amount of damage to all enemies in a short time. FACTION PASSIVE SKILL Mountain's Power Type: Passive All heroes of the selected faction have increased Health. Health parameter: 4% Lightweight armor Type: Passive Grants use of Light Armor. Dual Wield Specialization Type: Passive Allows you to use two one-handed weapons. Reduces damage from weapons in the left hand by 40% for physical and 30% for magical. Dagger Type: Passive Grants use of daggers. One-handed Sword Type: Passive Grants use of one-handed swords. One-handed Axe Type: Passive Grants use of one-handed axes. [In development] The skills are character powers that will help us a lot during our adventure in the game, each character has a maximum of 5 basic skills when you start the game. As the player levels up, the character can obtain skill points to improve them. Now let's know what the Rogue's skills are. Characteristics Attack skills deal physical damage They can increase parameters with positive effects They place negative effects or debuffs on the enemy Relics [In development] Merciless Strike Type: Active Usage range: Melee Cooldown: 6 Seconds Energy expense: 12 / 13 / 14 / 15 / 16 Units A furious attack with a weapon, dealing heightened physical damage. The strength of damage increases with skill level. (*)Skill Damage: Depends with skill development Kick in the Back Type: Active / Temporal Usage range: Melee Cooldown: 15 Seconds Energy expense: 13 / 14 / 15 / 16 / 17 Units Blow that reduces the enemy's Accuracy parameter for a while. As the skill develops, the number of attacks and effect duration time increase. SE Parameter Enemy's Accuracy Reduction: -5 / -15 / -25 / -35 / -45 % SE Duration: 3 / 7 / 9 / 12 / 15 Seconds Negative Effect: Accuracy Dodging Type: Active / Temporal Cooldown: 30 Seconds Energy expense: 15 / 16 / 17 / 18 / 19 Units Increases the character's Dodge parameter for a while. As the skill develops, the power of the effect also increases. SE Parameter Dodge: 10 / 14 / 18 / 22 / 26 % SE Duration: 15 Seconds for all levels Positive Effect: Dodge Gouge Type: Active / Temporal Usage range: Melee with bonus Area on Effect Cooldown: 20 Seconds Energy expense: 13 / 15 / 17 / 19 / 21 Units Deals the Paralysis debuff to the enemy, as well as to all targets within a radius of 1 yard from the character, for a while. Oppenents cannot move or use skills, any impact on paralyzed opponents removes the effect. If all opponents who are in battle with the character are paralyzed, then the character can use the Stealth skill. SE Duration: 3 / 3.5 / 4 / 4.5 / 5 Seconds PvP: 3 / 4 / 4 / 5 / 6 Targets PvE: Unlimited Targets Negative Effect: Paralysis Stealth Type: Active / Temporal Cooldown: 8 Seconds Energy expense: 15 / 16 / 17 / 18 / 19 Units Allows the character's to move in stealth mode if not already in battle. Any attack made when stealth is in effect deals increased damage. (*)Skill Bonus Damage: Only for 1 increased hit. SE Duration: 7 / 9 / 11 / 13 / 15 Seconds Positive Effect: Stealth [In development] They are new skills that have been put during the development of the game. These are unlocked at level 18 and to access them you need to have spent 10 skill points on the basic ones. Elusive Jump Type: Active Usage range: 5 yards Cooldown: 16 Seconds Energy expense: 22 / 24 / 26 / 28 Units Moves the character to the enemy and deals physical damage. The enemy receives extra damage if they're affected by the Poisonous Blades skill. (*)Skill Damage: Depends with skill development (**)Enemy Poisoned Skill Damage Bonus: 20% Flurry of Steel Type: Active Usage range: 5 yards Cooldown: 18 Seconds Energy expense: 7 / 8 / 9 / 10 Units You are able to throw a knife at your enemy which will deal some physical damage with a chance to stun the enemy. (*)Skill Damage: Depends with skill development. 85 / 110 / 125 / 145 % Stun chance: 35 / 45 / 60 / 80 % SE Stun Duration: 1 / 1.5 / 2 / 2.5 Second/s Negative Effect: Stun Poisonous Blades Type: Active / Temporal Cooldown: 26 Seconds Energy expense: 14 / 16 / 18 / 20 Units Puts a poison on the weapons. Poisons the target during any attack and causes damage for a certain amount of time. (*)Skill Damage: Depends with skill development. SE Duration on Player: 8 / 10 / 12 / 14 Seconds SE Duration on Enemy: 6 Seconds for all levels Number of Intervals: 3 Hits Intervals Time: 2 Seconds Positive Effect: Poisonous Blades Negative Effect: Poison Ricochet Type: Active Usage Range: 4 Yards Cooldown: 15 Seconds Energy expense: 14 / 16 / 18 / 20 Units A rogue throws a dagger that ricochets and hits a few targets at once. (*)Skill Damage: Depends with skill development. Damage Radius: 3 / 3 / 4 / 4 Yards PvP: 3 / 4 / 5 / 6 Targets PvP: Unlimited Targets Extermination Type: Active / Temporal Cooldown: 40 Seconds Energy expense: 20 / 22 / 24 / 26 Units Increases attack speed and reduces skill cooldown time. SE Parameter Attack Speed: 8 / 15 / 22 / 35 % SE Parameter Cooldown: 15 / 20 / 25 / 30 % SE Duration: 12 / 16 / 20 / 25 Seconds Positive Effect: Extermination Absolute Reflexes Type: Passive After successful dodge from an enemy attack, the hero's attack speed and dodge chance increases for some time. The skill's effect cannot trigger again during the duration of skill, as well as 2 seconds after the duration expires, for all levels. SE Parameter Attack Speed: 8 / 12 / 18 / 22 % SE Parameter Dodge: 5 / 7 / 9 / 12 % SE Duration: 3 / 4 / 5 / 7 Seconds Positive Effect: Absolute Reflexes Sinister Strike Type: Active / Temporal Usage Range: Melee Cooldown: 18 Seconds Energy expense: 16 / 18 / 20 / 22 Units Deals physical damage to an enemy and decreases its physical and magic defense by a certain percentage for some time. The power, time and damage of the effect increases with the skill level. The damage dealt also depends on the character's physical power and its level. (*)Skill Damage: Depends with skill development. SE Enemy's Defense Reduction: -15 / -20 / -25 / -35 % SE Duration: 7 / 10 / 13 / 15 Seconds Negative Effect: Weakness Frenzy Type: Active / Permanent Cooldown: 10 Seconds Energy expense: 16 / 18 / 20 / 22 Units Reduced energy regeneration: 5 / 7 / 9 / 10 Units Increases the character's Critical Hit parameter and the amount of critical damage they cause while the skill is active. All incoming damage to the character is increased while the skill is active. SE Parameter Critical Hit: 5 / 7 / 9 / 11 % SE Damage Critical Bonus: 6 / 10 / 14 / 18 % Incoming Damage: 20 / 16 / 12 / 8 % from enemies Positive Effect: Frenzy Trickiest Technique Type: Active Usage Range: Melee Cooldown: 16 Seconds Energy expense: 24 / 26 / 28 / 30 Units A blow that deals physical damage to the enemy and a negative Stun effect with a certain chance for some time. If the enemy is under the effect of the Poisonous Blades skill, the skill deals increased damage to the enemy and restores a certan percentage of the character's maximum health. The combo works with any Poison. (**)Skill Damage: 110 / 115 / 120 / 125 % (**)Enemy Poisoned Skill Damage: 120 / 130 / 140 / 155 % Stun Chance: 60 / 70 / 80 / 90 % SE Stun Duration: 2 / 2.5 / 3 / 3.5 Seconds Restored Points: 15 / 20 / 25 / 30 % of HP Negative Effect: Stun Legend: SE = Skill Effect (*) = The skill's damage doesn't meet the assigned percentage, or depends on a mathematical formula that includes the assigned percentage, hero level and/or skill level. (**) = The skill's damage if it meets the assigned percentage, but the damage doesn't en up being exact. ? = Unknown Data [In development] Stealth + Status: 1 / 2 / 3 Level/s Cost: 5000 / 10000 / 15000 Knowledge Increases duration of a skill effect. SE Bonus Duration: 1 / 1.5 / 2 Second/s Merciless Strike + Status: 1 Level Cost: 30000 Knowledge Increases the power of the skill from the physical strenght of the character by 5%. Shadow Veil Status: 1 Level Cost: 42000 Knowledge When leaving an invisible state from the Stealth skill, the character gets the Shadow Veil positive effect for 5 seconds. The effect keeps 25% of the damage bonus from the skill. Positive Effect: Shadow Veil ROLE TALENTS (DAMAGE DEALING CLASS) [In development] Long Death Status: 1 / 2 / 3 / 4 Level/s Cost: 2625 / 4465 / ? / ? Knowledge Increases the damage from the character's skills that deal periodic damage by 0.5 / 1 / 1.5 / 2 %. Moment of Power Status: 1 / 2 / 3 / 4 Level/s Cost: ? / 5735 / 7765 / 10125 Knowledge Increases the damage from the character's skills that instant periodic damage by 0.5 / 1 / 1.5 / 2 %. Frugality Status: 1 / 2 / 3 / 4 / 5 Level/s Cost: 1800 / 2700 / ? / ? / ? Knowledge Reduces energy consumption when using skills by 1.5 / 3 / 4.5 / 6 / 7.5 %. [In development] Stellar Blessing Status: 1 Level Cost: 36000 Knowledge Character receives an additional skill development point. Well those are all the exististing skills of the Rogue, now let's see how we can develop the skills and evaluate them for PvE and PvP. Currently there are many ways to build it, some builds are not as effective as the others, but each one depends on how the Rogue is equipped. It also depends on the strategy and gameplay of the player, it is a character that uses combos so to speak, and as a player of this class you must take advantage of it. Defensive Parameters: HP, Dodge, Accuracy, Vampirism, Parry, Resistance, Solidity Offensive Parameters: Accuracy, Critical Hits, Penetration, Attack Speed, Rage, Piercing Attack, Attack Strenght, Stun. ROGUE DODGE The most well-known build, by the rogues community, is used for PvE, and exploited for PvP. It is a good build, it has excessive dodges, which can be replaced with the equipment that the player possesses. But it lacks control effects and damage. 3/5 Merciless Strike or Stealth (Stealth Recommended) 5/5 Dodging 5/5 Kick in the Back 4/4 Extermination 4/4 Absolute Reflexes 4/4 Trickiest Technique 1/4 Frenzy [2/4 +1 Stellar] I like to call it a mythical build, I got to use it when I reached the level 32, my rogue was untouchable and I could farm the bosses of the game. It serves a lot to farm bosses or mobs. Frenzy help us a lot for critical hits bonuses, need take a lot of care because enemies can make on us more damage. ROGUE HP (TANK) It is a Hybrid variant of the Rogue dodge, but this one has a bit change in its skills, it gives it good advantages of negative effects and control, supporting with it the good dodge index. 3/5 Merciless Strike [4/5 +1 Stellar] 5/5 Dodging 5/5 Kick in the Back 4/4 Extermination 4/4 Ricochet or Sinister Strike 4/4 Trickiest Technique This build works so that you are the tank of the group, you must have good damage with a little vampirism in your armor and this must have all the crafted equipment of HP% Sinister strike help us for decrease enemy's defense and that works for us for make more damage but is for melee chases. Ricochet help us for agro mobs around. Trickiest help us for recover HP cause of low vampirism, and healer classes Shaman - Necromancer is obligatory for dungeons bosses. NOTE: The members of your group party must not be classes that can surpass your damage. ROGUE DPS The fast rogue of the game, he has a good attack speed and vampirism, he also has good damage. It should be noted that the armor must have critical damage and accuracy. 5/5 Merciless Strike 5/5 Kick in the Back 3/5 Stealth 4/4 Extermination 4/4 Elusive Jump 4/4 Frenzy (Recommended Maxed) 1/4 Sinister Strike [2/4 +1 Stellar] Optional 3/4 Frenzy 2/4 Sinister Strike [3/4 +1 Stellar] This build serves to be fast damage of the group, and eliminate the enemies quickly, it is a build that has a little energy regeneration in the equipment, in exchange for making fast attacks and not using many skills. It has a medium performance to tank, it weakness is the control skills from mobs, most of players with this skill build haves specific armors for exploits all damage parameters, but they lacks of HP. Frenzy maxed, damage incoming from mobs are lethal for us. Depending of situations, many mobs or bosses with AoE attacks. Anyway if we use kick wisely, with a bit of luck we can dodge. NOTE: Is a PvE build. ROGUE DAMAGE It is a variant of the Rogue DPS, it can have a bit of attack speed and exploit some attack parameters of the game, it has a good control skills and effects, which makes it useful for PvE and PvP. 5/5 Merciless Strike 3/5 Kick in the Back 5/5 Stealth 4/4 Extermination 4/4Flurry of Steel 1/4 Elusive Jump [2/4 +1 Stellar] 4/4 Frenzy Optional 1/4 Sinister Strike [2/4 +1 Stellar] Is the true rogue of the game is the league of almost all build, its armor must be balanced with the use of skills and auto-attacks. Stealth maxed is very higher damage for next attack from us. Imagine harnessing the talent of Shadow Veil. Frenzy is amazing for increase a lot of damage critical, so it can works for us. Elusive Jump makes good damage with poisons. Sinister strike for decrease enemy's defense, but in our group party we can use Necromancers 4/4 Infection 4/4 Dark power or Charmers 5/5 Weakness is more useful than waste points on it. Anyway is optional. ROGUE STUN The most useful for PvP and GvG is this construction, but it lacks dodging, it is a construction that works to do good damage, apply combos with negative and control effects towards the enemies. 5/5 Gouge 5/5 Kick in the Back 1/5 Dodging [2/5 +1 Stellar] 3/5 Stealth 4/4 Extermination 4/4Flurry of Steel 4/4 Trickiest Technique Optional 3/5 Stealth [4/5 +1 Stellar] 1/4 Absolute Reflexes [2/4 +1 Stellar] 1/4 Frenzy [2/4 +1 Stellar] 1/4 Sinister Strike [2/4 +1 Stellar] The build can alse be used for PvE, but you must be a more experienced player, to know when and where apply the skills. And with this build we can use the point of the talent tree in the skill that you like the most. With Gouge we can paralyze enemies around us, the downside is that it is very ineffective if there are classes in our group that use any area skills. You have to use Gouge wisely, it also serves to escape from combat. Kick will serve us well for the moment. Only works for 1 target of our preference, cause the skill still being melee. If you don't like Dodging so use the stellar in Stealth. If you don't want active Dodging so use the stellar in Absolute Reflexes, but Dodging gives more bonus than this expert skill. Frenzy with stellar is for PvE Stun Rogue. Sinister Strike with stellar is if you don't want Frenzy, Sinister works for PvP and PvE modes. NOTE: The stellar can be used in any skill of your preference, I only put recommendations. [In development] This section is very important, as every player who wants to be a master of the class should know these tactics and plays of the Rogue, that can be used within the combats in the game. Note: Most combos play much better on PC than on mobile devices. This is not to say that it does not work for phones, but that they are complicated to do. On the PC they are also complicated to do, but it all depends on the use of the keyboard and mouse. I present 2 ways to do it, the traditional way, and the double click action way that can be enabled by going to Menu > Settings and Logout > Settings > Joker It is a move to start first, it serves to deal auto-attack damage and make yourself invisible so as not to be targeted by the enemy. It is quite complicated to do, but when you do it it is satisfying. Realization: Click + Stealth Stealing Like the previous one, only this time it is in motion, which makes it even more difficult to execute. Since it's harder to do and has movement, I decided to call it stealing. Realization: Move to the Target > Click + Stealth Deception It is almost the same as the joker, but this time with a gouge, it can be used in most fights because of how basic it is. It also gives us time to think about what strategy we will use while our enemy cannot use skills and during this time we give the enemy an auto-attack damage and disappear. If you do it in PvP matches you will know why I call it deception Realization: Gouge the Target > Click + Stealth Short Time This attack for the enemy's eyes is like breaking the laws of space-time, but it is a slightly simple trick, Elusive Jump is a very instantaneous and fast skill, so there should not be many problems in its realization. The trick is quite useful to massively boost the damage of Elusive Jump, if you have it at 4/4 you could see a lot of difference. I called it "Short time" because the poison is a negative effect of periodic damage that we cannot control, so we must be fast enough to use the Jump before the poison makes us discover the enemy, and if they discover our damage it would be like using the Same basic poison-jump combo. Elusive Jump Combo Skill: Realization: Gouge > Poison > Click + Stealth > Jump Dirty Trick Well, in elusive jump we increased the attack a lot, but is it possible with the Trickiest Technique skill? The answer is: yes, we can use the ability to do even more damage, and even better, apply a stun. Trickiest Technique Combo Skill: Realization: Gouge > Poison > Click + Stealth > Trickiest Fatalities After training quite hard, you can perform the fatalities. They are personalized attacks with the mixture of the previous combos. Fatalities are performed with the Rogue's skill build stun. They are good for dealing a lot of damage while the enemy is stunned, or with some chance that your enemy will respond quickly with a counterattack. Some Demostrations: It is also good to have some useful relics for PvE / PvP, I do not recommend using relics of periodic damage because they damage the attacks. Fatality CDPS To do this, you need to hit 70% attack speed and have more than 66% cooldown (66.3% is the CD I did this with) It is used to kill monsters quickly, for PvP it could also work, it is good to evade any attack or control effects. Abbreviation: CD Cooldown + DPS Damage per Second = CDPS Cool Damage per Second (This in Spanish sounds cool ) Demostration: TIPS · If you have the Stun parameter equipped in your build, you should know how to take advantage of that time to add it with the other stun skills, so you will be able to keep the enemy stunned for longer. · Try to try several times it never comes out the first time, I even made mistakes for time and movement. SOME THINGS ABOUT THE CLASS It is a class that undergoes quite a few changes during the development of the game. It is a character that is better played on PC than on mobile devices. It has a high spam of skills, but not all of them are used completely. He is the character with the highest attack speed. Damage is only temporarily increased during combos. The class is not immortal, it possesses many weaknesses against ranged enemies. His previous counterpart was the Blade dancer, now is the Seeker. Many new players select the class solely for stealth, as does the Seeker. "For me the rogue is a character that I have a lot of affection, with the little development he has, he is still useful for many things. It has little attack strength to sustain close combat, but great things come from the little things."
-
In this guide we will be talking about castle and everything you need to know about castle when it comes to basic information, capturing, attacking & defending, strategies and the goods you gain from capturing a castle Basic information Castle locations Castle buildings Castle Requirement Castle goods and buffs Capturing Guild requirements to apply Castle siege Guard room Attacking the throne Attacking & defending 1st level 2nd level 3rd level strategies Members Diversity supplies Minions & buffs Basic information 1- Castle’s location There are 5 castles at the moment in Warspear and are located in the 3rd map of the game “Avyondil” each castle is located in its own section of Avyondil. 2- Castles buildings Each castle has 3 buildings where you can produce goods and an architect where you can build or level up buildings and the castle to fortify your castle and produce better goods. 3- Castles requirement To build or level up building you will need 2 main resources as well as gold and guild points. 1- Ideal essences which can be found in the same section as the castle. 2- symbols which can be found in the dungeons of the castle section which will drop as loot upon killing the dungeon final boss. 4- Goods and Buffs Capturing and owning a castle will grant you with lots of advantages such as the castle buildings which can craft powerful items and grant access to the castle steward where you can use certain buffs to aid your members in battles or help improve the guild. -The Laboratory where you can craft powerful potions for the guild. - The workshop where you can craft powerful scrolls for the guild. -The Magic Tower where you can craft group relics. - Keep in mind that upon crafting these items the building will lose durability and will make the items take longer to finish, you can repair them by using the castle resources and gold as well as guild points. - the castle steward where you can use a verity of buffs for the entire guild members which can aid you in battles or help with the guild development. Capturing - Now we will be talking about what you need to know when it comes to attacking and capturing a castle. 1- Guild requirement to apply Each castle has its own rules to apply when it comes to guild level and members, in order to apply for castle siege, you need to meet those requirement Upon meeting those requirements your guild can take part in the castle siege to have a chance of capturing it, your guild can apply by making the guild commander entre the castle afterward the rest of the members can join in. 2- Castle siege Once you have joined the siege the guild will spawn in one of the 8 camps, these camps serve as a spawning point for guild so upon dying in battle the members will respawn in the camp. Your objective here is to work together to break one of the castle gates while fighting other guilds who has the same objective. 3- Guard room Upon breaking the gate, the guild commander and his party will have access to enter the guard room where you attempt to kill the guard as well as other guilds commander party. Keep in mind that only the guild commanders can attack the castle guard while the party members should support the commander and defend him from other guilds. If your guild managed to kill the guard only then the members of the guild will be able to enter the guard room and prepare to attack the throne, other guilds will be teleported outside of the castle and result in failing the siege. 4- Attacking the throne once your guild has entered the castle citadel you will have to face the guild who hold the castle your objective is to find and destroy the throne while fighting the current guild that hold the castle. Attacking & Defending - the castle citadel contains 3 levels, the 1st level which has 3 gates and 5 drop down points where the attacking guild can use to enter the citadel also the middle area serves as a spawn point for the attacking guild. - the 2nd level contains 1 middle gate and 2 routes left and right of the middle gate. - the 3rd level contains the throne and the end of the 2 routes which leads to the throne in the middle - Attacker: your objective is to break the gates and destroy the throne while fighting the guild which hold the castle. -Defender: your objective is to defend the throne for 20 minutes by killing and slowing the attacking guild progress until the end of the timer. - Keep in mind: the health of the gates and throne as well as their stats is are different, each castle has its own stats Castle level object health Resilience % 1 Throne 50000 5 2 Throne 75000 10 3 Throne 110000 15 4 Throne 155000 20 5 Throne 210000 25 1 Gate 250000 5 2 Gate 275000 10 3 Gate 325000 15 4 Gate 400000 20 5 Gate 500000 25 For example, level 4 castle “Sky Sanctuary” gates will have 400k health and 20% resilience while the throne will have 155k health and 20% resilience. strategies Here we will be talking about some tips and tricks that could help with attacking or defending a castle as well as other helpful information. 1- Members Diversity A major thing a guild should consider before attacking or defending a castle is the classes and gears of the members participating in the siege, the guild most have a front liners, damage dealers and support. - Front liners are the classes that function as a tank class which can withstand a number of blows without dying and their job is to take most of the damage for the guild and force the enemies to engage them. - Damage classes are the main damage source for the guild relying on having a high damage but very low control or survivability. - The support classis’s main goal is to help the frontline and the damage classes in doing their job by providing buffs, healing and even control by disturbing the enemy formations. Keep in mind that the key to winning group battles is to have the balance between the game classes by not having too many of one class or too less of another and having everyone play their role. 2- Supplies Before attempting to attack or defend a castle you need to make sure you provide the correct supplies for your guild to help them win the battles. the most important item is the “courage scroll” which can be used to instantly respawn during castle battle. its really good to provide health potions to your guild to help them stay alive during the battle plus these potions don’t provide any extra buffs which could overtake any buffing potion which we will talk about next. 3- Minions & Buffs A really important thing to keep in mind when going into a battle is to have the right minions support and buffs to aid u in the battle. - Minions are an important assist when it comes to fighting, they can provide you with the extra damage you’re missing or the extra control you might need. - Having the correct buffs is also a necessity for battles we will talk about which buffs are recommended to get. I hope this guide could be of use to others specially to the guilds that aim into becoming stronger and claim a place among the high league, I will keep coming back to the guide and keep it updated. - Abi [ EU-Emerald]


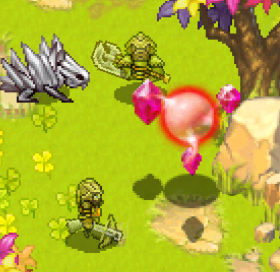


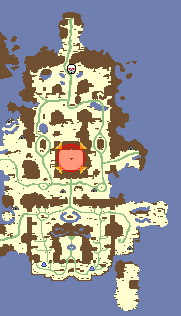

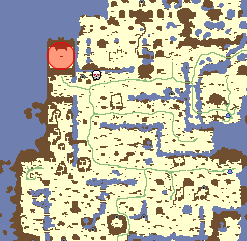


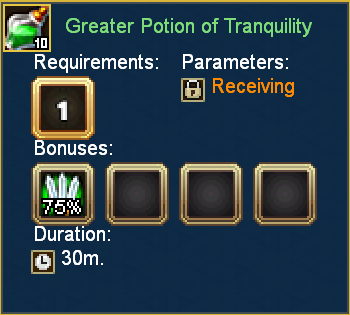
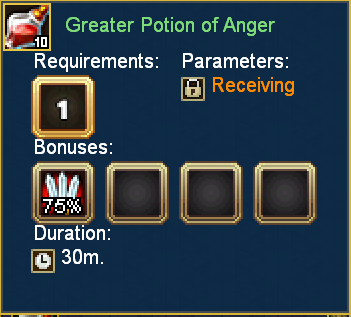
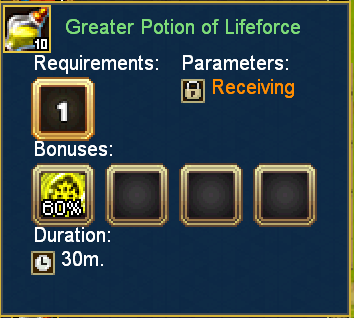
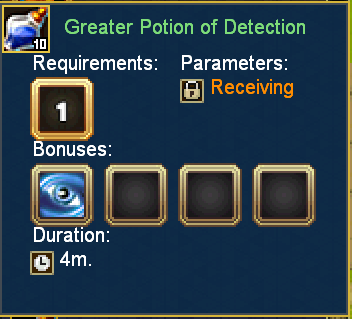
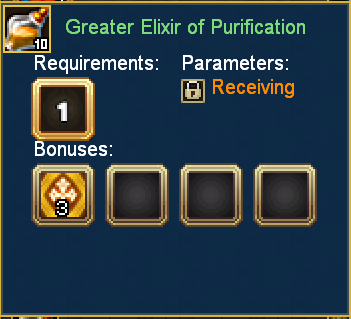
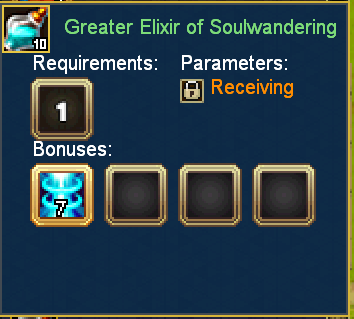
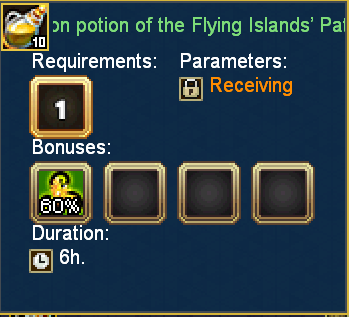
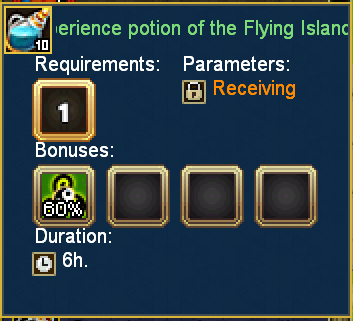
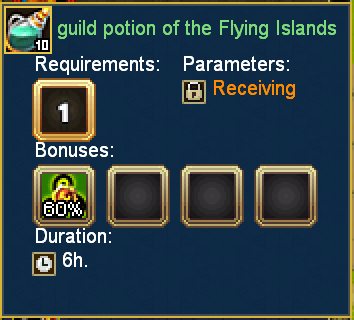
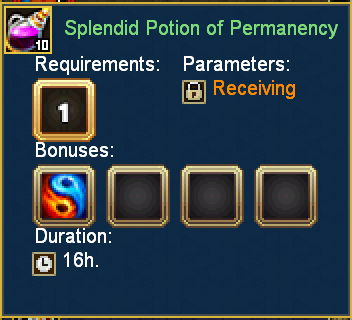
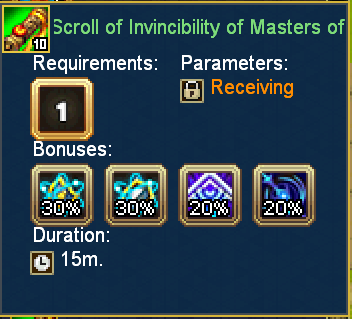
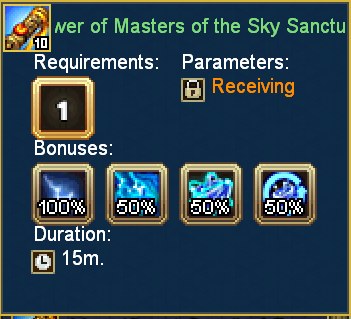
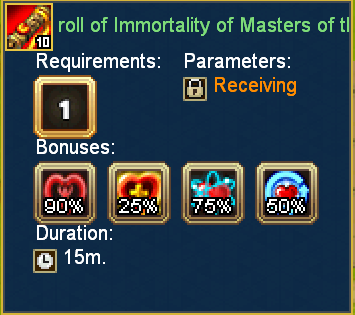


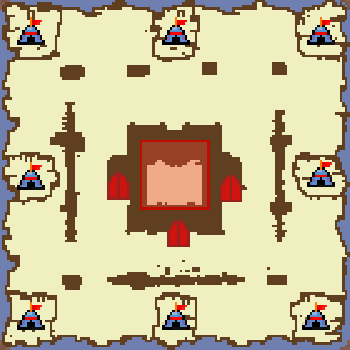
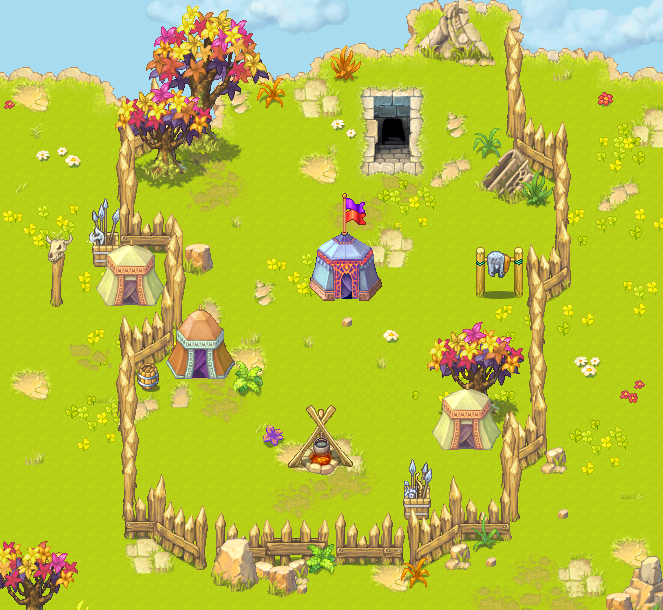
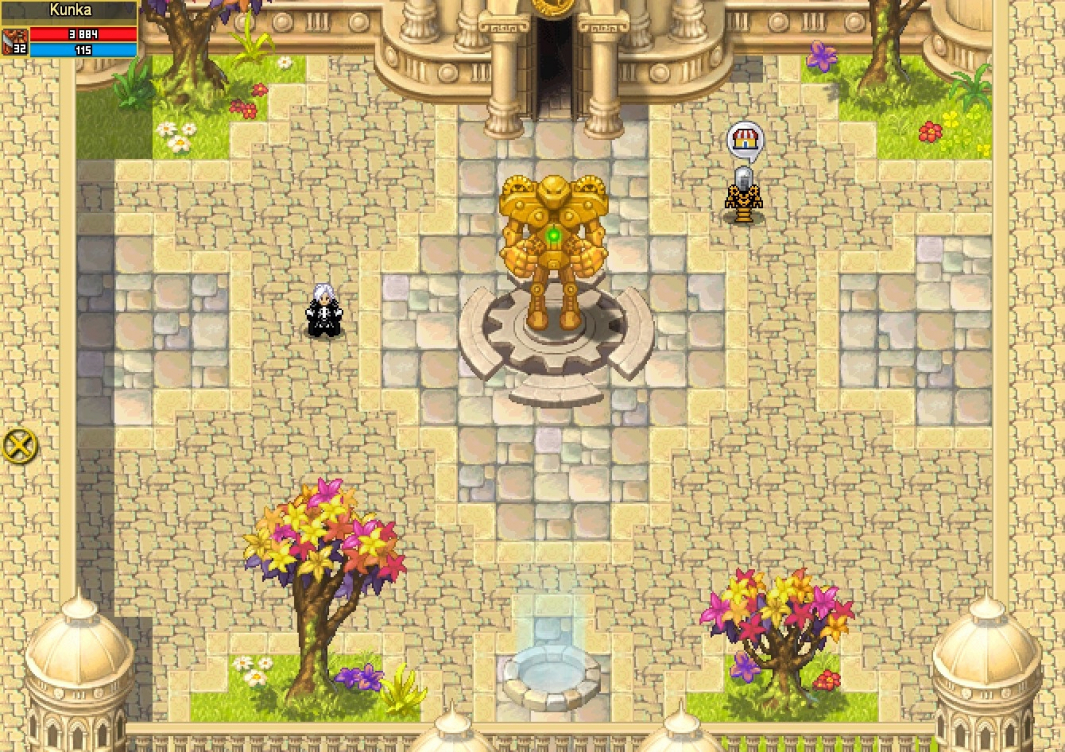
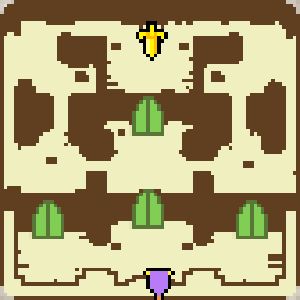
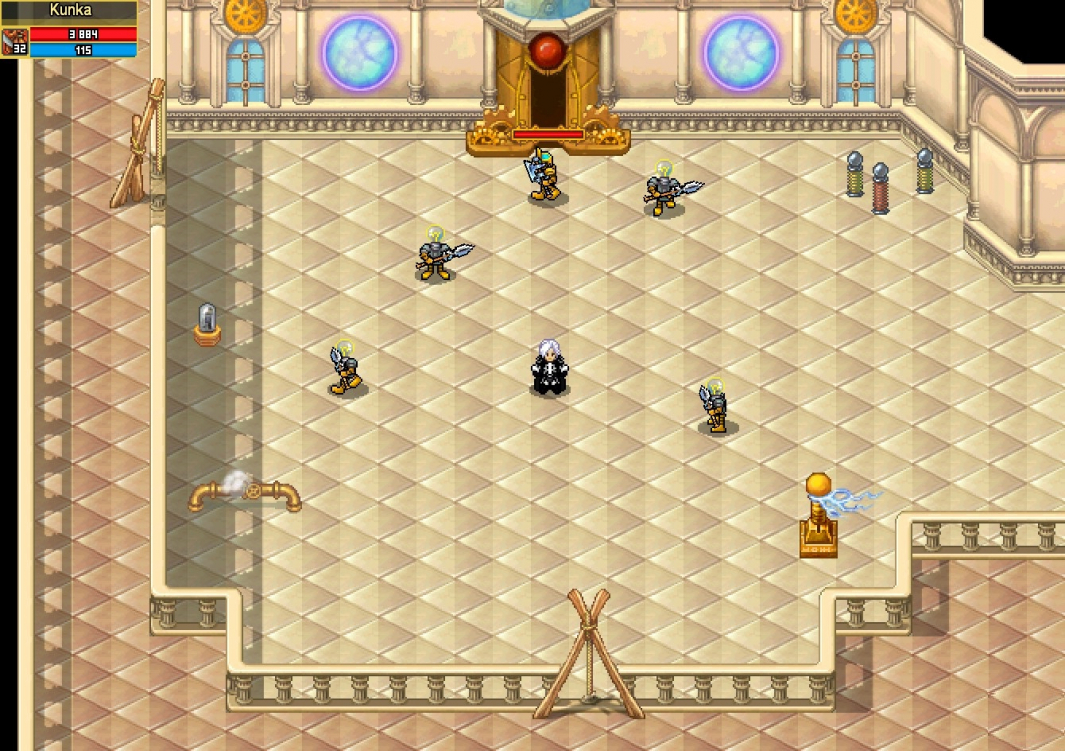
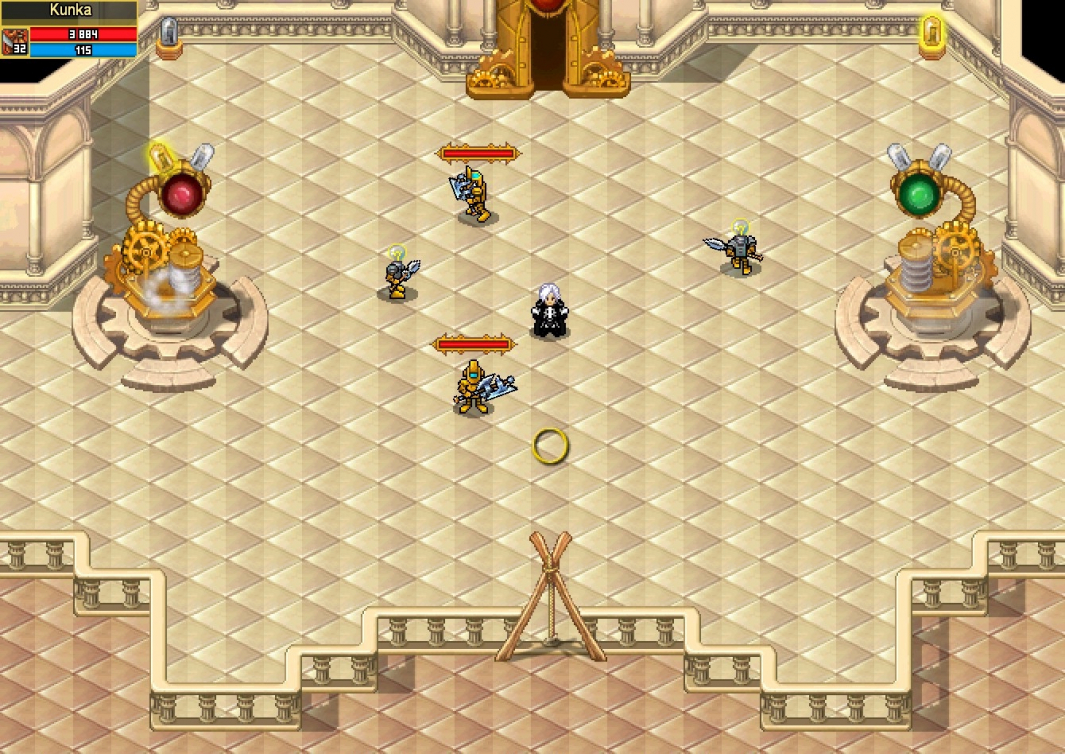
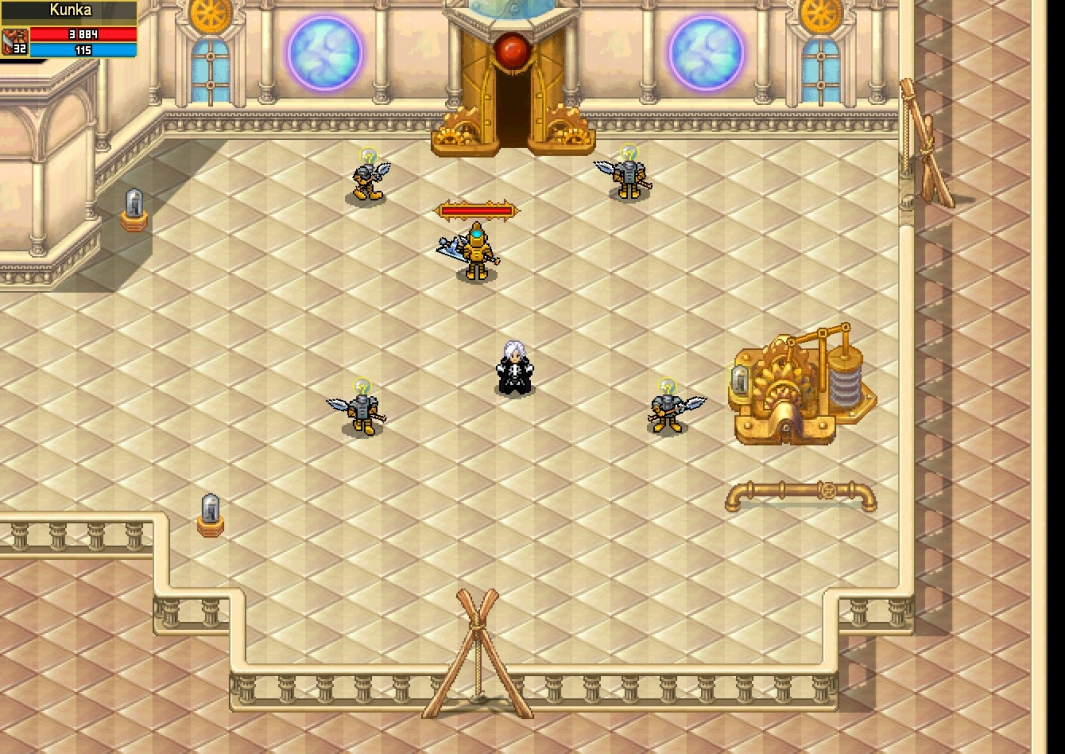
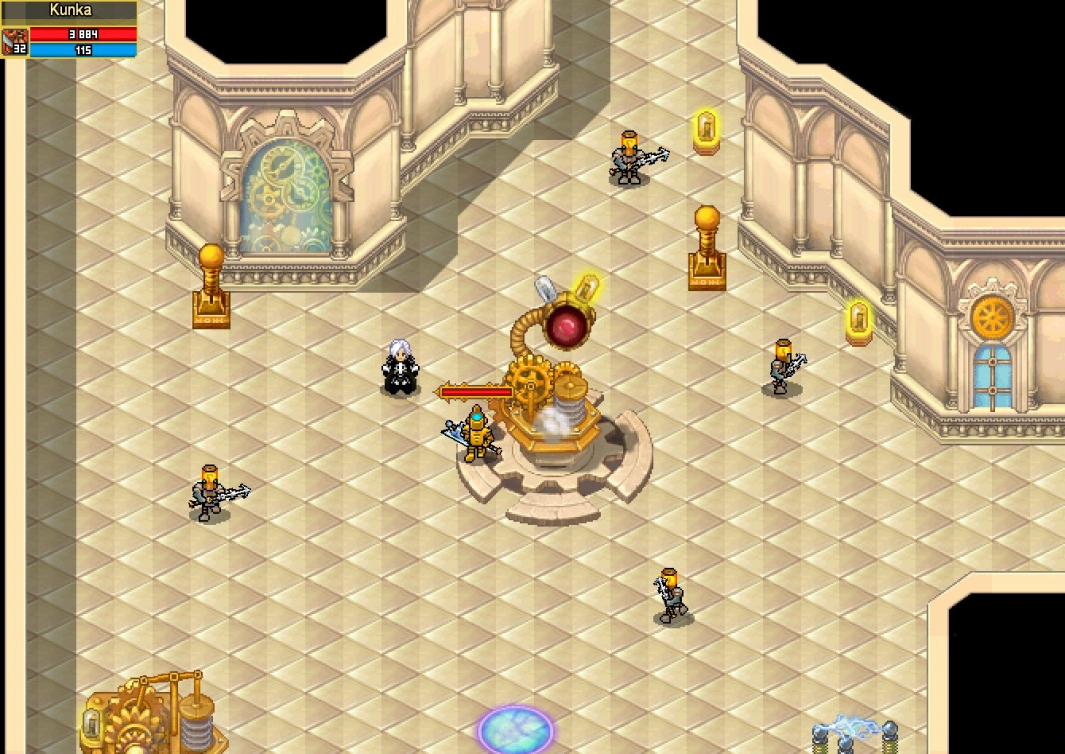


-
 Hello Guys Ibuguru here ^^ Are you new in this game? Your weapons not glowing? You doing daily quest but not got enough gold? You want to farm but u can kill boss alone? Or someone already farm in boss spot? No worries here small tips from me. 1. Maliat Elves (T1 Ayvondil) This zone is the first zone at ayvo when we graduate from irselnort we can get quest to travel here the average mob in this zone is 21.so let start with the first mobs. Servant of the Filth This mobs usually always in group so as a beginner we cant afford to farm it since we have decent and early items so we cant withstand for longer farm especially if your class not have survivability skill like healing or dmg reduction, here i will show u where u can farm safely also no minion needed ^^ first you need to go there 1x up from rotting garden dungeon. there are 4 mobs in the area the green means is easy to kill (they are alone) the red is kinda hard if you attack one of the red circle mob the other one will attack you too. when u manage to kill the drop will look like this : Mobs can drop sign of filth ,honey, stale bun, and some gold Note : you need to take Sign,Gold, and stale bun. When your bag is full u can sell sign and stale bun at npc. Sign worth 20g and stale bun 6/12g (correct me if im wrong). Mutant of Cloaca this mob is kinda tricky the mob is not too strong but the real challenge is how you can go there, because to farm cloaca we must enter satrap cave and you know what? There are many mobs in the way xd so if u strong enough to kill 1 party filth mobs u can go there easily (must kill mob on the way), lesgoo to the next step. The purple circle is the mobs location. Remember to kill just 2 cloaca in left and right side. If you attack cloaca at mid the green fat guy will attack you so becarefull. This mob is dropped bar but not every kill u get bar so be patience xd NOTE : LVL 22 IS CAP FOR FARMING EFFICIENLY(the higher your lvl are the gold are decreasing, in cloaca case the drop rate become smaller when your lvl raise higher. 2.Tlaloc (T2 Zone Ayvondil) Well we have arrive at T2 🙉 this mob area is almost have same stat with T1 but it slighly stronger than t1. Fairtailed Predator and Cupacabra this mob come in group the firefox is protecting their cupacabra friends ^^ so if you attack one of them they all will come to you i recommended doing this farm with 2 ppl lvl 18-20 The is 3 fire fox in the area you must kill it all and take the dropped gold. If you level 20 u will get average 13g perkill so 13x3 = much gold. This is cupacabra thus mob dropped average 29g each kill also in this area you can party but remember max 3 ppl (max lvl 20 if party it would be good if your party full of lvl 18 amount of gold slightly better if your lvl lower than mob) NOTE: BETTER MAX LVL 22 IF LVL 23 UP ITS NOT WORTHY FARM THERE U GAIN LESS GOLD. ALSO 18 OR 20 ARE STILL GOOD IF PARTY 3. Flying Island (T4 Zone Ayvondil) now we arrived at t4 the mobs is more stronger and have high defense for beginner like me is hard to survive there if we only have low lvl equip and not glowing ofc. I only guided for 1 mob in this area lets check it ou Steel Bodyguard yes this is the one we gonna farm, this mob location is at engginer platform (raid boss area) thus mobs dmg is no joke so becarefull, also kill it one by one. There is 4 guard in the area and kinda good place since there is no other mob except them(not if raid boss alive tho) u can hunt them one by one(something bad might happen if vs 2 guard xd) my lvl is 30 so i got like 30-35g Ofc its kinda hard thanks to my barb skill i can survive but it take times to kill xd but u can party here 26-28 i recommended to make a party with your friends its easier and faster xd also u can chat while farming so u wont fallasleep ^^ if youre strong enough ofc u can solo this mobs. 4. SEA aka T5 Ayvondil Zone in sea for farming is kinda hard especially if u have low dps like me, also u need oxygen which is very important for long farming, having boots and wpn sea is gonna help you fsrm effieciently (i dont have sea wpn) Sea wasp its a jelly fishh the red one,here what its look alike, oh its pink xd What that pink jelly drop? Ofc its a gold here the pic Scyphozoan(Green Jellyfish) its the brother of pink jelly🤯 but more stronger and have cc too 🙊 Is it hard? Yes but trust me it worth it, you can get good drop from just killing elite mobs! The green jelly will drop craft resource,gold,deff etc. They are in sea map u can find them easily but if u have decent gear go for safer farm area(less mobs). Here what i got from kill cute jelly Cyanea (Blue Jellyfish) Its the blueee jelly (im also blue xd) its basically same like the green but this jelly is blue also have lower hp than the green one. Blue jelly drop Sea Devil last mob is the sea devil, yes they usually at the deep of the sea they are elite mobs the drop rate is better than jelly (i think) when i kill them this is what i got 🙊 This is the place when u can farm all of them (except green jelly) That place is good basically u kill all the mob in the area they all have good amount of gold and another items like bar, resource or even deff/dmg If i can do it you can too(you can inspect my character its weak xd) thank you i hope this gonna help some people who suffering from gold hunger xd Bonus :
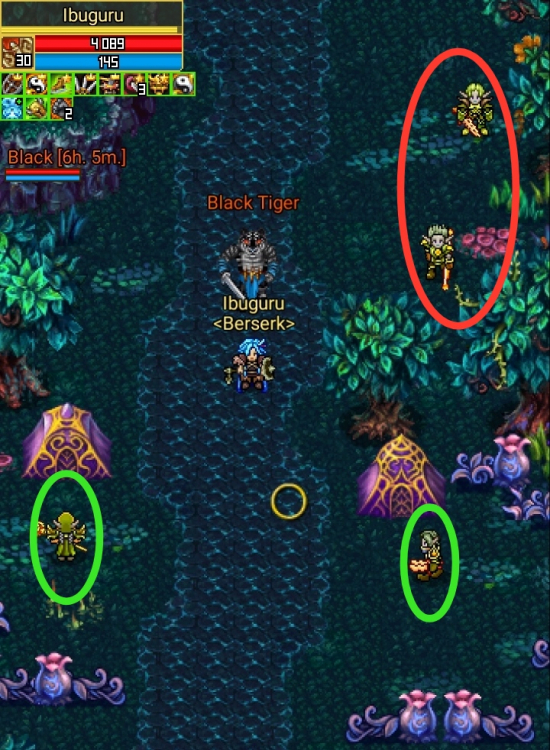
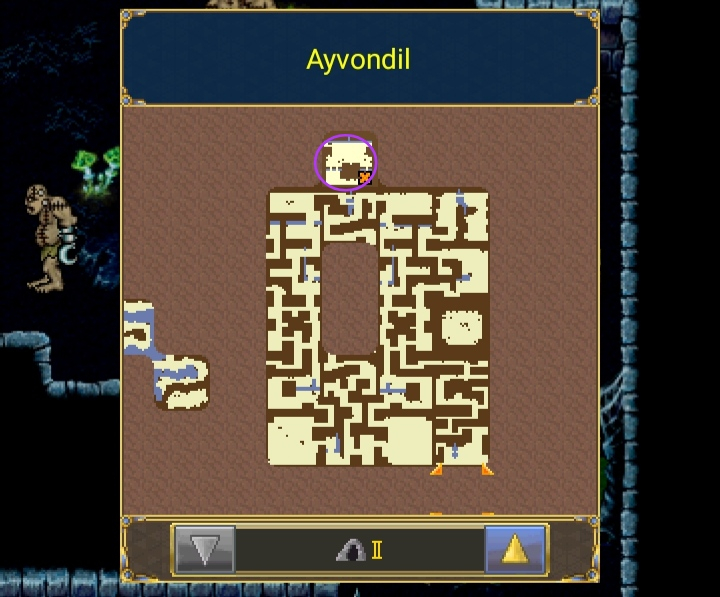
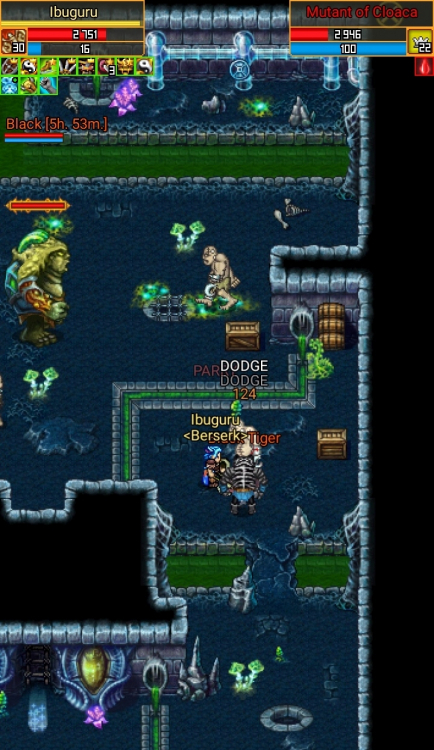


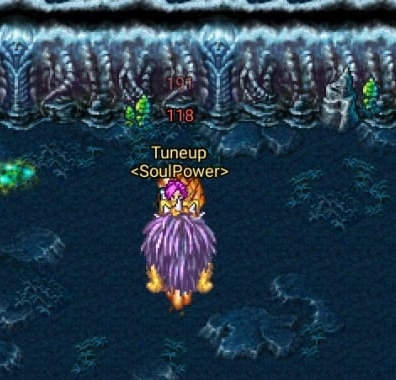


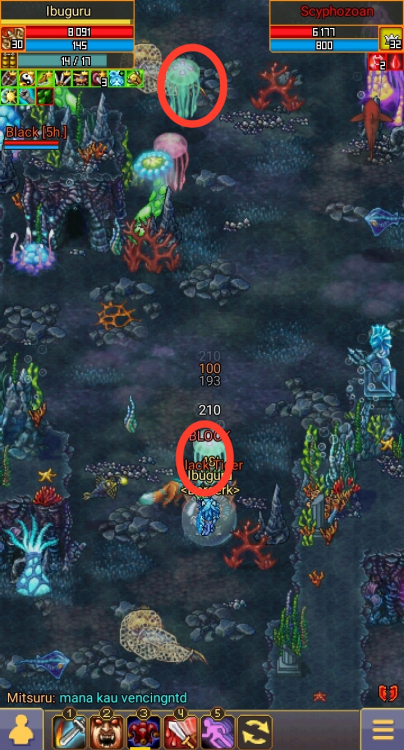

-
I see some character with op status on level 13 and he had so much gold
-
update log: - updated 07/09/2018 - updated 23/02/2019, v7.7.0 - updated 09/05/2020, v8.4.2 - updated 04/12/2020, relic section rewrite. - updated 04/06/2021 v9.3.0 BASIC SKILLS BUILDS PvP build Dark Shield 5/5 - Dark Shield give's the chance to ignore enemy damage with accordance to your armor, the more armor you have the more damage the skill will ignore which will give a increase chance of survival, as of the last time this skill got an update the chance of working is 75%, giving a huge durability and allowing you to withstand great amount of damage. Thorn of Death 3/5 - Leveling Thorn of Death will allow you to increase your output damage and let you kill enemies faster, its a given that you need to have a damage skill with some levels for all classes Exhalation of Darkness 5/5 - which will give you extra magical damage, as much as you have magical damage the skill damage will increase - (Update 8.4.2) the stun duration now increase with the skill level as follows 2/2.5/3/3.5/4 making it an essential skill in PvP! as for Provocation and Threads of Darkness keep them at 1/5 - use Provocation to make enemy lose target in case you want to run and use Threads of Darkness to pull running enemy's toward you - you could give Threads of Darkness some levels as it give extra damage to all following attacks but then you need to lose some levels in other skills, There is also the possibility of leveling Threads of Darkness to 3/5 or even 5/5 as the skill will increase all other skill damage toward the effected target - (Update 8.4.2) Threads of Darkness cooldown was decreased from 30 to 22 and its debuff duration was increased from 2/3/4/5/6 to 4/5/6/7/8 making it more spamable and the debuff duration increase allows you to deal more damage to enemies PvE build Dark Shield 5/5 - Dark Shield give the chance to ignore enemy damage with accordance to your armor, the more armor you have the more damage the skill will ignore which will give a increase chance of survival, as of the last time this skill got an update the chance of working is 80%, giving a huge durability and allowing you to withstand great amount of damage. Thorn of Death 3/5 - You need this skill to for outputting damage to enemies and bosses Provocation 5/5 - as of latest updates support classes heal Provoke the monsters to attack them so you need something to attract the monsters attention away from the healers - also bosses attack the higher damage outputted to them, so most of the time bosses will attack damagers so you need something to attract the boss attention to you - try spamming this skill it have low energy cost and cooldown. as you can see Dark Shield is leveled max in any case, this skill considered the heart and soul of DeathKnight, and is the most important Basic skill we have. - For knights who want to pass to the second map level Dark Shield it will give you durability to kill 5-6k mini bosses without help and survive if you get lot of Monsters around you, then level Thorn of Death for some damage EXPERT SKILLS BUILDS There is lot of build you can go with expert skills and combine them with base skills and each other Health steal build and this build it self split to some builds of course all Health steal skills need Horror accessories , thought it is not necessary, it help a lot, also getting Saturation 4/4 as it give 25% extra Health steal for 15 seconds. saturation will take 10% of your health along side energy with the latest update to the skill instead of the old 4%, you need to take this 10% in consideration, 10% of health is a lot of health for tanks that became easy for them to reach 4k-6k health 1 - AoE Health steal/Dungeons and Bosses hurricane 4/4 saturation 4/4 - Use these skills with each other to get high Health Steal parameter and then burst enemies with high physical damage and steal health from them - The more enemies around you, the more Health Steal you do! - use Death Call to attract the target around you toward you so that you can set yourself up for life stealing from them with the build. - NOTE : by the name this build can only work if big numbers of enemy's are targeting you, so that you get a use of that AoE skills its most effective in dungeons and against groups of players and/or mobs, although its not really a problem because you Steel Hurricane should deal up to 500-1000 depends on your damage - even in 1v1/2v2 you will get a good amount of Health Steal - and remember these AoE skills can detect and reveal Invisible enemy's 2- Single target Health steal saturation 4/4 Sharp Shadow 4/4 - as of latest update for sharp shadow Steal Health from enemy's if you on the effect of Saturation so leveling Saturation and Sharp Shadow 4/4 is really good, also this skill damage is magical so adding some magical damage to your gears and weapons is good for more damage from it - NOTE : the build is best and most effective in 1v1/2v2 arena, it can also be used in farming bosses as long as you don't get lot of enemy's around don't get me wrong, its good in group fight and dungeons but it will not show its max potentials... Regeneration build Secret Reserve 4/4 --update notes! read below...-- -This build need you to get a large amount of health regeneration which this skill multiply it to increase your regen - just remember Regeneration effect get cut in half if being attacked or in battlemode(When your health GUI flash red) - also recently i encountered some characters who wait until your Secret Reserve is activated To use all there skills and kill you before it do anything so getting some armor so that you can survive for the skill to do its magic - Gear like Heroic Endurance, Golden Dawn, Kronus, rings, and shields have a Hp regeneration Bonuses - other gears that you can enchant with regeneration like amulets, caps and shields for more regeneration - NOTE : this skill is useful in most of situations you might encounter and can reach to high regeneration income, that's probably why people consider it "Broken", however beware of smart players as they could play around this skill, also this skill help you by giving you bonus armor, if you managed to get high hp regeneration then the skill well do more than 900 regeneration a tick for 12 seconds --update notes-- I'm gonna keep this build for the sake of people who might be curios to know, but this skill and build got nerfed and while its still useful the loses requirement to reach favorable result outweigh its benefits, because of its high cooldown(2 minutes) the skill is most beneficial in arena and only recommended there, i will not recommend the skill for PvE where you need a constant healing as for latest update to secret reserve the skill now increase the "Health regen parameter" instead of giving a healing buff depending on health regen, and the skill decrease the regeneration rate while also receive a increase to its cooldown. the skill need full focus on health regeneration to acquire needed results... Stun build Blow of Silence 4/4 Sharp Shadow 4/4 with some Skills CoolDown luck and timing you can stun the enemy for a long time - also you can combine Health steal build with the stun build, as the stun build use Sharp Shadow get Saturation to 1/4 and then Sharp shadow will steal 50% with it use it with blow of silence to deal extra damage and steal even more - NOTE : this build is best used in arena and 1v1/2v2, as you can completely control an enemy if your skills succeed to hit, just remember that 2 of these skill require you to hit for there effect to happen so building accuracy is good, also remember Blow of Silence Does not stun the enemy but prevent them from using abilitys which mean they can move and the skill does not end if you fail to attack but stay until you successfully attack or the duration end - also use this skill on multiable targets if your team is in need, and don't waste all these stuns on 1 target, to give your team a chance to breathe -Use Exhalation of Darkness with this build because it also stun the enemy. Survivability/tanky build Dark Shield 5/5 Aura of Hatred 4/4 Blood Protection 4/4 - this is the only build that work great for heavy tanky death knight it offer both bonus armor and damage reduction for you. - this build can be used to withstand bosses and players, and with support classes shield you will be literately a tank Aura of Hatred - Aura of Hatred can be used with every build mentioned here, for more defense and surviving or for bonus damage, and considered one of the best expert skills for death knights the 15% increase can go along way with more defend, as well as increasing your solidity making you a better tank in general RELICS while i can't give specific guiding to relics because choosing relics depends on you and your playstyle and what you need, i can still give some opinions on likable relics. - Each Base Skill can have 4 relics, offensive, defensive, empowered and special PvE Great relic of Menacing is a great edition to your aggression skill, giving you a 60% increase aggro to the skill making it better at keeping bosses and enemies away from your party and making mobs focus on you Generally any life steal relic is good for dk and are recommended for him, they will help him with his AoE build and life steal build defensive relic are a great plus for PvE dks, they will make you more tanky and able to survive Icy relic of intractability is arguably one of the best relic a dk could have, increasing his dark shield effect by 40%, this relic is a must have! PvP any stun or silence relics are great for dk in PvP and will help you with the stun build to keep enemies under control in case one of your skills fail Great relic of punishing increase the damage of your skill by 12%, making it great to deal increased damage Great relic of inaccessibility increase the range of threads by 2 yards makin a total of 7 yards of range, good for caching those runners! Great relic of continues effect increase the duration of an effect by 40%, great to keep your skill running for a bit longer and have great use with exhilaration of darkness Other Death Knight Guides that might help


-
Crafting System Equipments are important as they help you on your journey in Warspear. You can get equipment items such as weapons and armors by completing certain quests or by raiding bosses and mini-bosses. You can also find them inside the dungeon, but the unique way to have cool and good gear items is to craft them! To access the crafting system, go to MENU>CHARACTER>CRAFT There are different crafting professions you can do: -Melee Weapon -Ranged Weapon -Cloth Armor -Light Armor -Heavy Armor -Cloak -Ring -Amulet You have to be a level 10 adventurer first to open a craft job slot. Craft job slot allows you to do a crafting task. At first, you can only have one craft job slot and perform one craft task at a time. You can unlock more craft job slots by meeting the condition needed. Crafting in Warspear is unique and it works on every class in the game. By completing a craft job, you will gain experience points on your crafting profession and level it up. You can unlock higher level of equipments to craft as your selected profession's level increases. But when the level of equipment gets higher, the longer it takes to complete. You can instantly complete the craft task using Miracle Coins according to the time left but it's not worth it and mostly no one is doing it. Craft Licenses To start crafting, the first thing you need is craft license. Craft license allows you to craft the resources needed or the equipment itself. There are four kinds of crafting licenses you can use: - the regular craft license. The best one if you are just started crafting. You can buy it on some NPC shops in the game. - a craft license that doubles the craft resources you are crafting. It only works on craft resources not on the craft equipment. This license is craftable. - use this craft license to gain more craft experience points on your selected craft profession by 50%. If you want to level up your craft profession faster, then it is good to use. It is available on miracle coin shop or you can buy it from other players. - a craft license that lessen the time needed to complete your craft task by 30%. Use it when you already maxed out your craft profession or you want to rush your crafted equipment. It is also available on miracle coin shop or you can buy it from other players. Craft Resources With enough set of craft licenses, you can now start to craft the resources needed. Craft resources are the materials needed to do a crafting task. Every equipment you want to craft requires certain amount of craft resources. You may start crafting common craft resources. Common craft resources are used to craft low level equipments(crafted equipment of level10-level14). Upon reaching level 8 of your selected craft profession, you can now able to upgrade those common craft resources into advance craft resources. You need these advance craft resources to craft higher levels of equipment(crafted equipment of level16 and above). Also, you can gain some craft resources by disassembling any equipment. Just click the equipment>MENU>DISASSEMBLE. The type of craft resources you will get is according to the type of equipment you'll disassemble. Special Craft Resources There are crafting materials needed to upgrade your normal crafted equipment or to do a certain craft task. You can obtain these resources by hunting bosses or from dungeon chest. There is also a chance to get them by disassembling an equipment. The type of special resources you will obtain is according to the type of equipment you'll disassemble. Common Catalyst Amplified Catalyst Energy Catalyst Ethereal Catalyst These crafting materials can be used for Melee and Ranged Weapon craft profession. Common Substance Composite Substance Energy Substance Ethereal Substance These crafting materials can be used for Cloth, Light, and Heavy Armor craft profession Common Essence Composite Essence Energy Essence Ethereal Essence These materials can be used for Cloak, Amulet, and Ring craft profession. The Energy and Ethereal resources are valuable materials. They are needed to upgrade your normal craft equipments. Random Rare Craft Tasks There are craft tasks that are randomly appear and they are listed at the very top of every craft profession. These craft tasks are special and rare that you can upgrade your equipment into its best form or to craft massive resources. Rare craft tasks have a timer. When the time has expired, another random craft task will appear. Using 49 Miracle Coins, you can select the craft task of your choice so you can start crafting it without waiting when the task will show. Some rare craft tasks that appear randomly can allow you to craft "Mass Collection of Common Resources" and "Mass Collection of Advanced Resources". They are available on all craft profession with different required resources. Note: You can use Apprentice's Craft License to double the amount of craft resources you gain. There are also rare craft tasks that allow you to upgrade your special resources or to make Apprentice's Craft License. They are also available on all craft profession with different required resources. Note: You can use the Apprentice's Craft License to double the special resources you gain but it will not work on crafting Apprentice's Craft License itself. Upgrading Crafted Equipment You can upgrade your crafted equipment for additional stats. On the first upgrade, you just have to gather the amount of resources needed. You need the crafted equipment you want to upgrade and yellow special resources (resources with the word "Energy" on its name) to start. The type of special resources you should use depends on the the type of the equipment (Check the Special Craft Resources section). The amount of resources needed depends on the level of the equipment you want to craft. For the second and final upgrade, you need the upgraded equipment and purple special resources (resources with "Ethereal" on its name. The type of special resources you should use depends on the the type of the equipment (Check the Special Craft Resources section). Again, the amount of resources needed depends on the level of the equipment you want to craft. The final upgrade craft tasks are rare and only appearing randomly but you can select the special craft task of your choice using 49 Miracle Coins. The upgraded crafted equipments are unique and have better stats than regular equipment. The final upgrade weapons have more physical/magical power stats than any other equipment on the same level and amplified value. The final upgrade armors and shield weapon have more physical defensive stats than any other equipment on same level, type(being cloth, light, or heavy) and amplified value. They also have a unique + 15% HP stats except the shield weapon. The final upgrade accessories also have more physical/magical defensive stats than any other equipment on the same level and amplified value. They also have physical/magical power bonus stats. +4% physical power or +5% magical power on cloak, +4% physical power or +6% magical power on amulet, and lastly +3% physical power or +5% magical power on ring. Special Craft Tasks During Holiday Events There are special rare craft tasks that only available during certain Holiday event. Unique crafted weapons with one doubled stat and attack strength bonuses on Spring Event, unique crafted accessories with percentage physical/magical power and stealth health(life steal) bonuses on Horror Circus Event, and unique crafted armor gears with resistance and pair set bonuses during World Creation Event. These crafting tasks are appearing randomly but you can use 49 Miracle Coins to select the tasks of your choice instantly. So get ready and level up your crafting professions and craft these unique gears in Holiday events. Tips And Tricks Crafters have different approach in their crafting routine. You can be a full-time or part-time depend on your fund but you can start anytime as soon as you reach the requirements needed. Here are some tricks and tips of how you can start your crafting journey. *Disassemble Lvl10 Craft Equipments. Disassembling any lvl10 craft equipment can give you the exact amount of the resources that you have used to craft that equipment. As you reach craft profession level 2, you can able to craft lvl10 equipments. With this trick, you don't have to craft more resources. You just need craft licenses to craft the weapon right away! To disassemble an equipment, select the equipment>MENU>Disassemble. You can use this trick until you reach level 8 or up to level 10 of your crafting profession. This makes your crafting experience points gain bit slower but it is cost efficient. *Disassemble Your Non-valuable Equipment. If you have any equipment with low value, disassemble it. It's better to disassemble it and gain craft resources than sell it on NPC shop. You might get special craft resources on it. *Crafting Massive Collection of Resources. A good way to get massive resources is to craft the tasks "Mass Collection of Common Resources" and "Mass Collection of Advanced Resources". And with the help of Apprentice's License, you can double the craft resources reward. These two craft tasks are appearing randomly and available to all craft profession with different required resources. So if you got the chance, craft them right away! Just collect lots of required resources needed so you will be ready if they show up on your available craft tasks. *Using Rookie's Craft License. Rookie's Craft License gives more experience points on your crafting profession by 50%. It is very effective on higher level of equipments that give good experience points when crafted. *Craft The Highest Level of Equipments You Can Craft. If you have enough funds, it is wise to craft the highest possible equipment you can craft. Higher level of equipment means more craft experience points. With the help of Rookie's Craft License, you can level up your craft profession faster. *Unlock Craft Job Slots As Many As You Can. A productive crafter needs more craft slots. Unlock them as you can. You need atleast 5 craft slots for more productive crafting experience. It is recommended to have 3 craft professions at most. Do not study more than 3 craft professions as they slow your progression. Choose 1 main craft profession and 1 or 2 sub craft professions. Warspear's crafting system is still improving and developing new contents. Crafting can cost you lots of golds and time but it's worth it once you max out the level of certain craft profession. You can craft for yourself or earn golds as a crafter by putting a crafting fee when some players want you to craft for them. You can also unlock achievements about crafting. Good luck blacksmith artisans and happy crafting! 🙂
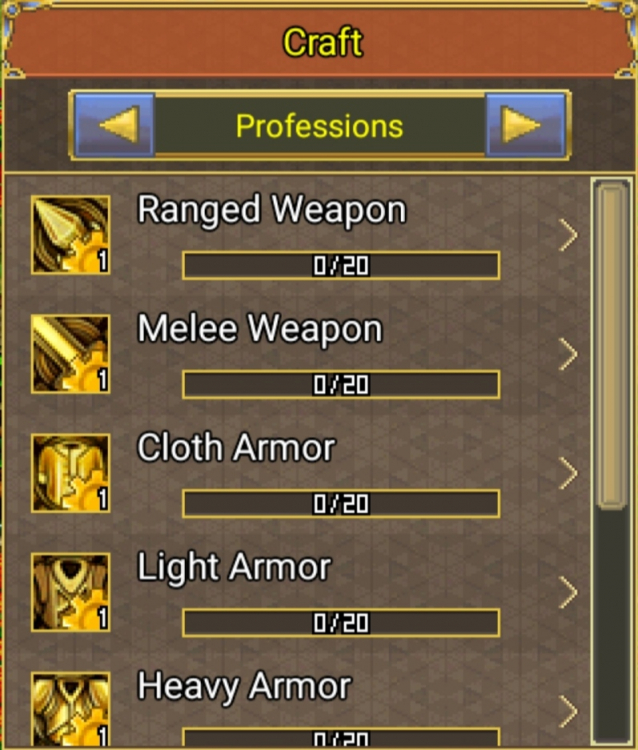

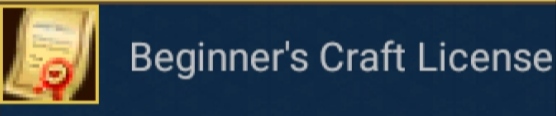


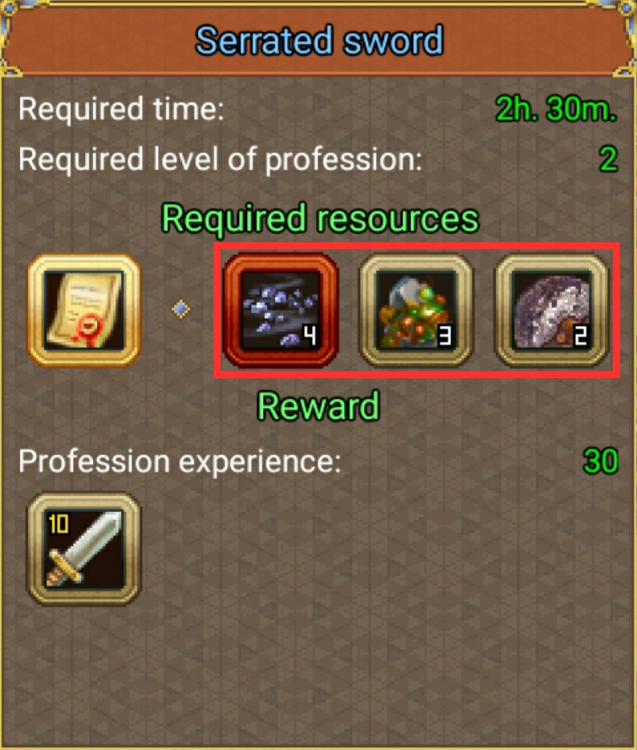
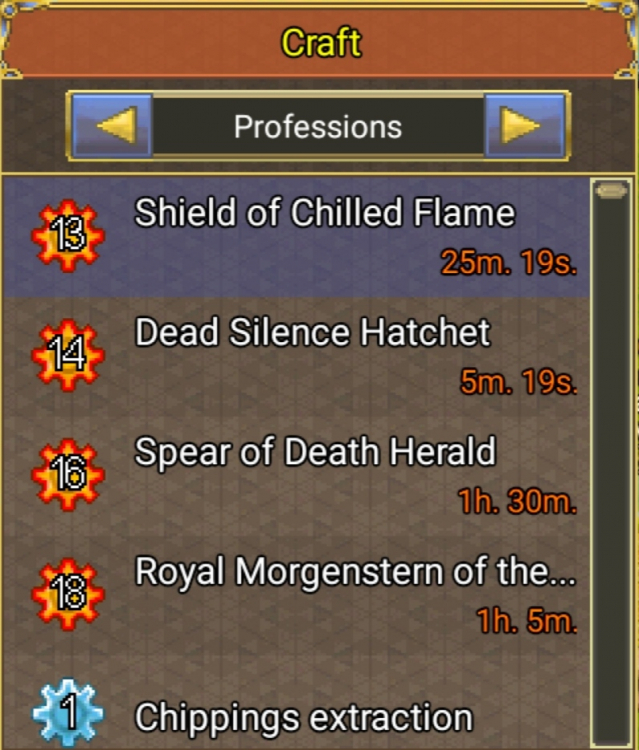


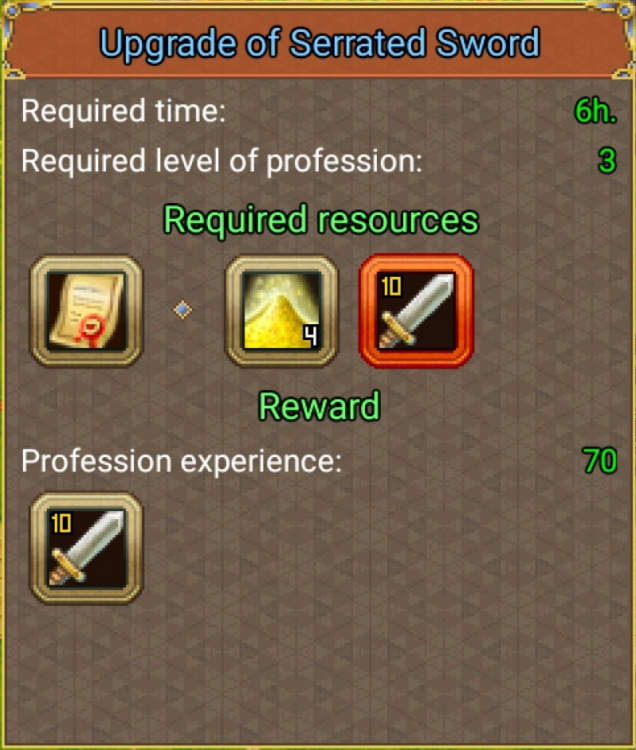
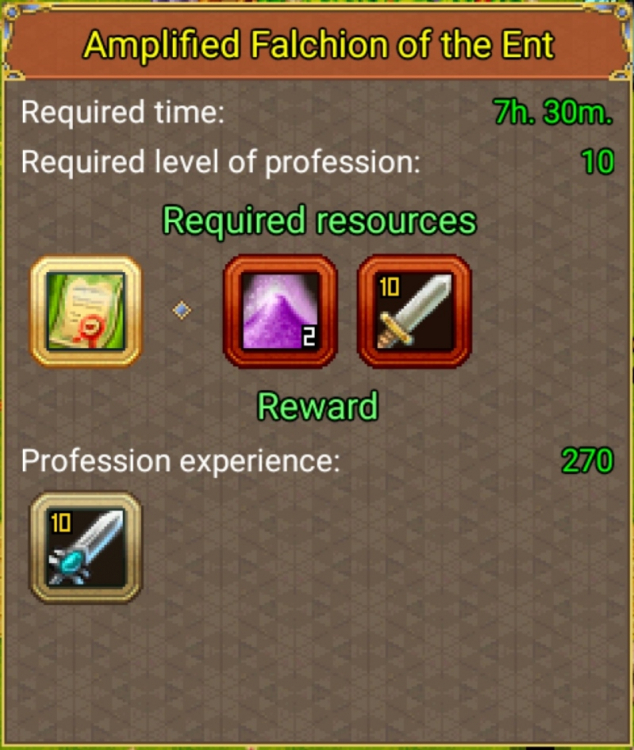


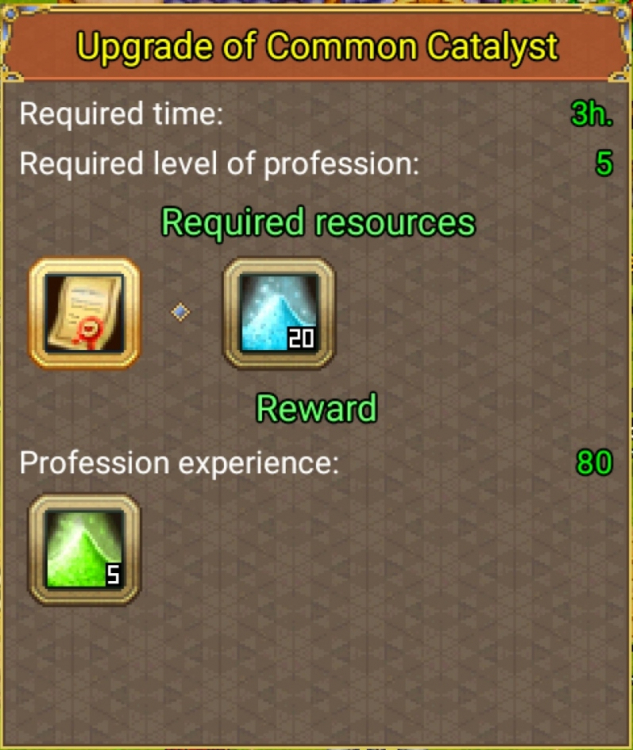
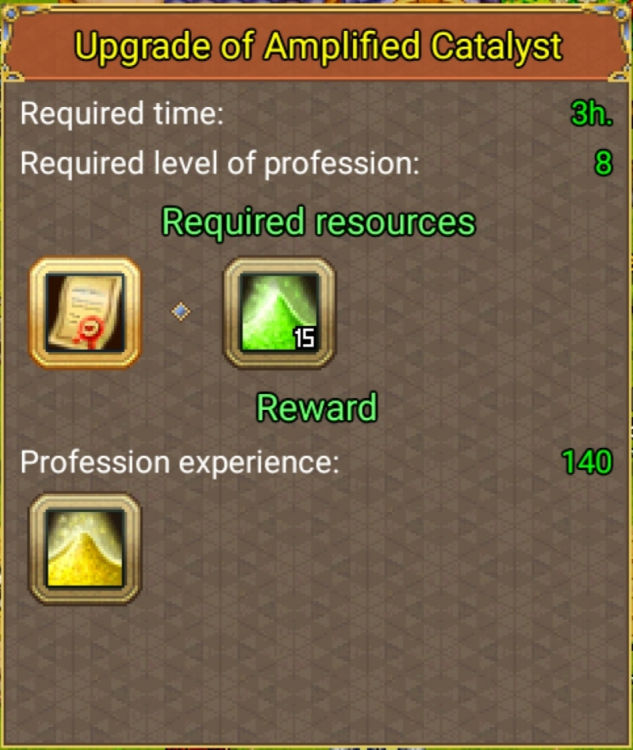

- 36 replies
-
- 10
-
-
-
INTRODUCTION 😃 Hi my name is Marleeeee, thank you for taking the time to come read my content 😊.As you all know these days we're on SPRING EVENTS😆 which mean we all gonna be rich 😁💰(probably 😅), and a lot of interesting stuff waiting 😗. So ayye, now let me explain what i will inform on this post 😁 ⏬⏬⏬ 1. DUNGEONS First thing first,all player gold engine, Dungeon 😅.Spring dungeons are Solo Dungeons which means you can't enter it by party. There's a plus minus about it,the plus things is you don't need to wait any longer to find party, no toxic people will blame your perfomance 😅, and there's no time limit to complete it😗 very interesting. Well the minus things it's take a long time for non dmg classes to complete it (except all your gear +10🥺), and it's kinda bored spam dg's alone without interaction with people 😞 TIPS & TRICKS😁😁😁 Alright let me get this quick... 😜 There's 4 stones that required to activate to enter the boss room, it can be activated by completing the cave room and activate the toggle, each room has two type of stages, blue and green. Now i will show you which the fastest room to complete the dungeons. a) Main Hall b) Cave Room Stage c) Boss Hall The Boss was easy too kill no need specific tactic on it.There's 5 chest on dungeons, one is main chest and the rest four need reputation to open those chests. 2. HOW TO EARN REPUTATION As we know, we need to earn reputation to open the four spring chest in dungeons, noww here's a few way to earn faster reputation,😁, check this out 😎 a) Get The Repu Buff First! 🤗 Before you doing all activity to earn reputation, the first thing to do is get the reputation buff from world event, that will boost your reputation by 30%, it's on last stages of world event 😇 b) Daily Quest Quest's a few daily quest that give you reputation. The NPC location is inside the castle 😁 c) Reputation from Dungeons Every dungeons on spring map will give you reputation with same amount, but it limited by 600 reputation per day 🥺 d) Boss Raid There's two boss to raid on spring map, both give you reputation if you participate to raid the boss, however you need specific amount of reputation to enter the boss room 😓 e) Guild Versus Guild Event Guild Versus Guild Event give you some reputation too. Be sure you join active guild to participate the event. In this guild event you qnd your guild need to kill three boss to complete the event. You will get free enter dungeons buff too after your guild complete this event 😃😄  3. CRAFTED SPRING WEAPONS The Spring iconic stuff, CRAFTED SPRING WEAPONS 😁😁.Yes,maybe this is the favorite things that everyone wait for every spring events 😄. Why this is so favorite? The stats of these weapons really good 😎👍 , and there's some most favorite weapon that people always wanted to have it a) Weapons For Tanks (DK, Barbarian, Paladin, PHY Charmer & PHY Templar) b) Weapons for Caster (Almost all Caster)  c) Weapons For Ranger & Hunter d) Weapons Ford Rogue, Seeker & BD 4. Collect All Ethereal Items Well, Ethereal Items price going drop when spring event because it's dropped from 4 spring chest on dungeons that i talked before.The price around 3-4k/pcs (4k for ethereal catalyst). For ethereal essence the price will increase around 7-9k when horror event (October-December) because people will use it for crafting horror accessories. Same as ethereal essence, ethereal substance prices will increase too during snow event (December-January), so my friend let's collect all those ethereal stuff on this spring event 😃😃 since the price still cheap, so you can build your character and growing OP 😎👍. CLOSING 🤗🥺 Well my friends👭👬👫 that's all things that i wanna to inform you, hope you helped after read my post😚🥺. Thanks for coming i really appreciate guys, I'm sorry if there's any mistake on my content or misspelled on the notes. I'm play at EU-MC server, feel free to contact me if y'all wanna play together 😆. See you later guys...
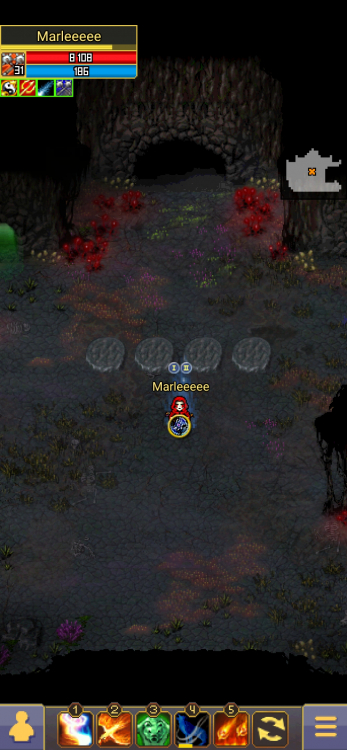
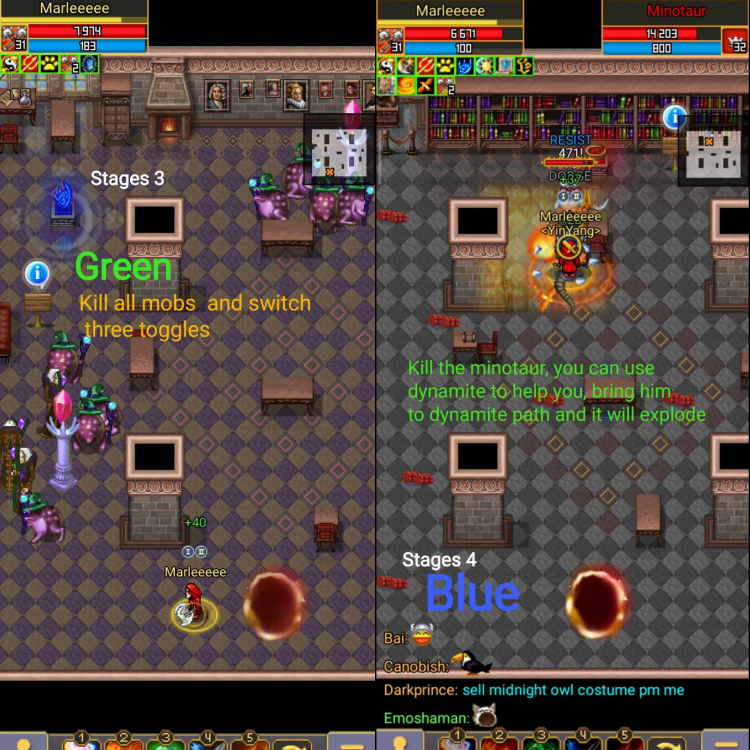
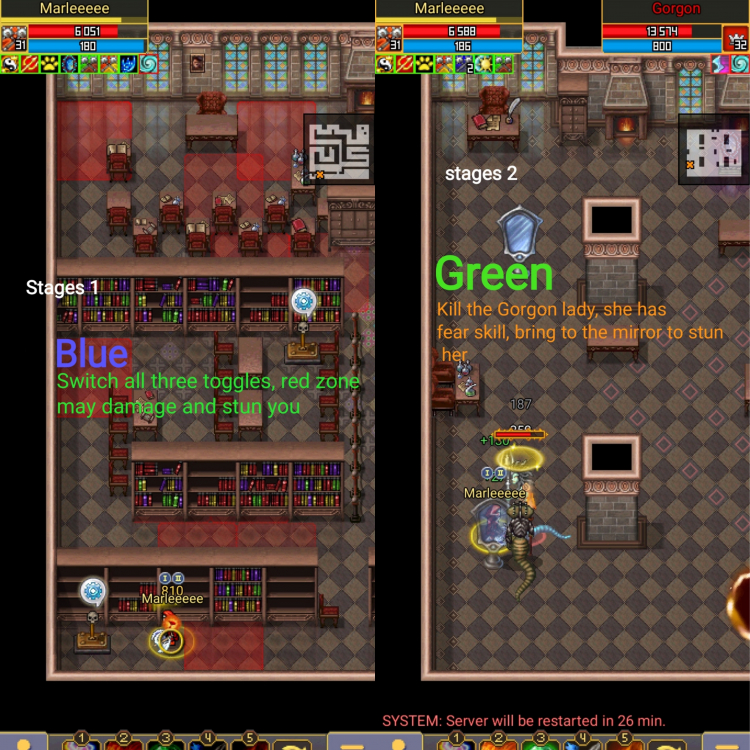
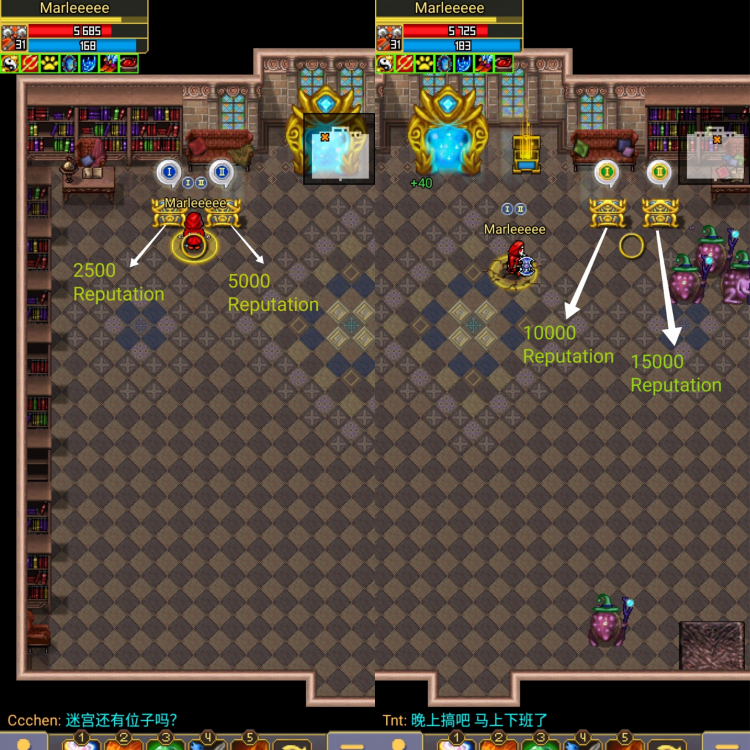
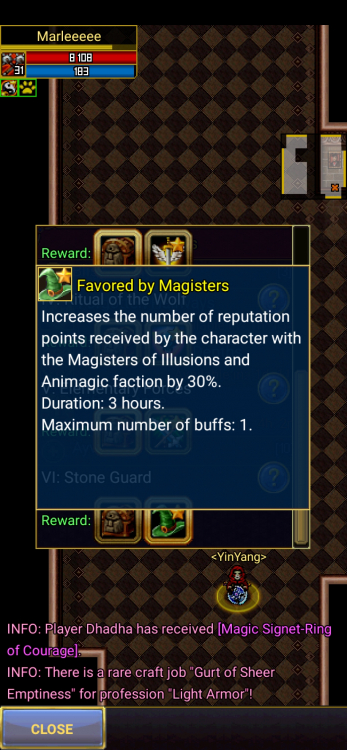
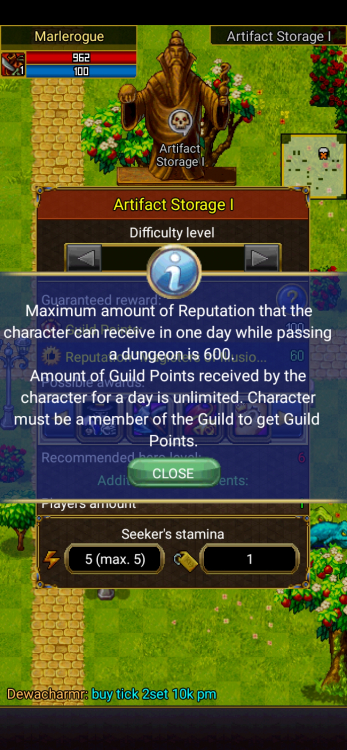


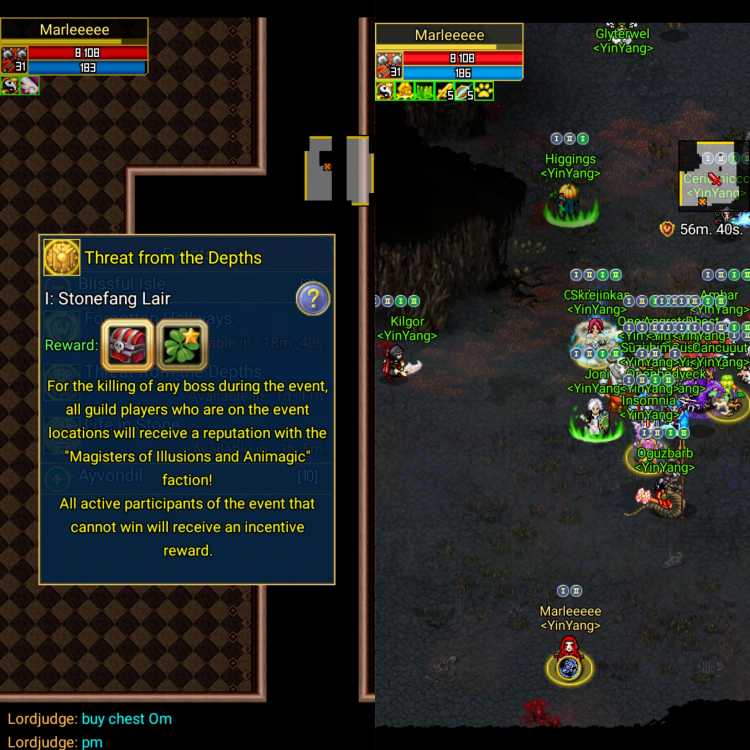
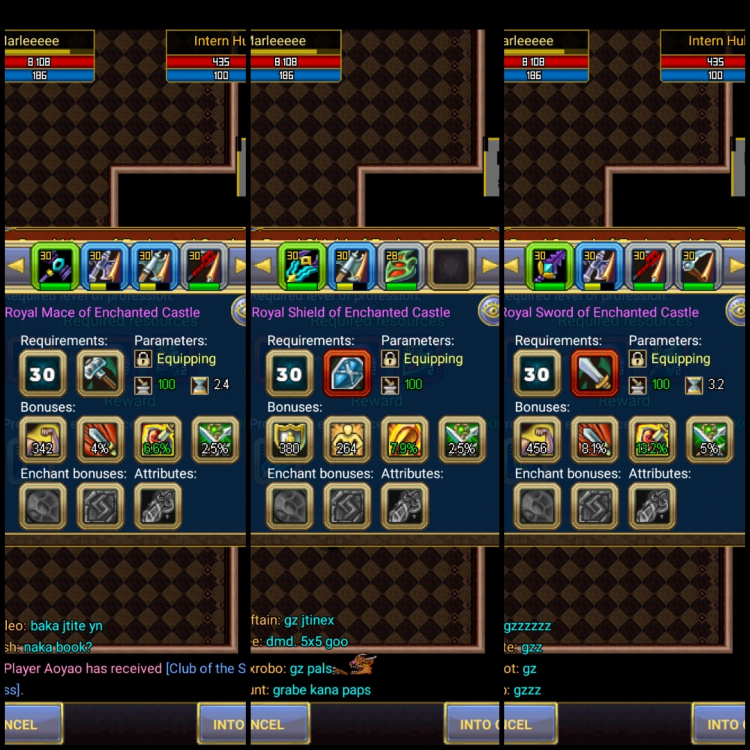
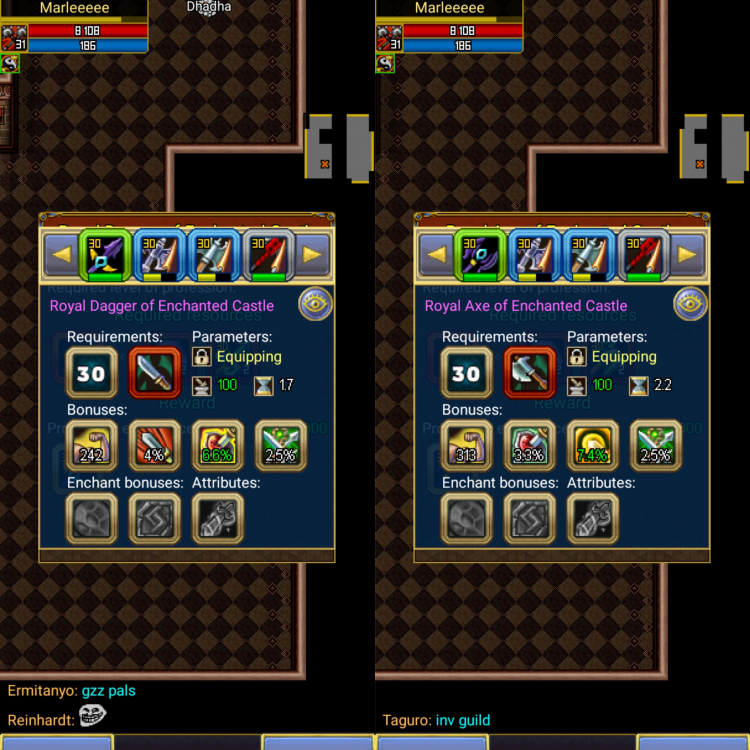
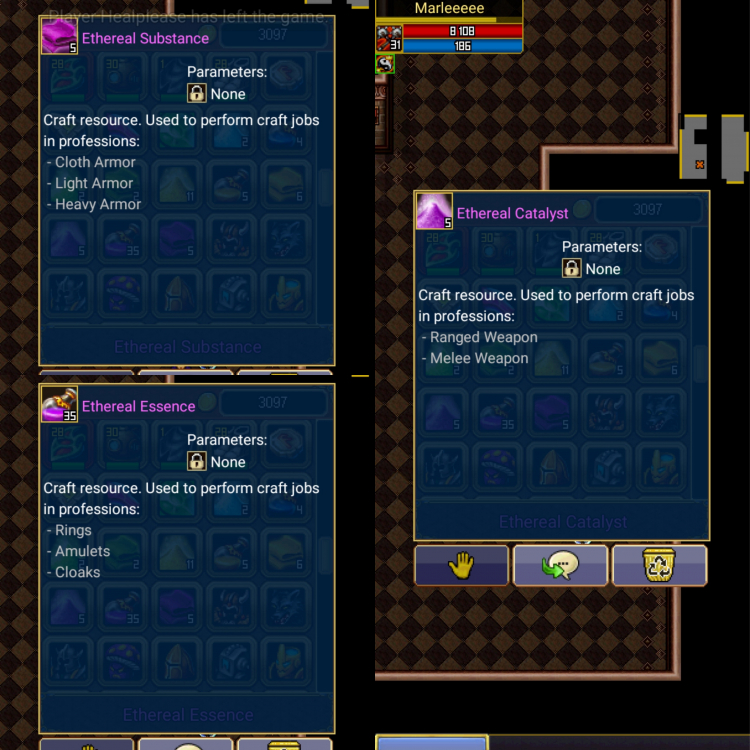

- 6 replies
-
- 2
-
-
- spring 2021
- spring event
- (and 6 more)
-
 Good day Warriors! Since we are all trying our best to do the fastest run in Spring Dungeons, here is the perfect guide for you! By the way, I have a link of my video of proof at the end this topic on how I did fast run in Spring Dungeon. Just follow these easy steps: Step 1: Enter the dungeon 🤪 ofcourse how can we start if you are not going to dungeon? love you! 🥰 Step 2: Look around you 👁️🗨️ Step 3: Entering the rooms in correct order 👌 First enter the 1st room to the left 2 times! you need to finish the Blue and Green on that room. Then if the 2nd room to the left is Blue, enter there too! 🤪 but its okay if it is not Blue 😰 just dont enter if color green🤚 3rd step is to enter the 1st room to the right, either Blue or Green, its okay! 😝 Optional: If you then 2nd room to the left is not Blue and as I said do not enter if Green, you might need to do 1 more room, So dont worry 😝 just repeat the 3rd step AND FINALLY YOU CAN ENTER THE BOSS AREA! hoorayyy 🎉🤪 But can you kill the boss faster? 😟 hehe dont worry cause I will give you 2 simple tips on how to kill the boss within 3 seconds! 🤯 Step 1: Use the Serpent Whisper skill This skill can make clones and deals more damage than any skill minions! Step 2: Use the 15k spring reputation skill, the Metamorphosis skill This skill will turn you into a wolf, can create clones and deals auto attack more damage, but cant use skill. And finally you done the fastest dg run ever!!! 🎉🎉🎉 Here are the photos with every step: Step 1: Enter the dungeon 🚪 Step 2: Look around you 👁️🗨️ Step 3: Entering the rooms in correct order 👌 1. First enter the 1st room to the left 2 times! you need to finish the Blue and Green on that room. if Green room: if Blue room: 2.Enter the 2nd to the left room if color Blue! 🤪 but its okay if it is not Blue 😰 just dont enter if color green🤚 if Blue room: 3. 3rd step is to enter the 1st room to the right, either Blue or Green, its okay! if Green room: if Blue room: Take note: Here are the 2 codes for this puzzle room. Enjoy! 🎉🎉 1 is the first one, 4 or 3 is the last one you will click. Last Step: in Boss Area Check out my Video on how I did this fast run Spring Dungeon: Keep Safe Everyone! 🙏 To God be the Glory. ☝️

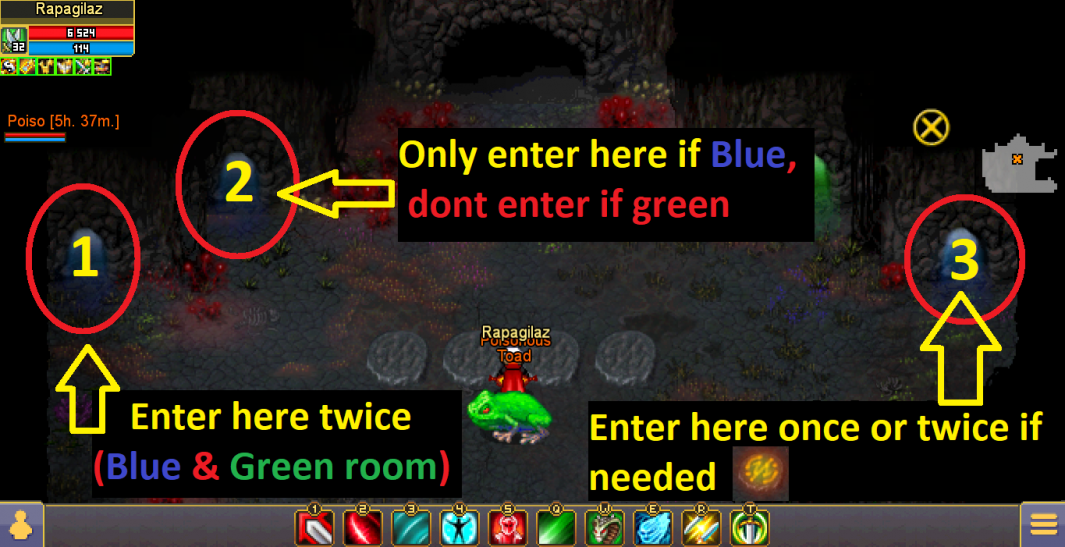
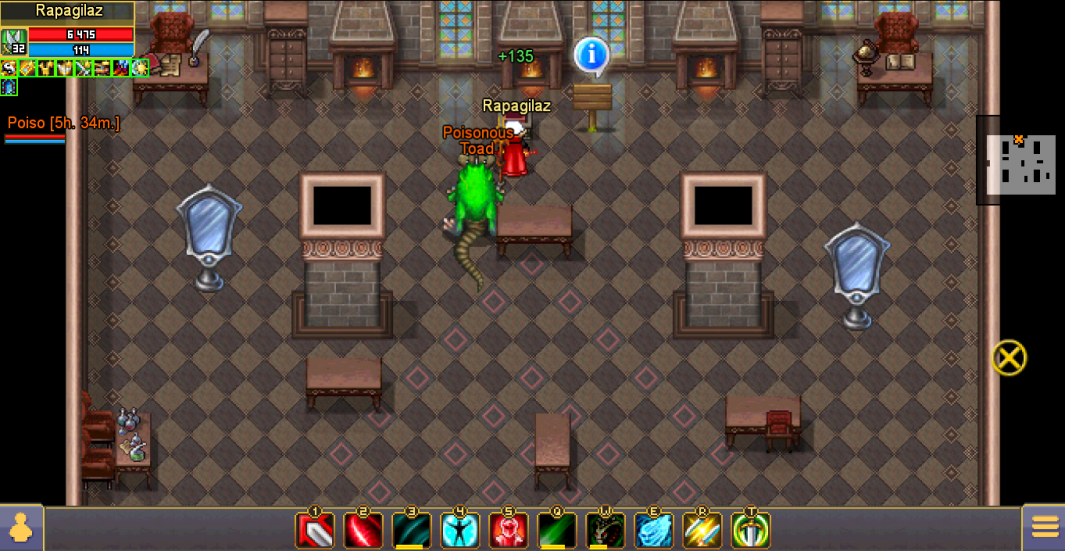
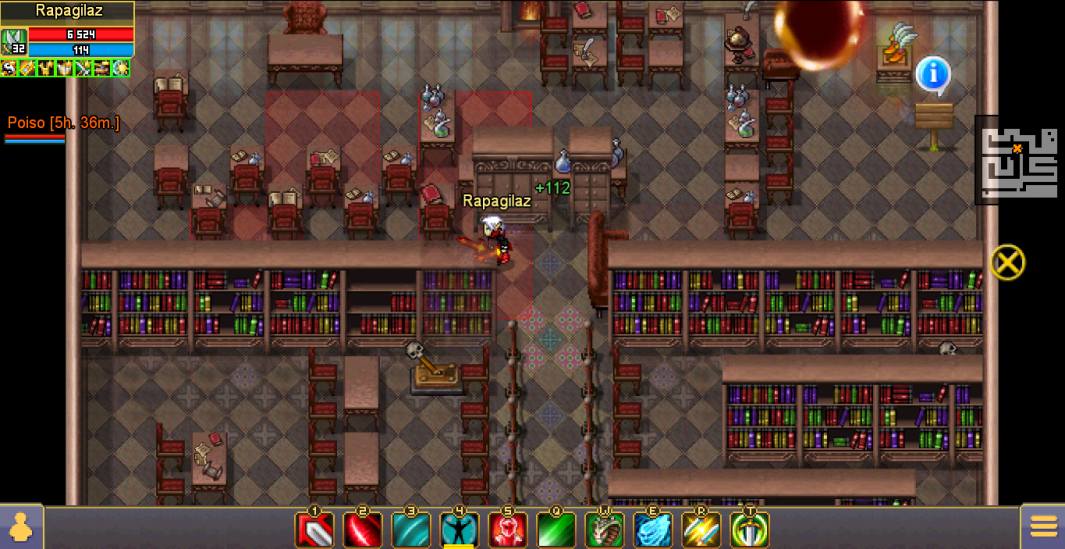
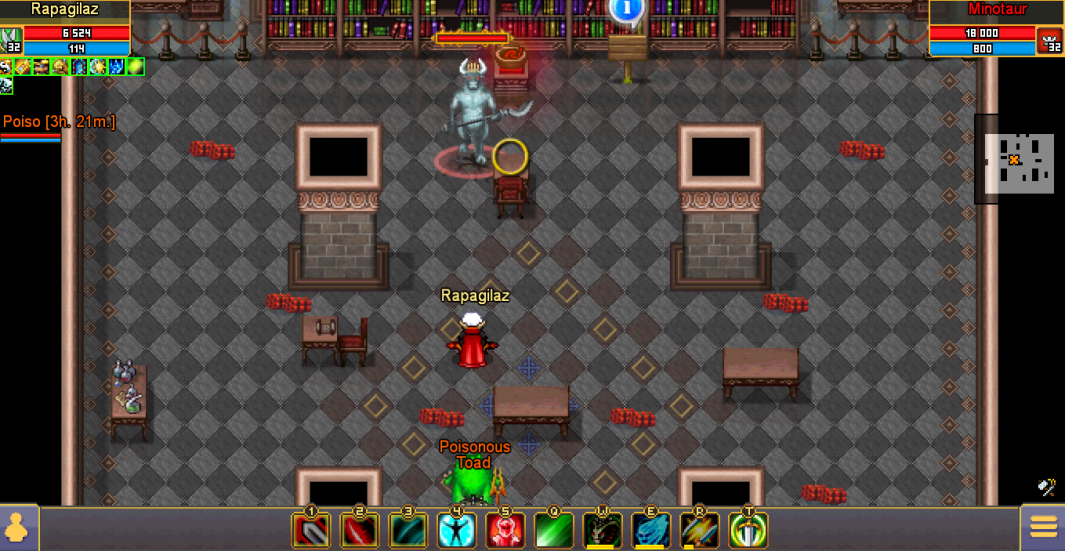

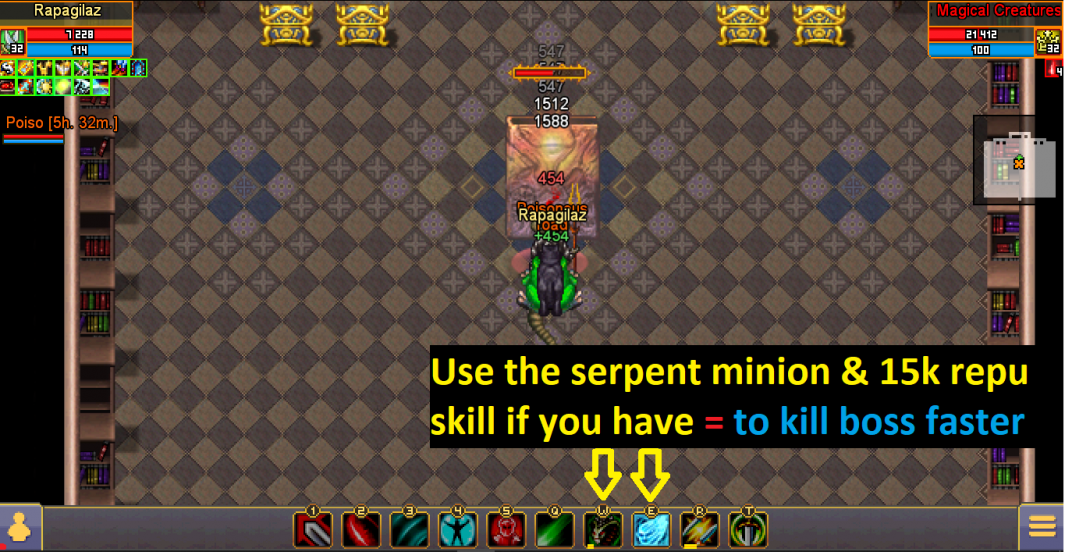
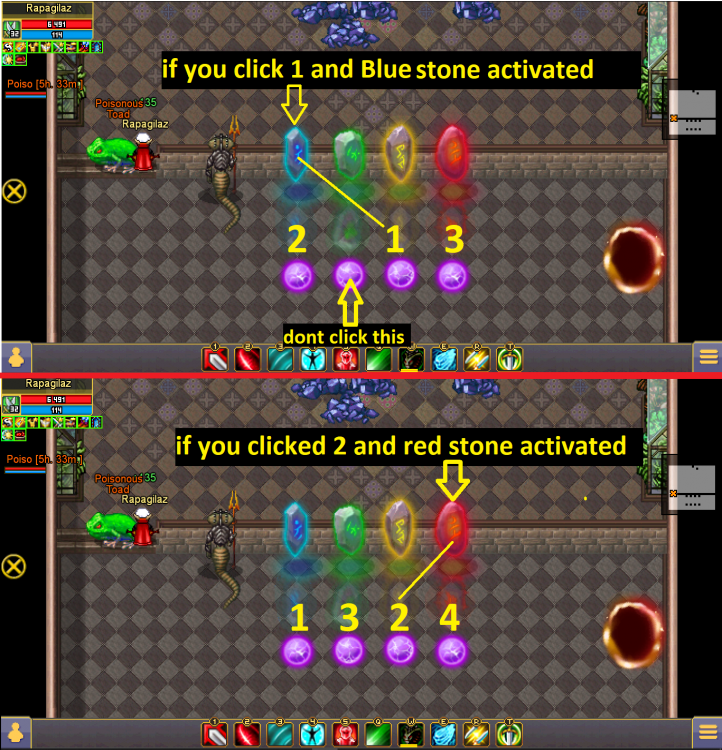
- 10 replies
-
- 1
-
-
- speedrun
- spring dungeons
- (and 1 more)
-
Guys who can add a guide of all skills of the Chieftain? I mean a guide of the skills of how it work at [1/4], [2/4], [3/4] and [4/4] I really apreciate who do it
-
Class description Faction: Firstborn. The spellcasters of the Firstborn have learned the very essence of natural magic over the centuries. They use their knowledge to heal the wounded and support their allies on the battlefield. In case of danger, Druids can delay enemies by entangling them with roots, releasing a swarm of dangerous insects, or unleashing lightning from the sky. Features. Group support, ranged combat, magic damage, slow enemies. Attack: Defense: Support: Passive skills Concentration. Increases character damage by 4% Staffs. Allows the use of staves. Cloth armor. Allows you to wear cloth armor. Basic skills Lightning. A lightning attack that deals magic damage to the enemy. Type: Active Cast Range: 5 yards Reload time: 9 sec. Energy consumption (units): 13 | 14 | 15 | 16 | 17 Dodge / Parry / Block Check: Yes Healing dew. Replenishes the health of a character or his ally for some time using magical power. Type: Active Cast Range: 5 yards Reload time: 15 sec. Energy consumption (units): 18 | 20 | 22 | 24 | 26 Oak leather. The character's defense becomes strong for a while, reducing damage from any attacks. Type: Active Cast Range: 4 yards Reload time: 14 sec. Energy consumption (units): 20 | 22 | 24 | 26 | 28 Entanglement with roots. The roots entwine the enemy, and hold him in place for a while. When a skill is developed to the fourth level and higher, the enemy is blocked from using the skills. Type: Active Cast Range: 5 yards Reload time: 13 sec. Energy consumption (units): 19 | 20 | 21 | 22 | 23 Action Time: 2 | 3 | 4 | 5 | 6 Swarm of insects. Launches a swarm of insects at the enemy, which inflict magic damage for some time and reduce the enemy's attack speed. Type: Active Cast Range: 5 yards Reload time: 15 sec Energy consumption (units): 14 | 16 | 18 | 20 | 22 Duration: 7 sec. Attack speed reduction efficiency (%): 25 | 30 | 35 | 40 | 50 Dodge / Parry / Block Check: Yes Expert skills Forest singing. All opponents within the range of the skill fall into a sleep state with a certain chance (%). When taking damage, this effect disappears. Type: Active Cast Range: 2 yards Reload time: 18 sec Energy consumption (units): 18 | 20 | 22 | 24 Holding time (sec.): 4 I 5 I 6 I 7 Skill triggering efficiency (%): 50 I 60 I 70 I 80 Area of effect: diamond-shaped (the range is 2 yards) Tornado. Deals magic damage and attracts opponents to the center of the skill zone and reduces the speed of skill recovery for all opponents who are in the zone of effect. Type: Active Cast Range: 5 yards Reload time: 18 sec Energy consumption (units): 30 | 32 | 34 | 36 Zone area: 3x3 Duration (sec.): 4 I 5 I 6 I 7 Dodge / Parry / Block Check: Yes Cooldown Recovery Rate Reduction Effectiveness (%): 35 | 60 | 85 | 90 Secret connection. Magic power connects you with an allied hero in your group and restores health to the character with the lowest number of hit points. With the development of the skill, the speed of health recovery increases. Type: Active Cast Range: 4 yards Reload time: 22 sec Energy consumption (units): 26 | 28 | 30 | 32 The effectiveness of health restoration (%): 40 | 55 | 70 | 85 Life-giving stream. Restores some health and energy to the character with the lowest health points within a 4x4 yards radius of the druid. Type: Active Cast Range: 4 yards Reload time: 10 sec Energy consumption (units): 12 | 14 | 16 | eighteen Area of effect: 4x4 (from the point where the druid is) Energy recovery (units): 15 | 25 | 35 | 50 Health regeneration (from% damage): ... The power of water. The water ball deals damage to the target and nearby enemies. A debuff is applied to the target, when the "Lightning" skills hit the targets, the enemy will be stunned for a while. Type: Active Cast Range: 5 yards Reload time: 18 sec Energy consumption (units): 18 | 20 | 22 | 24 Area of effect on standing enemies near the target: 2x2 Damage to nearby enemies from the target (%): 10 | 15 | 20 | 25 Stun time (sec.): 2 | 3 | 4 | five Debuff duration (sec.): 3 | 4 | 5 | 6 Dodge / Parry / Block Check: Yes Punishing roots. Roots enemies in a small area and deals damage over time to targets. With the development of the skill, damage to targets and retention of enemies increases. Type: Active Cast Range: 4 yards Reload time: 28 sec Energy consumption (units): 24 | 26 | 28 | thirty Action area: 3x3 Duration: 4 sec. Damage Ticks: 2 Parry / Block / Resist Check: Yes Healing barrier. Applies a barrier to a character or ally. The barrier absorbs a certain amount of incoming damage and restores the same amount of health. With the development of the skill, the strength of the effect and the duration of its action increase. Type: Active Cast Range: 4 yards Reload time: 35 sec Energy consumption (units): 26 | 28 | 30 | 32 Duration (sec.): 7 | 9 | 11 | thirteen Damage absorbed capacity (Unit): 1220 | 1470 | 1920 | 2220 (values belong to the maximum level) Elemental support. Summons a monster to the target area for a while. The monster deals magic damage to the enemy. The health of the summoned monster depends on the level of character development and the level of skill development; The value of the parameters "Accuracy", "Critical Damage", "Penetration", "Resilience" and "Ferocity" of the summoned monster depends on the value of the character's parameters. Type: Active Cast Range: 4 yards Reload time: 35 sec Energy consumption (units): 26 | 28 | 30 | 32 Monster lifetime (sec.): 15 | 20 | 25 | thirty Monster Health (units): 2720 | 2920 | 3220 | 3620 Physical defense of the monster (%): 15 | 20 | 25 | 30 (that much% of protection is taken from the character to protect the monster) Magic protection of the monster (%): 15 | 20 | 25 | 30 (that much% of protection is taken from the character to protect the monster) Dodge / Parry / Block Check: Yes Protection of the forest. Imposes a positive effect on a character or an ally in a group for some time. The effect absorbs any incoming damage to the target if the amount of damage is greater than the current health, and restores health to a certain percentage of the target's maximum health if the current health level is less than a certain percentage of the maximum. Type: Active Cast Range: 3 yards Reload time: 50 sec Energy consumption (units): 24 | 26 | 28 | thirty Action time (sec.) 10 | 13 | 16 | 20 The effectiveness of restoring health after fatal damage (%): 30 | 35 | 40 | 45 The interval between the return of the buff after health is restored (sec.): 6 sec. Health threshold (%): 25 | 30 | 35 | 40


-
Данный гайд актуален на версию 5.3.0. ---------------------------------------------------------------------------------------------------------------------------------------------------- Разбойник - класс, наносящий прямой урон противнику. Носит кожаные доспехи. Имеет невидимость. Может носить: кинжалы, одноручные мечи, одноручные топоры. Прежде чем мы приступим, снова немного цифровой базы: Теперь о нашем оружии: ------------------------------------------------------------------------------------------------------------------------------------------------------------------------------------------------------------------------------------------------------- Ну а теперь давайте традиционно про умения разбойника, с цифрами, разумеется. - Безжалостная атака. Дальность: Ближний бой Мана: 12-13-14-15-16 Время перезарядки: 6 секунд Базовый урон: 25 Прирост урона с уровнем персонажа: 2 Прирост урона с уровнем умения: 15 Прирост урона от физической атаки: 105%-110%-115%-120%-125% Время действия: - Количество целей: 1 Комментарий автора: Сильное умение ближнего боя, наносит хороший урон, маленькая скорость перезарядки. Основная атакующая способность разбойника. Как посчитать урон который вы получите (для всех умений объясняю 1 раз на примере этого умения): - Толчок. Дальность: Ближний бой Мана: 13-14-15-16-17 Время перезарядки: 15 секунд Базовый урон: - Прирост урона с уровнем персонажа: - Прирост урона с уровнем умения: - Прирост урона от физической атаки: - Время действия: 5-7-9-11-15 секунд ИЛИ 1-2-3-4-5 автоатаки Количество целей: 1 Спасибо игрокам за помощь в тесте: Hrizamer, Manhettan. Комментарий автора: Толчок снижает точность противника на 50% на следующие 1-2-3-4-5 автоатак, либо если автоатаки не были сделаны - кончится через 5-7-9-11-15 секунд. Важно то, что работает он на автоатаки, т.е. если у нас толчок прокачан на 3, мы используем его против противника, он делает по нам две автоатаки, потом использует 5 различных умений - все умения тоже будут иметь точность, сниженную на 50%, так как они не считаются за автоатаку. "Глаз дракона" мага даёт 50% точности, таким образом после использования толчка на маге - у него останется только шанс точности, который был до использования умения "Глаз дракона". - Невидимость. Дальность: - Мана: 15-16-17-18-19 Время перезарядки: 8 секунд Базовый урон: - Прирост урона с уровнем персонажа: - Прирост урона с уровнем умения: - Прирост урона от физической атаки: 120%-130%-140%-150%-160% Время действия: 7-9-11-13-15 секунд Количество целей: 1 Комментарий автора: Умение начнет перезаряжаться только после того как вы покинете невидимость.Невидимость увеличивает только ваш физический урон в параметрах. Например, с использованием умения Безжалостная атака 5/5 из невидимости 1/5 - оно Не нанесёт на 20% больше урона, просто его значение в 125% от физической атаки будет считаться от вашего повышенного невидимостью физического урона. - Парализующий удар. Дальность: Ближний бой Мана: 13-15-17-19-21 Время перезарядки: 20 секунд Базовый урон: - Прирост урона с уровнем персонажа: - Прирост урона с уровнем умения: - Прирост урона от физической атаки: - Время действия: 4,5-5-5,5-6-7 секунд Количество целей: 1 Комментарий автора: Не знаю, увеличивается ли шанс прохождения в зависимости от уровня умения. Постараюсь посчитать позже. - Уклонение. Дальность: - Мана: 15-16-17-18-19 Время перезарядки: 20 секунд Базовый урон: - Прирост урона с уровнем персонажа: - Прирост урона с уровнем умения: - Прирост урона от физической атаки: - Время действия: 20-30-40-50-60 секунд Количество целей: - Действие: Даёт 5%-6%-7%-8%-9% уклонения. Комментарий автора: Уклон он и в Африке уклон. - Неуловимый прыжок. Дальность: 5 Мана: 14-16-18-20 Время перезарядки: 12 секунд Базовый урон: 20 Прирост урона с уровнем персонажа: 2 Прирост урона с уровнем умения: 20 Прирост урона от физической атаки: 110%-115%-120%-125% Время действия: - Количество целей: 1 Комментарий автора: Прыжок за спину противника (о.О). Спасибо игрокам за помощь в тесте: Groundman. - Ядовитые клинки. Дальность: Ближний бой Мана: 14-16-18-20 Время перезарядки: 26 секунд Базовый урон: 60 Прирост урона с уровнем персонажа: 2 Прирост урона с уровнем умения: 20 Прирост урона от физической атаки: 100% Время действия: 8-10-12-14 секунд Количество целей: - Действие: Накладывает яд на цель после автоатаки (Если вы попали), Яд наносит урон 3 раза с периодичностью в 2 секунды. Спасибо игрокам за помощь в тесте: Feme, Groundman, Derzskiiy, Schok, Mmushaa, Revn, Venturik. Комментарий автора (!): Урон указан для всех трёх срабатываний умения. Т.е. то, что вы посчитали - надо будет поделить на 3. Погрешность возможна в 1-2 единицы для каждого срабатывания из-за плохого округления игры. - Истребление. Дальность: - Мана: 14-16-18-20 Время перезарядки: 39-37,8-37-34,4 секунд (Пока умение действует - сокращает своё же время восстановления) Базовый урон: - Прирост урона с уровнем персонажа: - Прирост урона с уровнем умения: - Прирост урона от физической атаки: - Время действия: 10-11-12-14 секунд Количество целей: - Увеличение скорости атаки: 5%-9%-13%-17% Увеличение перезарядки навыков: 10%-20%-25%-40% Комментарий автора: Прикона . - Стальной шквал. Дальность: 5 Мана: 7-8-9-10 Время перезарядки: 4 секунды Базовый урон: 0 Прирост урона с уровнем персонажа: 3 Прирост урона с уровнем умения: 10/10/10/20 Прирост урона от физической атаки: 30%-45%-50%-60% Время действия: - Количество целей: 1 Комментарий автора: Непонятно зачем, но на 4/4 умение получает дополнительные +10 урона от прокачки. Спасибо игрокам за помощь в тесте: Tenb. - Рикошет. Дальность: 4 Мана: 14-16-18-20 Время перезарядки: 15 секунд Базовый урон: В процессе Прирост урона с уровнем персонажа: В процессе Прирост урона с уровнем умения: В процессе Прирост урона от физической атаки: В процессе Время действия: - Количество целей: 3-4-В процессе-В процессе Комментарий автора: Ещё занимаемся. Спасибо игрокам за помощь в тесте: Hypeology, Travel, Maqnat, Tenb.
- 68 replies
-
- 10
-